And There You Are by McRee
FREE Mix Winner #5
Artist Bio – Michael Clay – writer/bandleader McRee:
I am a classical pianist and composer which is most of my output. I’ve played with some prestigious orchestras, chamber groups around the US and Europe. For money I write media, television and some film music. Not that involved with TV anymore but in the past I have written for America’s Most Wanted and Cops as well as other shows. I am a guitarist and writer and have released albums with Prog Rock band Hands, Non Fiction and Fission Trip. This song is from my third solo album of alt rock/pop music called Underneath. I also recorded an album with Adrian Belew (King Crimson, Bowie and Zappa fame) of classical piano arrangements of Adrian’s and King Crimson songs. http://adrianbelew.net/shop/
I’m currently working on some classical music commissions and I’ll be giving some solo piano recitals in Europe at the end of this year.
Mixing Notes
I really liked this song, and wanted to take a crack at the mix to see what I could do with it. The challenge for me was trying to add a bit more contrast between sections of the song, without stepping on the groove and the overall intent/vision of the writer, Michael Clay. I liked the fact that it wasn’t your typical pop/rock structured arrangement, and it had some unexpected arrangement elements, such as the bass dropping out in some sections. I wanted to keep the overall feel of the mix more on the “dry” side, with an up-front, in your face sound, but to bring in some different effects and processing in different sections to add the contrast. So, when you see my settings below, it will look like I used quite a few effects, especially on vocals, but there are mostly used in a subtle fashion and I used automation on the levels as well as turning some of them on and off in various sections. Thankfully, my instincts were correct for the song, and Michael loved what I did with it, and we only made one change for a repeated vocal line that should have had a telephone/radio effect on it.
BASS GROUP

Bass Group Inserts
I was given DI and Mic tracks for the bass. I didn’t process the tracks individually, but got a good blend, and routed them to a Bass group channel and did all my processing on that group channel. Nothing too heavy on the inserts processing for the bass. A bit of tape emulation first, followed by the Slate Virtual Mix Rack filled with the “Hollywood” virtual tube emulation (blended in at 50%), the Revival plugin for a touch of “Thickness”, followed by the FG-Stress (Distressor emulation) for a bit of compression. After that I used Microshift from SoundToys to give a bit of stereo width to the track, blended in lightly.
DISTORTED BASS for Instrumental break
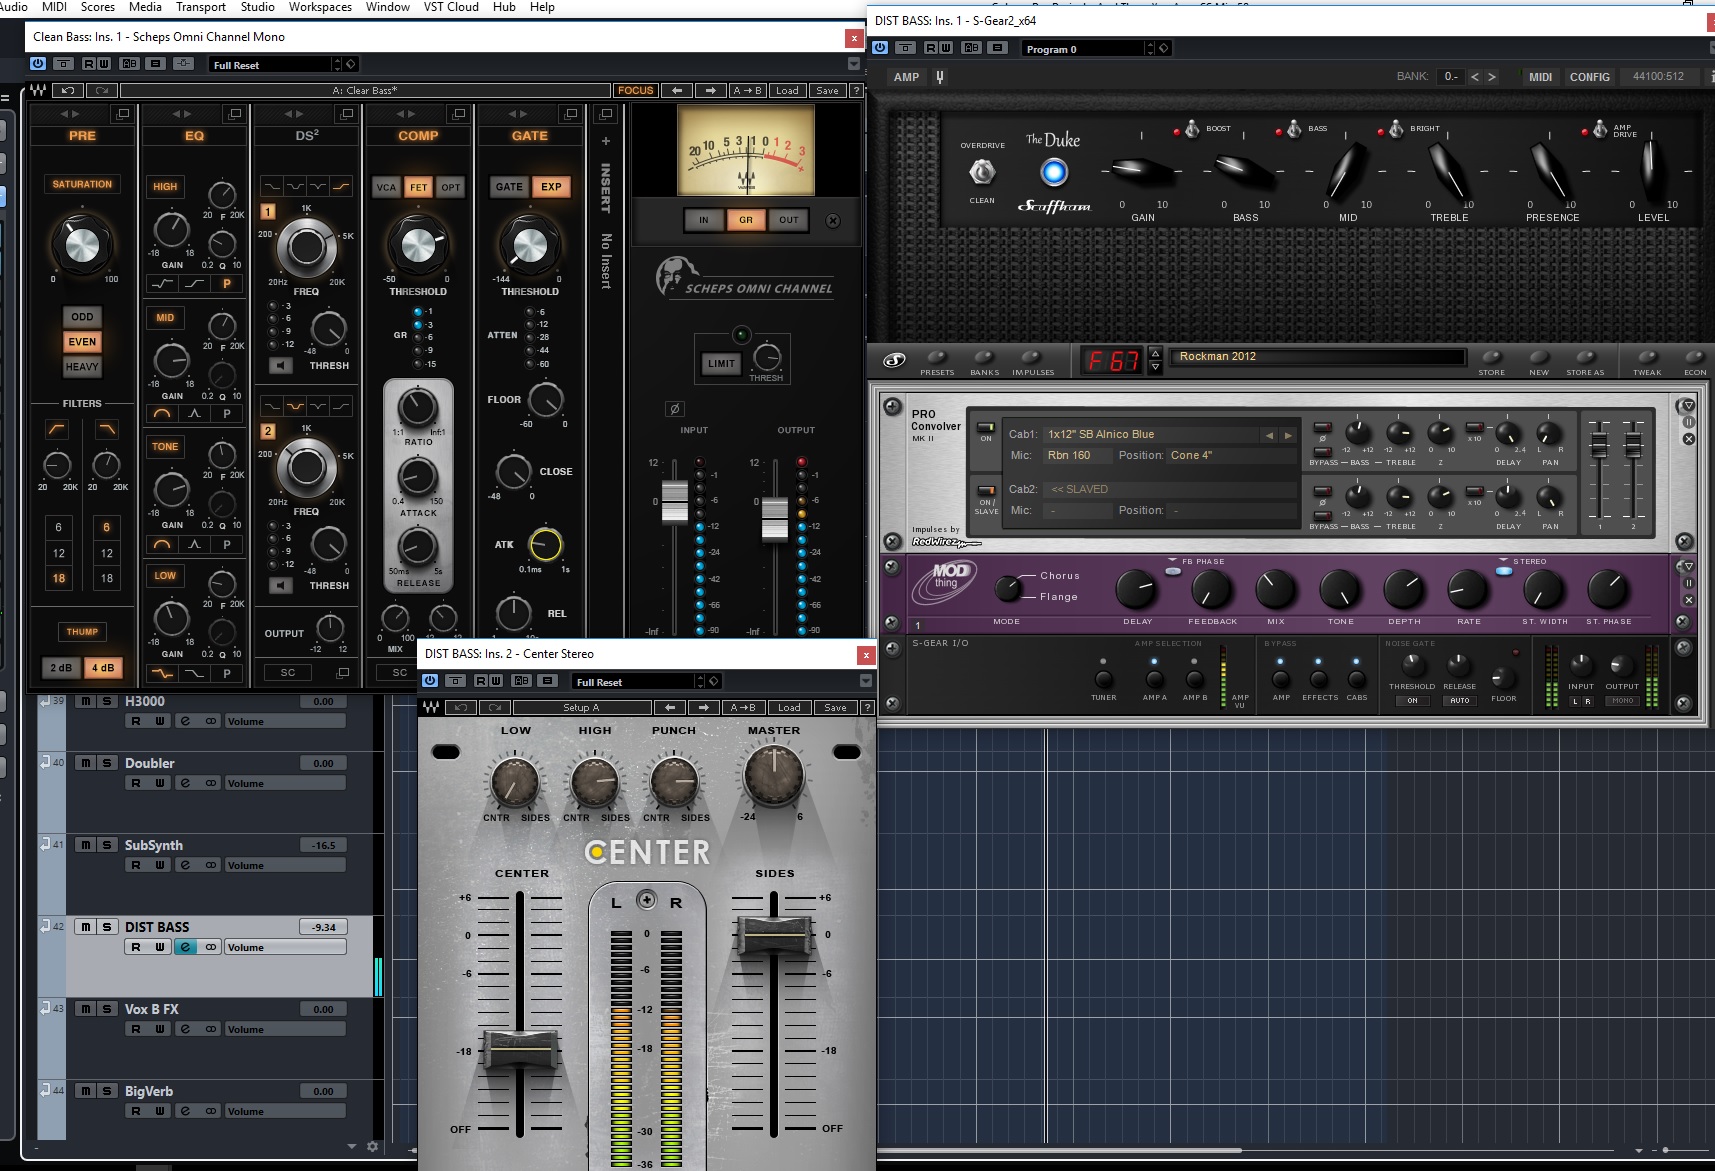
Bass – Instrumental Distortion
There is an instrumental break section where the bass and guitar are doing some quick riffs together. In this section I copied over the bass DI to a new “clean bass” track, and processed it differently using the Waves Scheps Omni Channel. I then set up a separate FX track for just this section where I used an S-Gear amp sim to get some mid-bite distortion, and followed that by Waves Center to spread that distortion out to mostly the sides. That FX was blended with the clean DI track to create the overall bass sound for this short instrumental break.
DRUMS
Overall, the drums required a bit more work than many songs I mix. The recording quality was not as great as I would have hoped, so it took quite a bit of tweaking and fixing to get a sound that I was happy with, and I did not have to resort to triggering any samples.
KICK DRUM BUSS
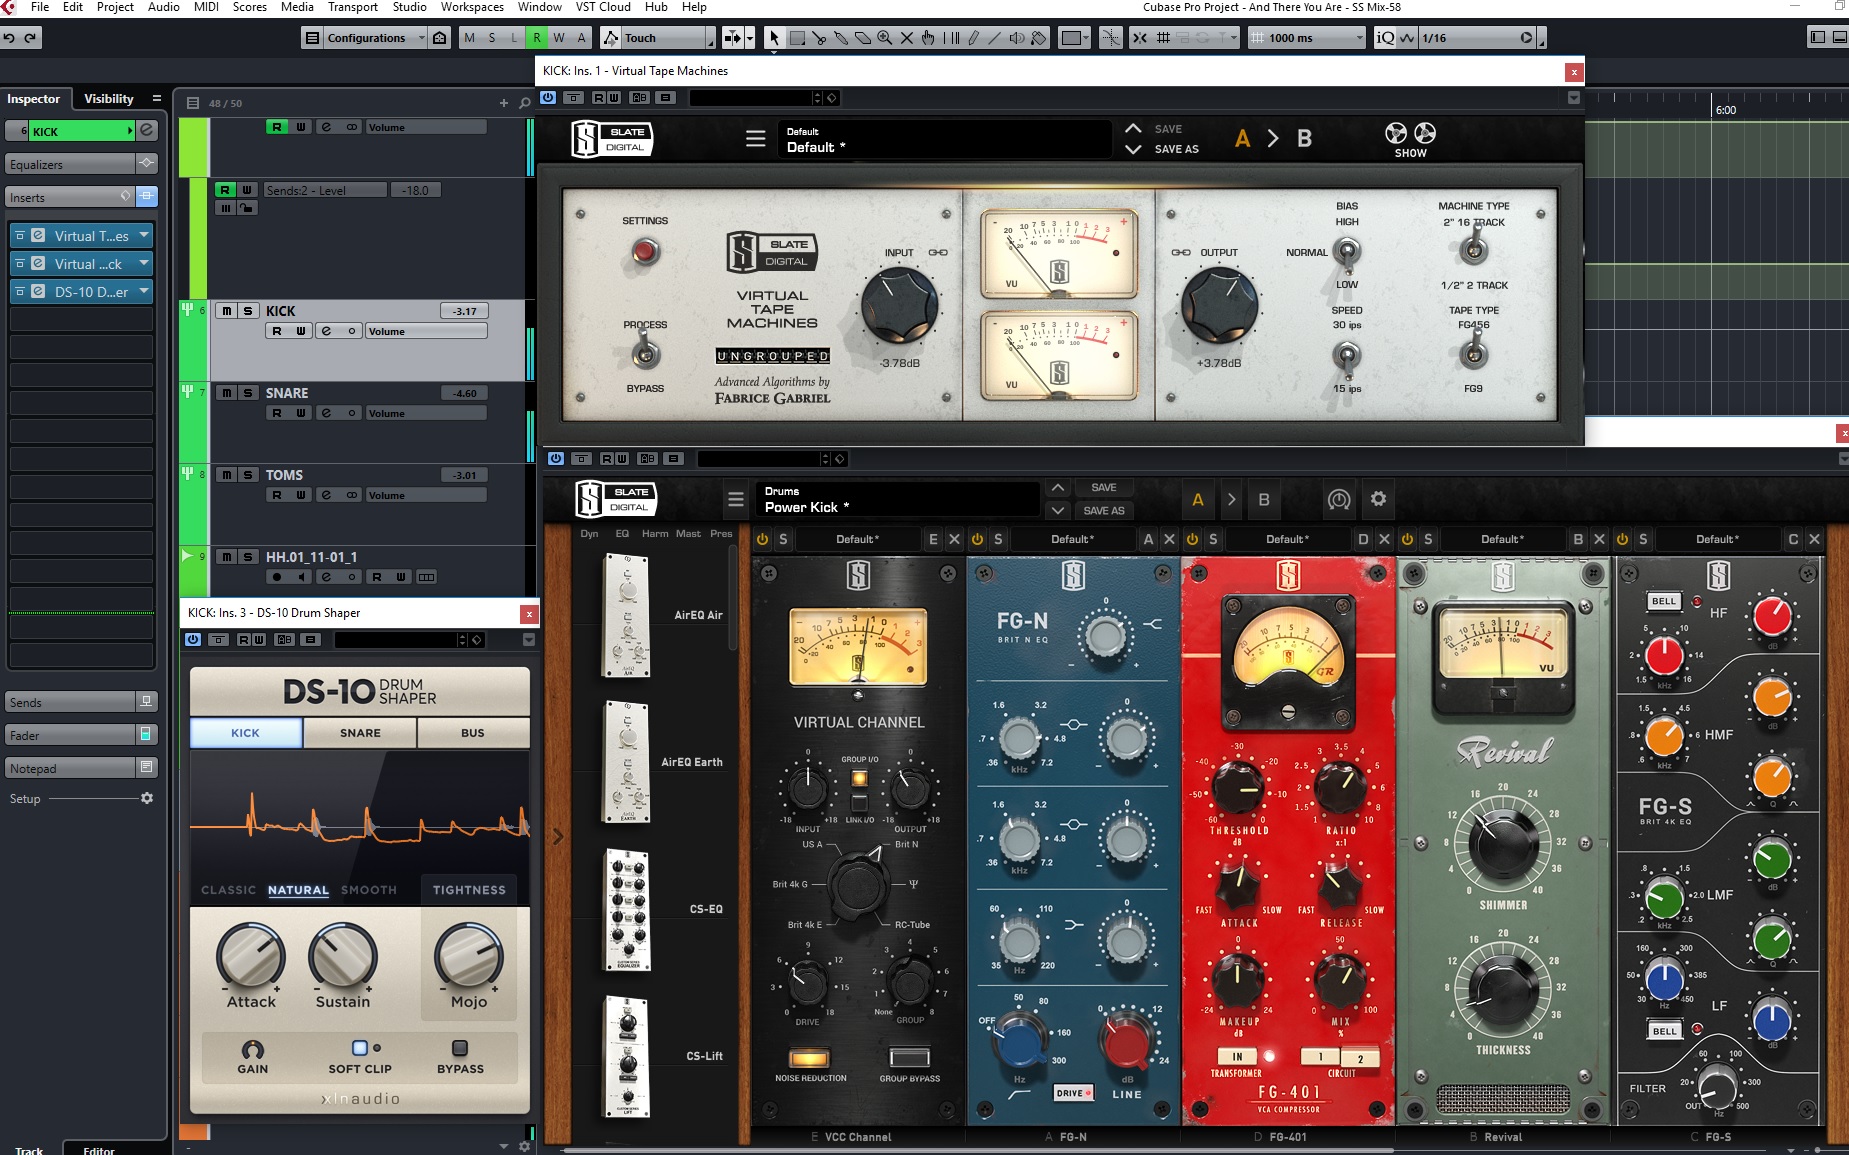
Kick Buss Inserts
There were 3 kick drum tracks provided: In, Out, and Subkick. I ended up only using the inside mic and sub-kick tracks. I used the UAD Little Labs VOG plugin on the sub-kick track as a resonant filter to beef up the low punch of the kick. Then both kick tracks were routed to the Kick Group where I did most of the processing. On the group channel I used the Slate Virtual Tape Machine plugin, followed by the Virtual Mix Rack which had the N style console emulation, followed by some N style EQ to bring out some attack, then a compressor doing a bit of parallel compression, then the Revival plugin and yet another EQ to try to get even more attack out of the kick. All of that was followed by the DS10 Drum Shaper to beef up the attack and tightness even more. Sometimes it just takes quite a bit of processing to get the sound you need!
SNARE DRUM BUSS
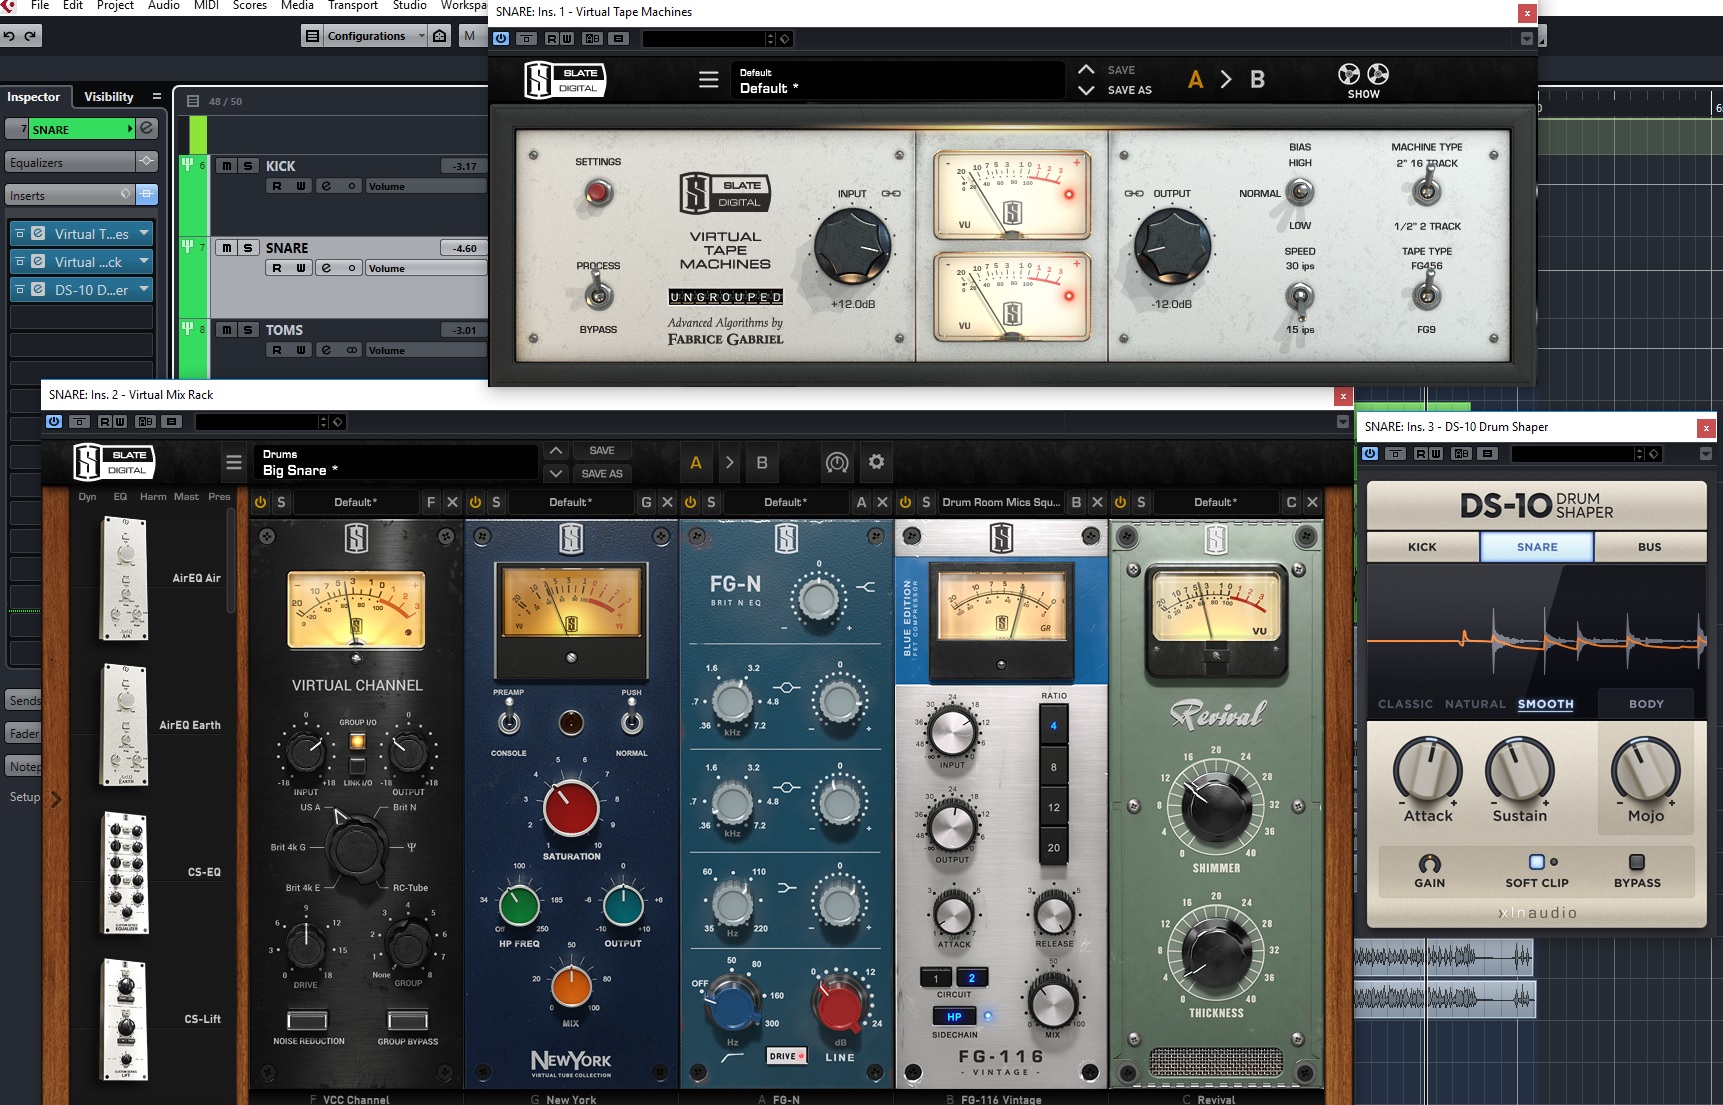
Snare Buss Inserts
For the Snare drum, there was a top and bottom microphone. For the bottom microphone, I used a high-pass filter on the built-in channel EQ to remove the low end from that microphone, as I only needed it from the top and I didn’t want the low end rumble from the kick drum in the snare channel. Both of those were blended to taste and routed to the Snare Drum Buss where I did most of the processing again. As with the Kick Drum Buss, I had the Virtual Tape Machine first, followed by the Virtual Mix Rack and then the DS-10 Drum Shaper. In the Virtual Mix Rack for the snare, I had the A style console emulation, followed by some New York style tube compression blended in at 50%, then a hefty amount of N style EQ to bring out the crack, remove some boxiness, and beef up the low. Those were followed by an 1176 style compressor set to compress hard, but blended in parallel at a fairly low level, followed again by the Revival plugin. The DS-10 was a bit more mild on this, just pulling out some of the body and sustain, and adding a touch more attack.
TOMS BUSS
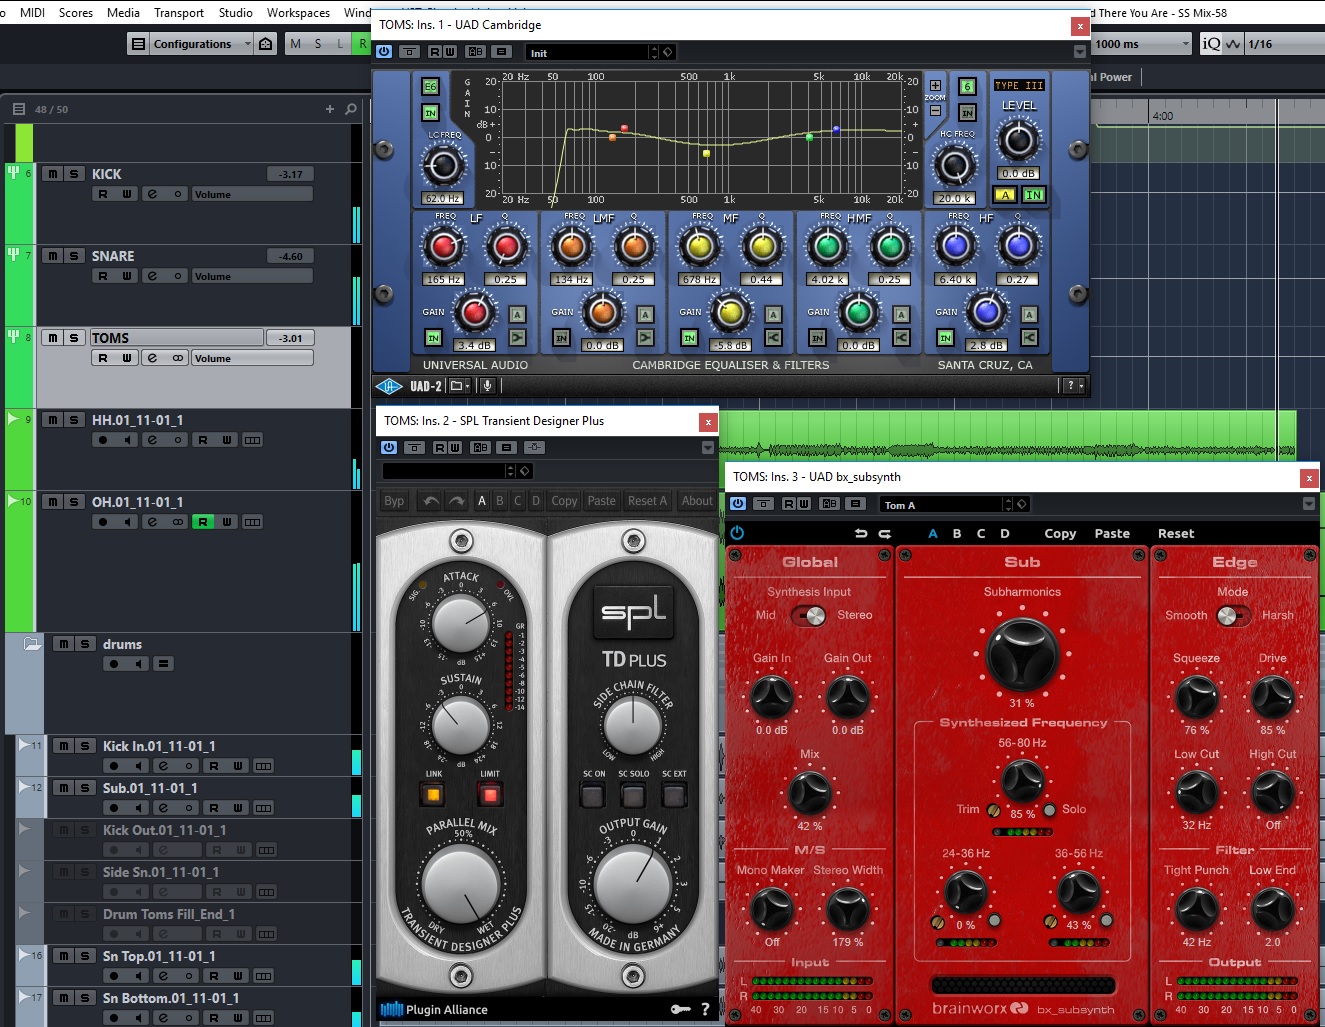
Toms Buss Inserts
There were 4 toms, recorded on 4 tracks, and I manually gated the toms by simply editing the tracks so only the tom hits were remaining. They weren’t used very often at all, so it wasn’t too time consuming, and I often prefer to manually gate the toms in this way as I have better control of the fade out and can make sure the attack isn’t clipped off like gate plugins often do. There was no processing on the individual tom tracks, but all four were routed to the Toms group channel, where I did all the processing again. No Slate plugins on this buss, for a change. Instead there was a bit of overall EQ shaping with the UAD Cambridge EQ, followed by the SPL Transient Designer Plus plugin to really beef up the attack, and then the Brainworx Subsynth plugin to give the toms some more “boom” and a bit of saturation overall (blended in at 42%).
OVERHEADS
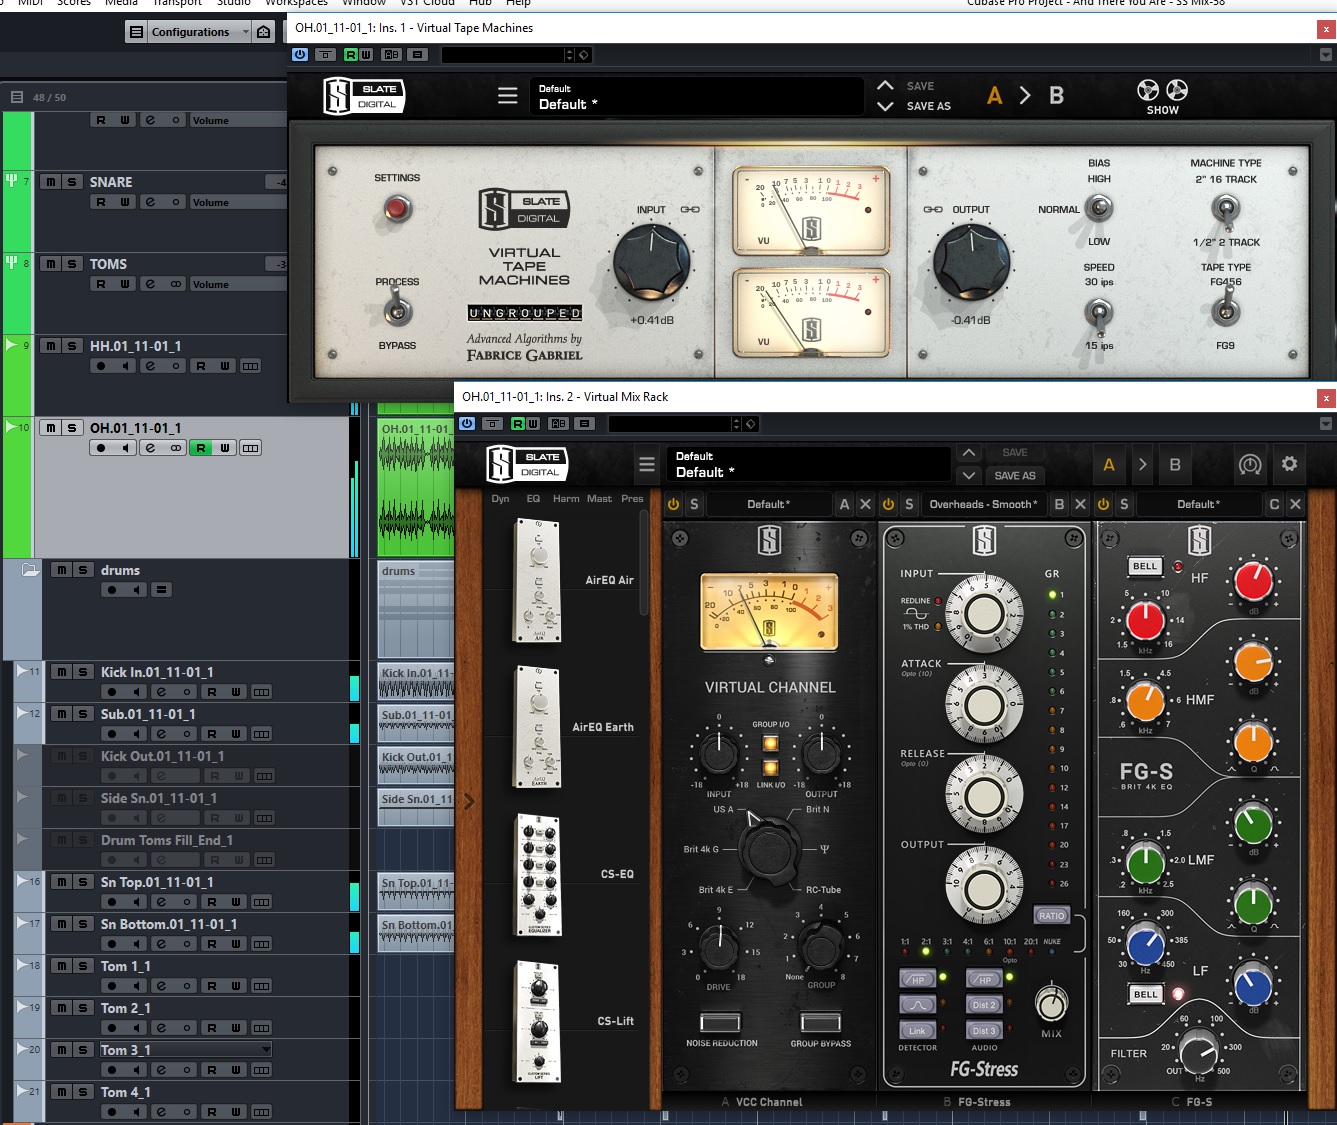
Overheads – Inserts
Overheads were just one stereo track, and I didn’t do anything too extreme with them. I used the channel high pass filter to roll off the lows from about 80Hz down. Then I had the Slate Virtual Tape Machine followed by the Virtual Mix Rack. On the Mix Rack, I just had the A style channel emulation, followed by the FG-Stress blended in parallel at a bit over 50%, followed by some EQ to bring out the high end a bit, and remove some of the box mids.
DRUMS MASTER BUSS
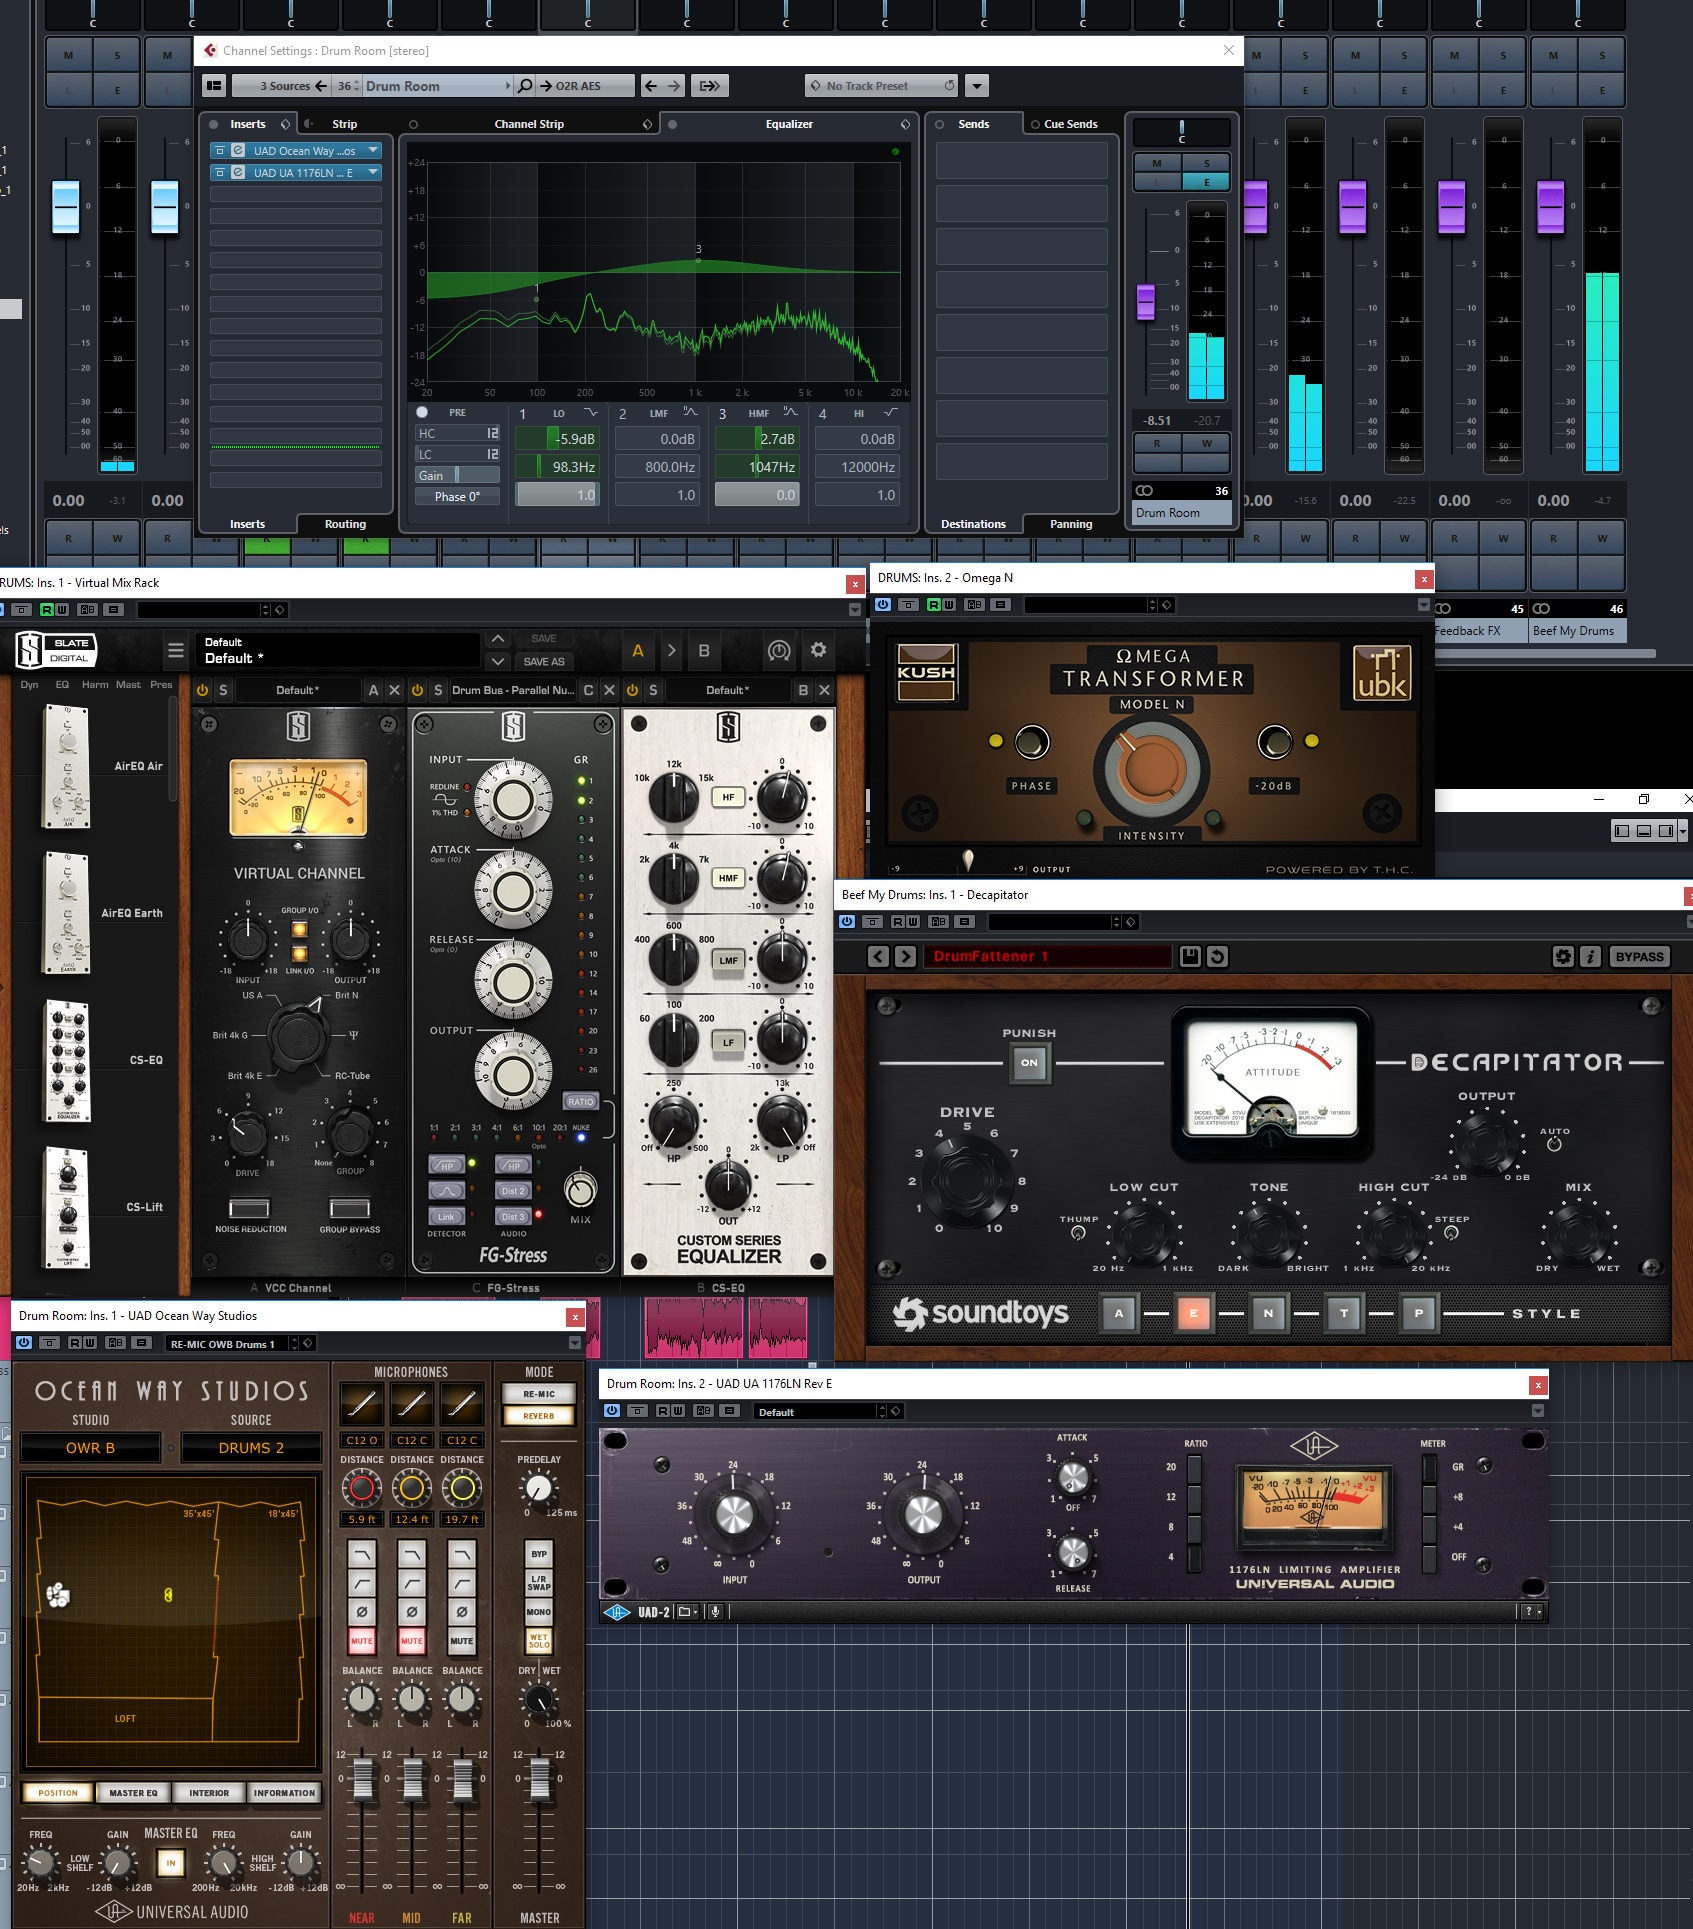
Drums Buss Inserts and FX
As with most of my mixing projects, all the above drum group channels and any remaining individual channels, were routed to a master DRUMS group channel, for a final bit of overall processing. On the drums buss, I used the N style channel emulation, followed by the FG-Stress set to “Nuke” mode and blended in parallel at less than 50%, and then just a little bit more EQ to open up the high end a bit. I followed that by a transformer emulation plugin from Kush/UBK to fatten up the drums a bit more.
Since there was no recorded room microphone for the drums, I used an FX send to the Ocean Way plugin from UAD to give them some natural room sound. I compressed the output of the Ocean Way plugin with a UAD 1176 plugin, and blended it to taste.
As I progressed through the mix, I still was not entirely satisfied with the drum sound, and ended up trying one more thing to give the drums some more punch and bite. I set up another FX send and put the SoundToys Decapitator plugin on it. I called this FX track “Beef My Drums”, as it really did beef them up quite a bit. I rode the send level to this FX channel with automation throughout the song, so I could bring the levels of that extra beefy distortion up and down to fit in depending on how busy the track was, and to also give some contrast in different sections of the song.
GUITARS BUSS

Guitars Inserts
There were 6 tracks of guitars in the song, although some of them had very minimal parts that only occurred once or twice. I didn’t do any individual processing on any of those tracks. Again, they were all blended to taste and routed to a Guitars group channel where I did some overall processing. Started with the Virtual Tape Machine plugin again. Then, the Virtual Mix Rack did most of the processing, with a Trident console channel emulation, followed by a bit of tube saturation, some subtle compression with the newer U73b compressor, and then a couple of different EQs to shape the overall tone a touch. EQ was very minor, and I just used a couple different EQs because of the bands and curves I wanted were a bit different for the different ranges.
I also used another instance of the UAD Ocean Way plugin to add a bit of natural room sound to the guitars (not shown).
BRIDGE VOCALS BUSS
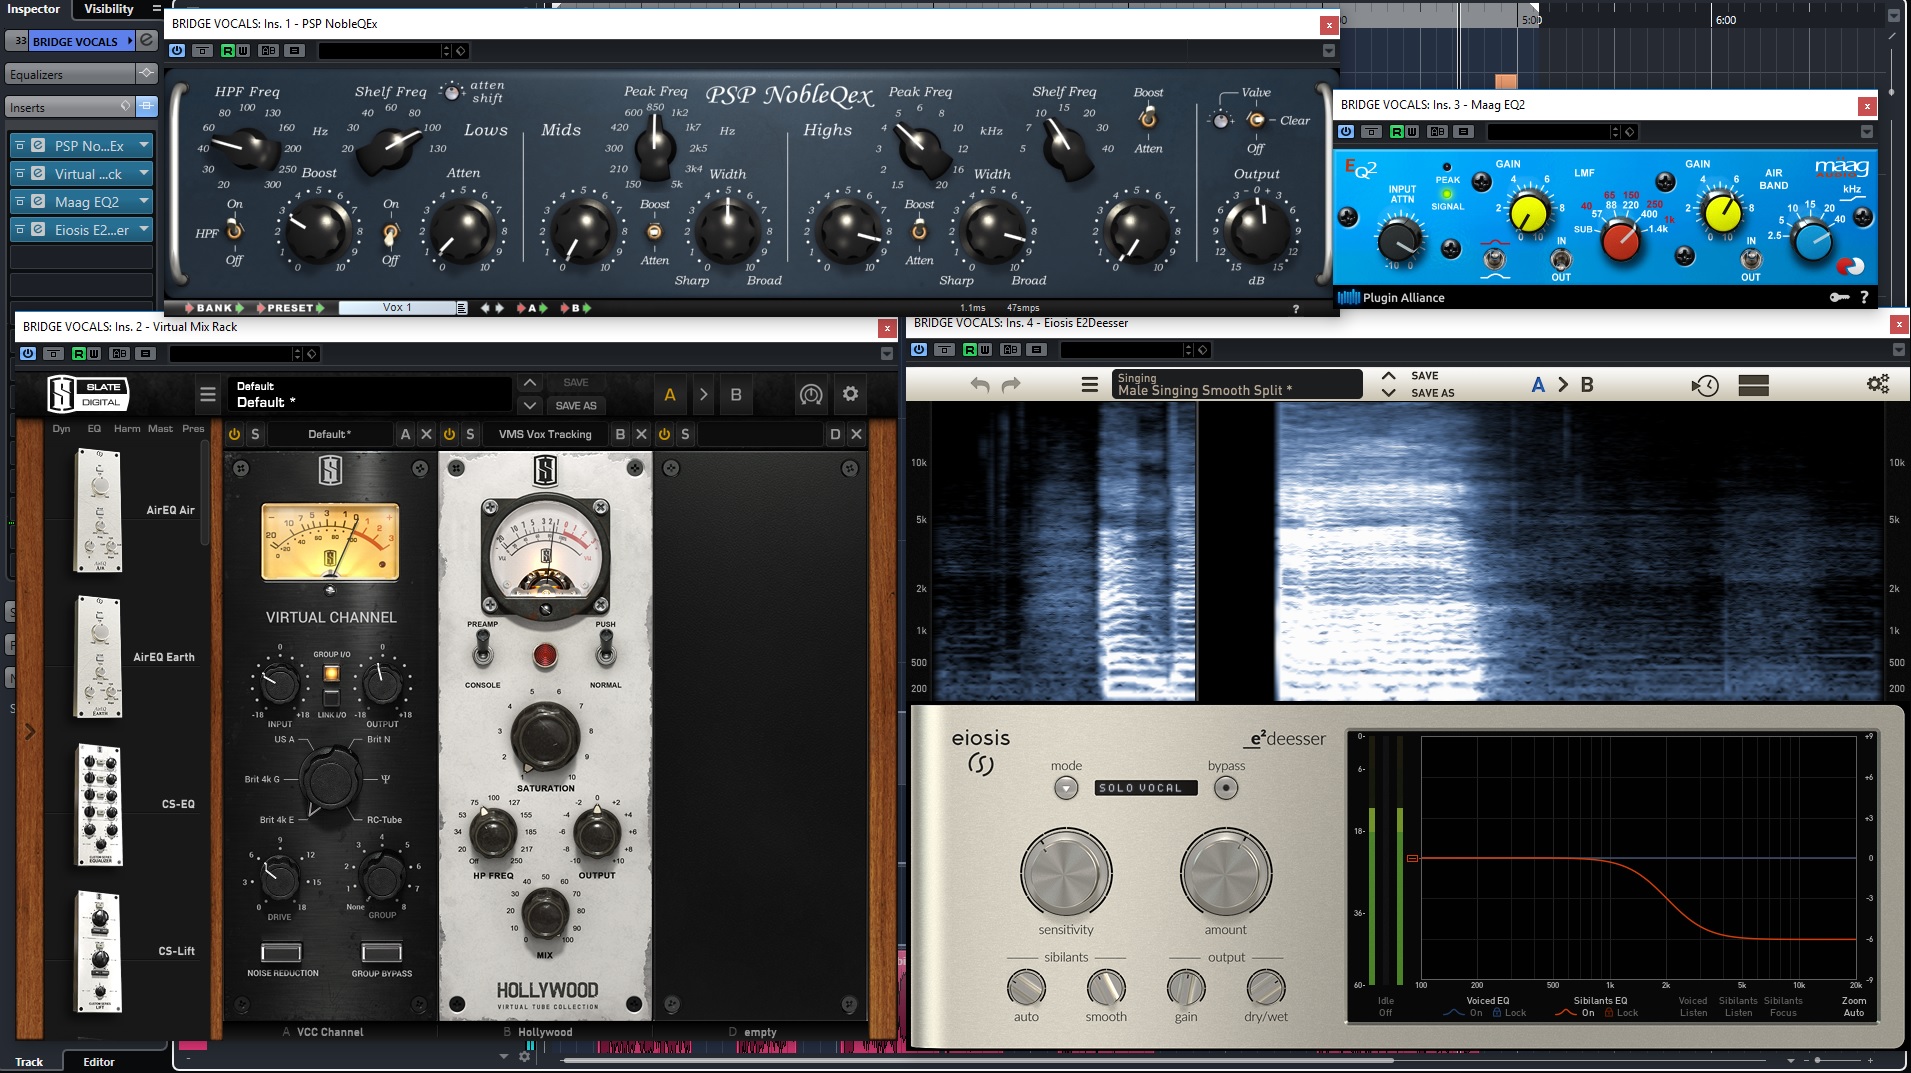
Bridge Vocals – Inserts
There were 4 tracks of “Bridge” and Harmony vocals that I blended and routed to this one group channel. The inserts on this channel started with the PSP NobleQEx EQ, which I used to roll off some low end and do a bit of overall brightening of these vocals. Followed by some console emulation and tube emulation. After that a bit more Air EQ with the Maag EQ plugin, and then a De-Esser to tame some of the sibiliance after all that high end boosting.
LEAD VOCAL
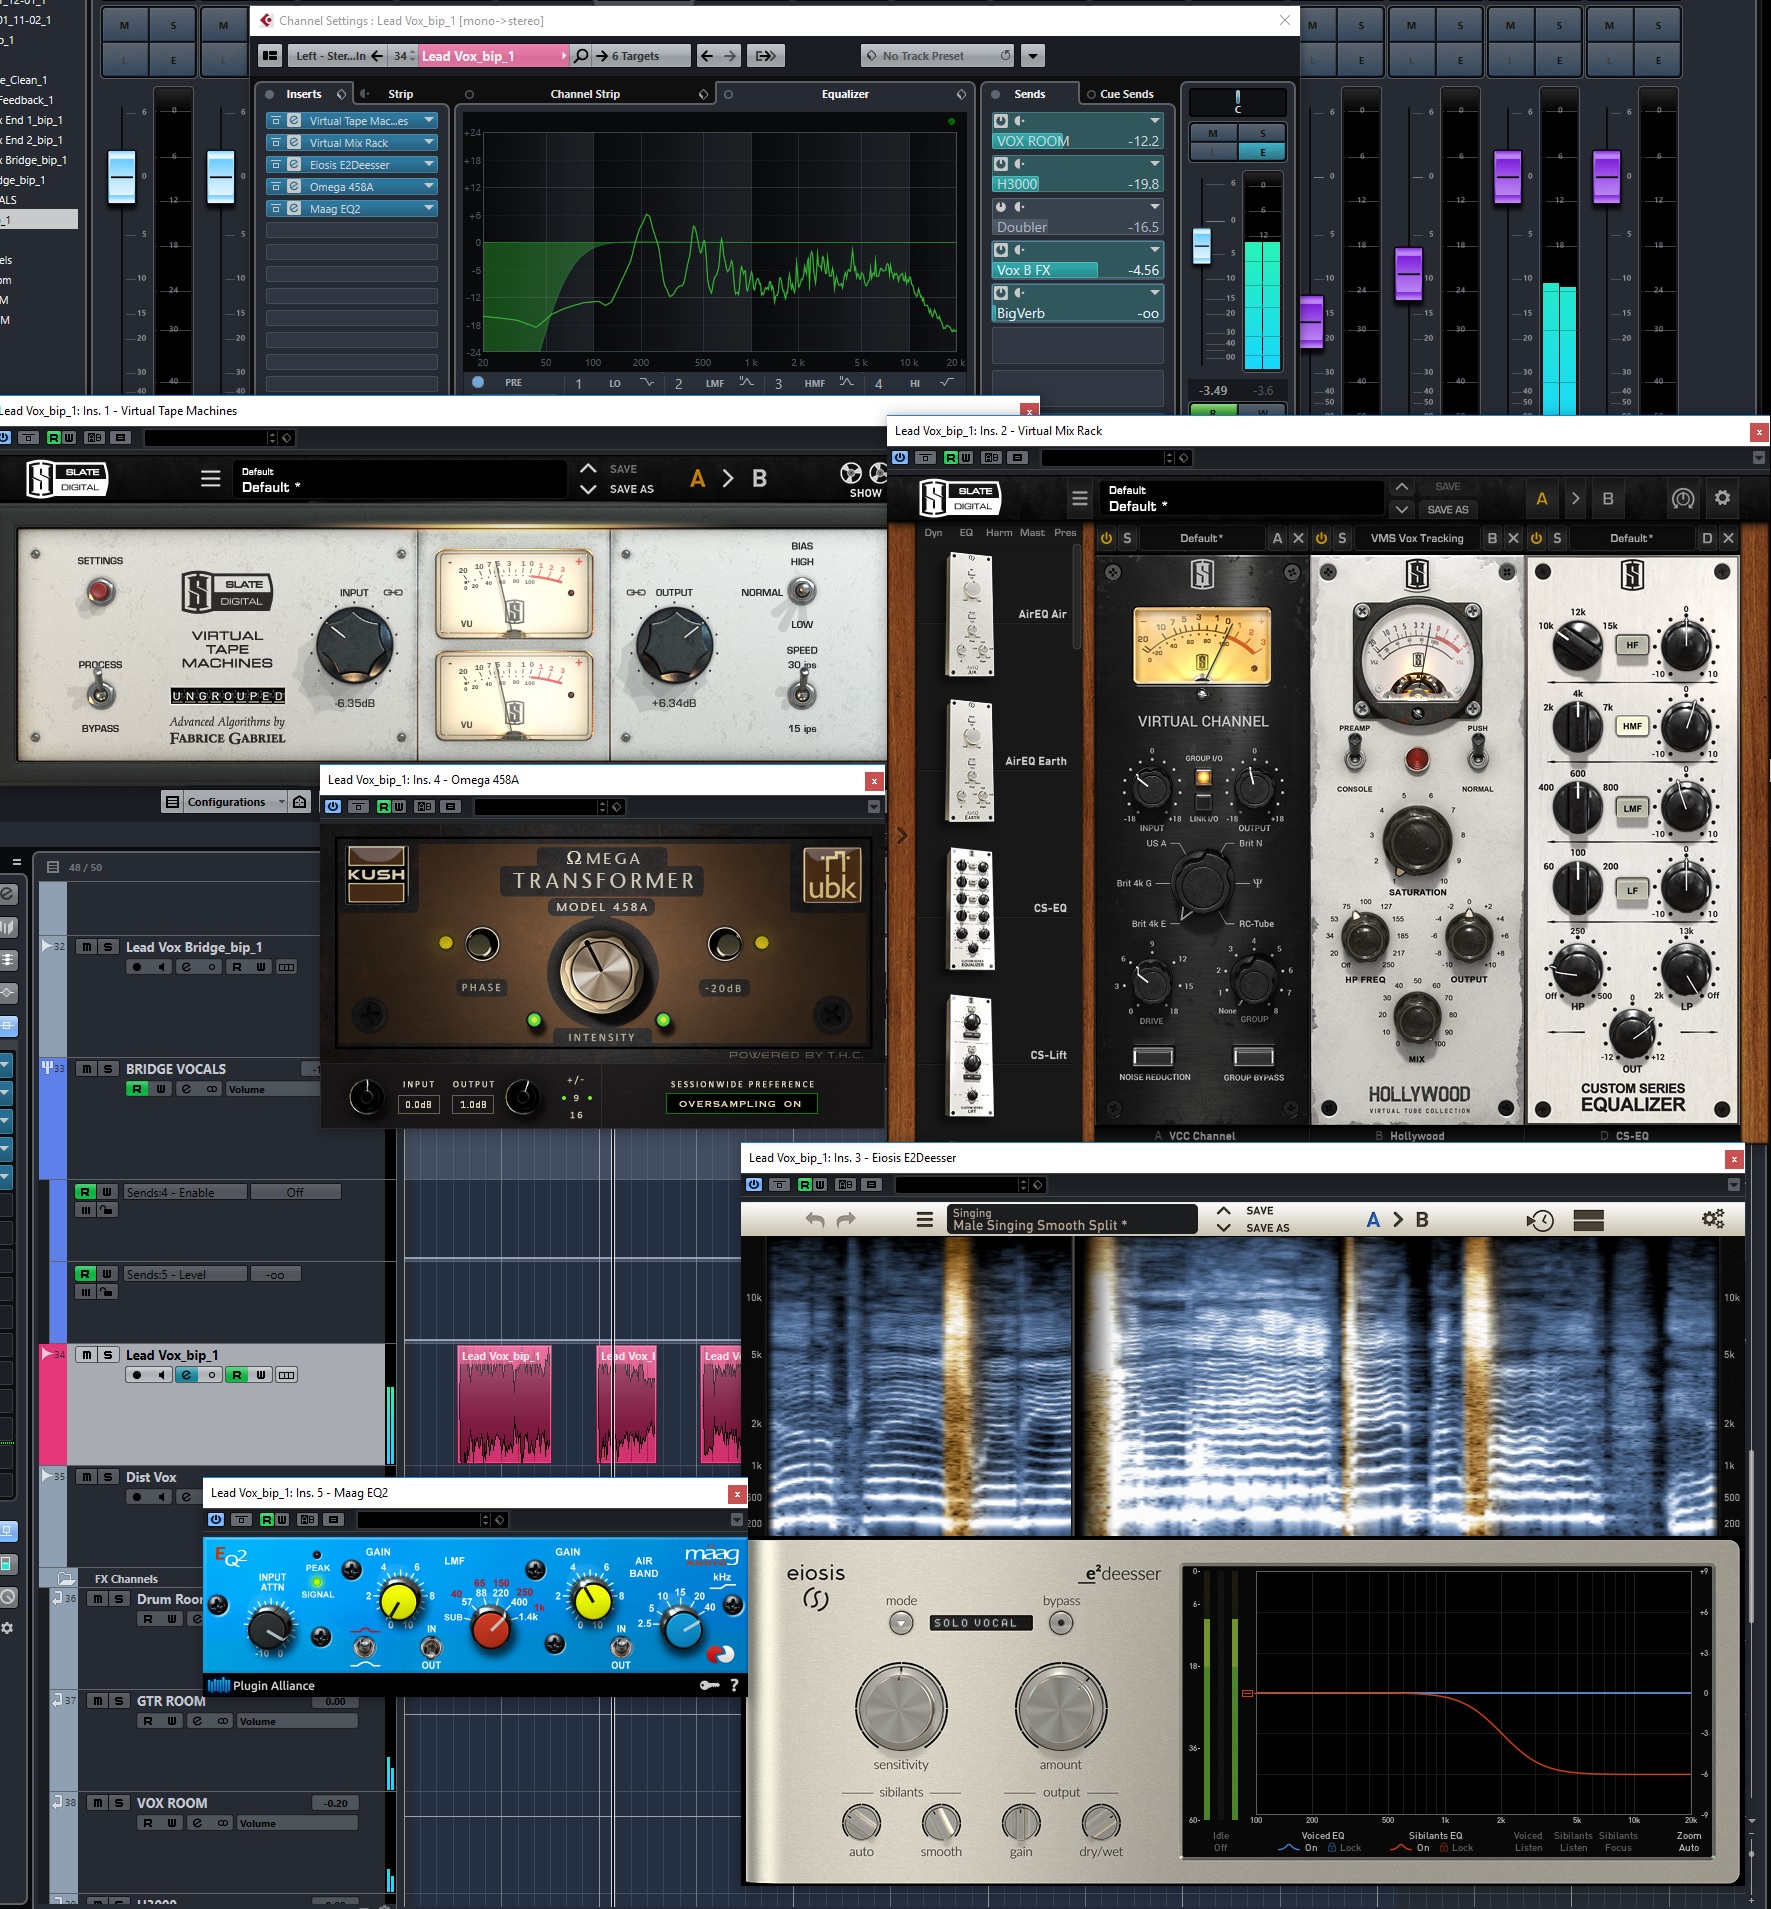
Lead Vocal – Inserts
The Lead vocal track had a high-pass filter with the channel EQ to remove some low end rumble from the track. Then, I used the Virtual Tape Machine, followed by the Virtual Mix Rack that had a channel emulation, followed by some very subtle tube emaulation, and just a touch of EQ at 4K to bring out some presence. I put the De-Esser next in the chain to tame some sibilance, and then went through a transformer emulation for a bit of thickness, and finally the Maag EQ again for some upper air.
VOCAL FX

Vocals – FX
I had quite a few FX channels setup for this song, mostly used by the vocals, but some other instruments used them a bit as well. The sends to most of these effects were automated as I was bringing different effects in and out, and riding the levels, for different parts of the song.
The two effects that stayed at a constant level throughout the song were the Ocean Way plugin (a third instance) that was setup for some natural room sound on the vocal, and the H3000, which was set to a subtle thickening type of effect.
The Waves Doubler effect was only used during the “B” or “Bridge” sections to thicken/widen the vocal even more. I also had a “Vox B FX” effects channel setup which had a Quadravox plugin for a different type of micropitch widening effect followed by the RC48 Reverb set to a special fx type of reverb sound. Vox B FX was turned on for the Bridge sections, and also for the lines in the verse that talk about angels (where you can here the reverb fx more clearly).
Finally, there was also a “Big Verb” fx channel, not shown in the screen shot, which was from the Valhalla Shimmer plugin. That was mostly a longer type of reverb that I automated for just a few select words in the song to give them a bit of a tail, and also at the very end of the song (last word again).