We are just a three piece instrumental band hailing from the deep tundras of Mpls, MN. We don’t like to put restraints on our music, we want to play every style and try to do it well. Sounds range from jazz to prog rock to all out metal to doom.
We have our album for free download at https://constantsandvariablesband.bandcamp.com We have a Facebook page at https://www.facebook.com/constantsandvariablesband
Mixing Notes
Project Overview
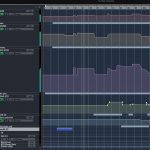
I picked this song for a free mix, not just because I liked the song, but because I wanted to see if I was up to the challenge of giving this song a bit more dynamics/contrast, while also dealing with some very busy drumming! Although at first listen, it doesn’t seem like there was much going on, as there are not that many parts or instruments. But, the complexity of the drums, and the layers of guitars made it much more of a challenge than I thought it would be. This mix had a LOT of automation happening. Thankfully, the band liked what I did with it!
BASS OVERVIEW AND GROUP CHANNEL
BASS Overview
BASS Group Channel Inserts
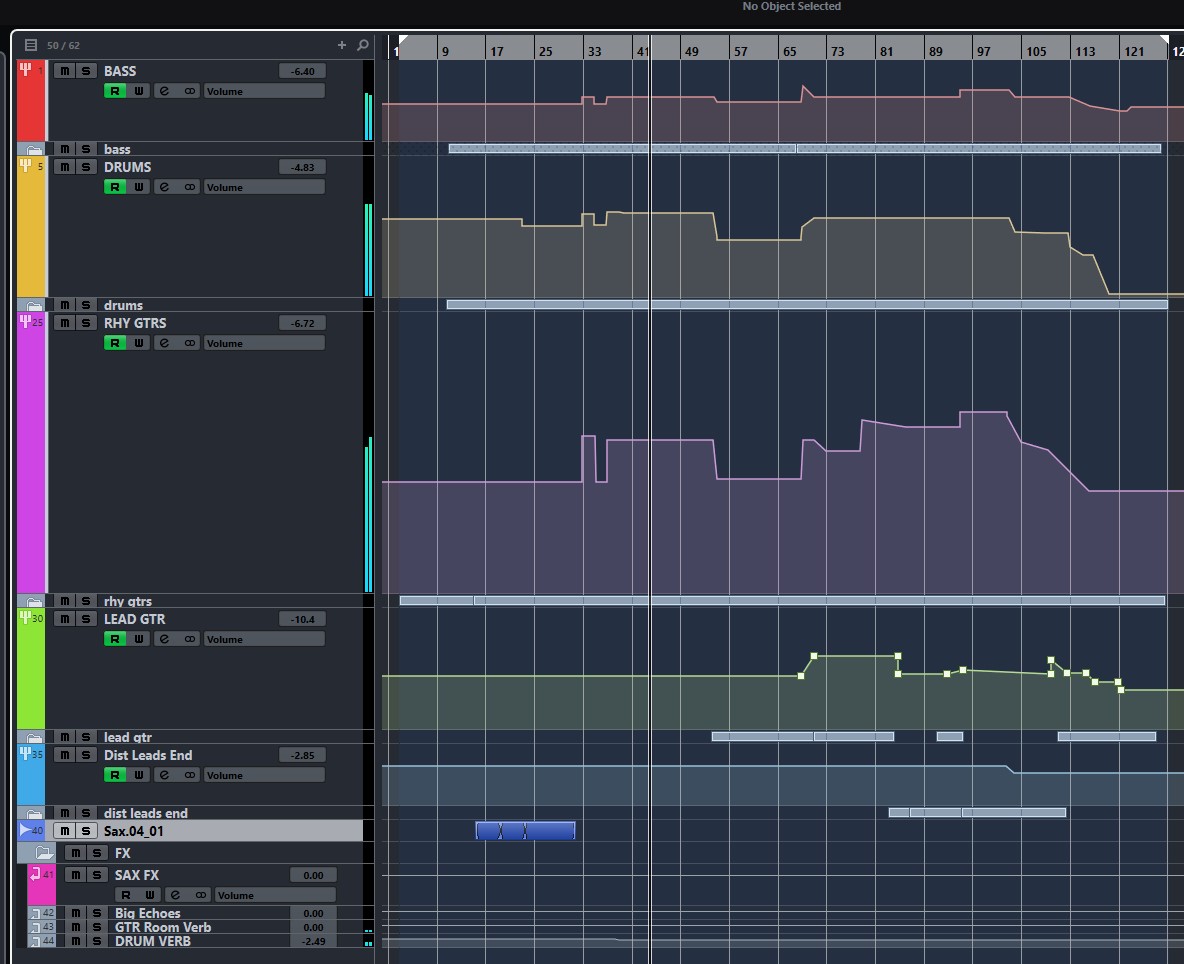
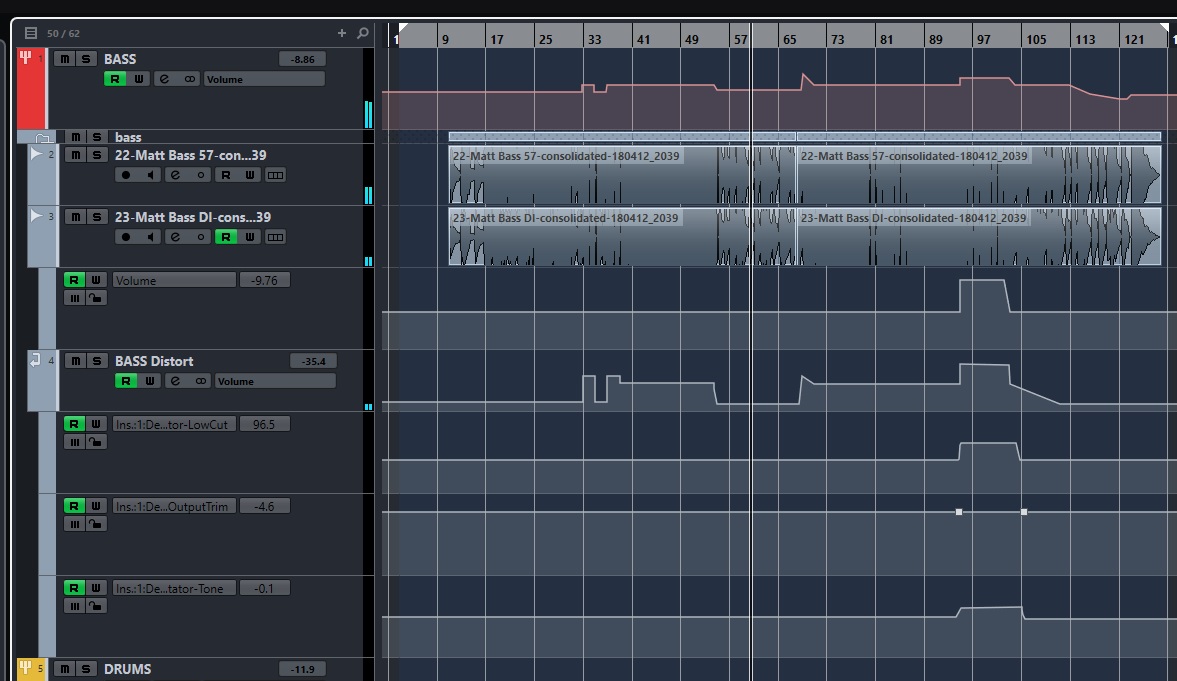
I was given DI and Mic tracks for the bass. I didn’t process the tracks individually, but got a good blend, and routed them to a Bass group channel and did all my processing on that group channel. For group channel inserts, I used a bit of tape emulation first, followed by the UAD LA-2A emulation for some mild compression. After that through the Slate Virtual Mix Rack where I had some of the Earth EQ to beef up the bass, with a touch of some subs roll off with the LoCut filter, then my favorite N style channel emulation, then a bit of “NewYork” style tube emulation blended in, and then a touch more compression with the U73b. After all of that, I used a bit of the H949 dual harmonizer, blended in very subtly (32% mix), to give the bass just a bit of stereo width.
BASS DISTORT
BASS Distort FX
One of the challenges of this song was keeping the bass sounding full and present in the heavy sections of the song, where the drums were crazy busy, and there were several layers of distorted guitars happening at once. As with many other mixes, I achieved this be setting up a “Bass Distort” FX channel, which got returned and blended in to the above Bass Group. The send to this FX channel was only from the mic channel bass track. The main purpose of this effect is to add a varying amount of mid-range bite and harmonics to help the bass cut through the denser parts of the mix, without simply turning up the bass volume and muddying things up with too much low end. The FX chain is fairly simple, with Soundtoys Decapitator providing distortion, and then a bit of Microshift blended in to spread out the distorted mids a bit in the stereo mix. The volume of this FX channel was automated to keep it fairly low (almost off) in the softer parts of the song, and then to crank it up to varying degrees in the louder parts of the song. In addition, near the end of the song, during the loudest and most dense section, I automated a couple of parameters on the Decapitator plugin to increase the lo-cut frequency and to brighten the tone even more. You can see these automation curves on the Bass Overview screen shot.
DRUMS
Drums – Overview
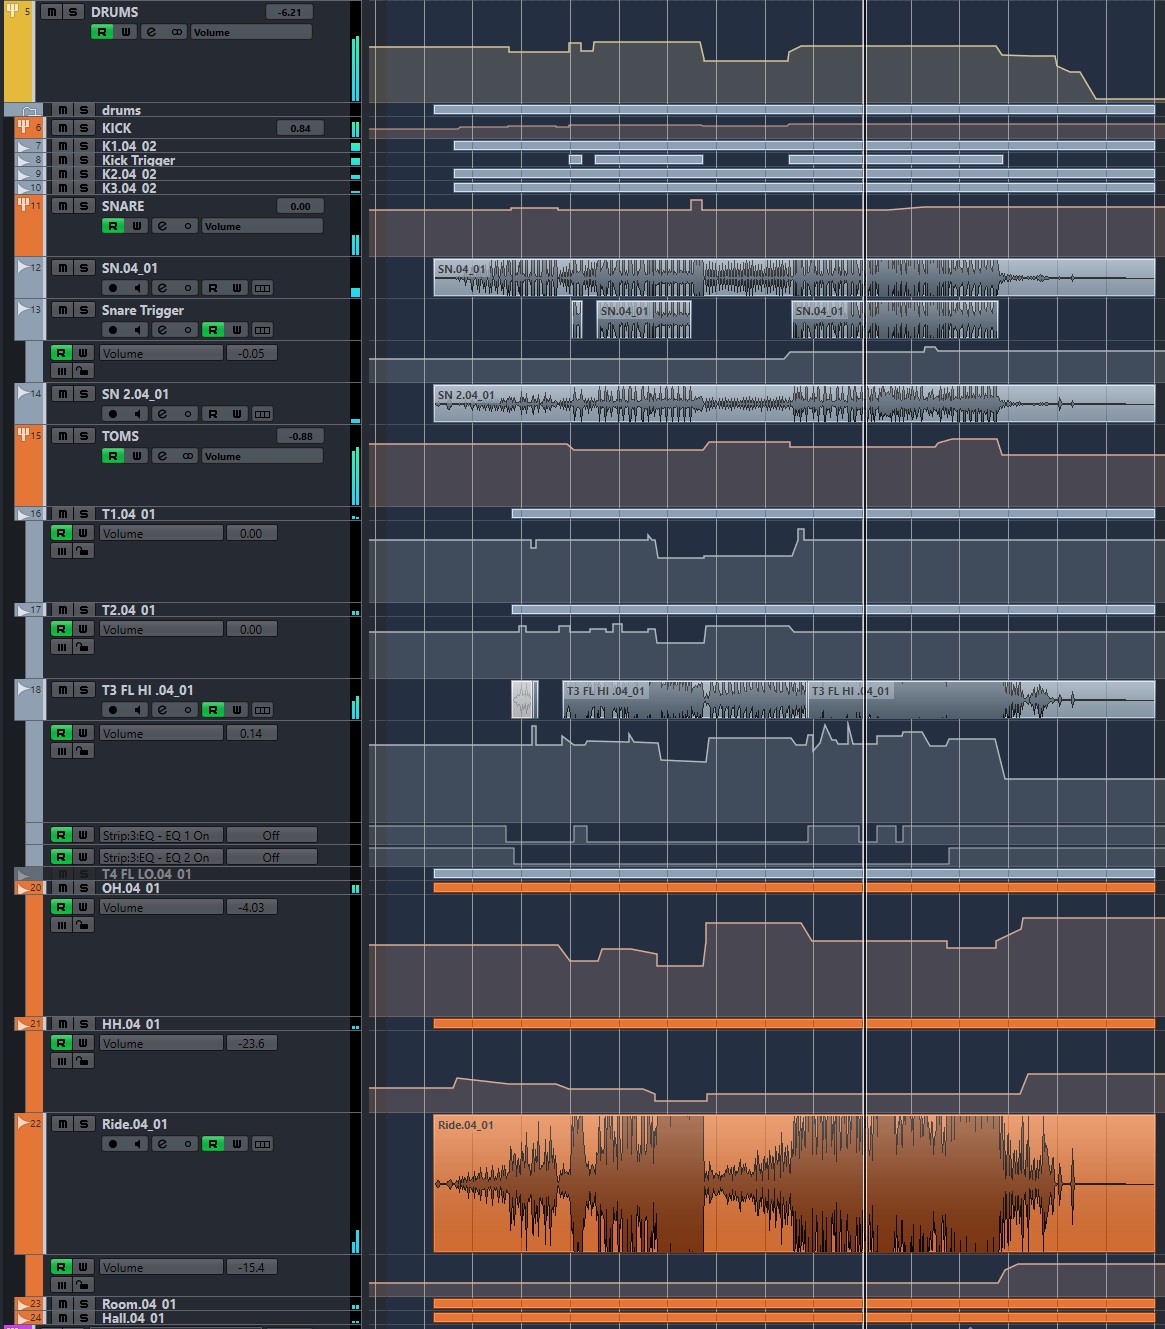
The drums were one of the biggest challenges of this mix, and required quite a bit of automation throughout the song. The playing varies from a soft jazz type feel, to an extremely busy heavy rock type of style. Lots of snare and tom rolls that were difficult to bring out without overwhelming or muddying the mix. Also, as is the case with most drummers, the faster the playing, the less hard the individual hits, and thus those sections had less attack on those drum hits than the slower sections. In addition to plenty of volume automation, there was also automation on EQ on some tracks, as well as blended in triggered kick and snare drums for heavy/busy sections to give more attack in those sections without bringing up all the bleed from the original tracks.
KICK DRUM OVERVIEW
Kick Drum Overview & Kick 1 EQ
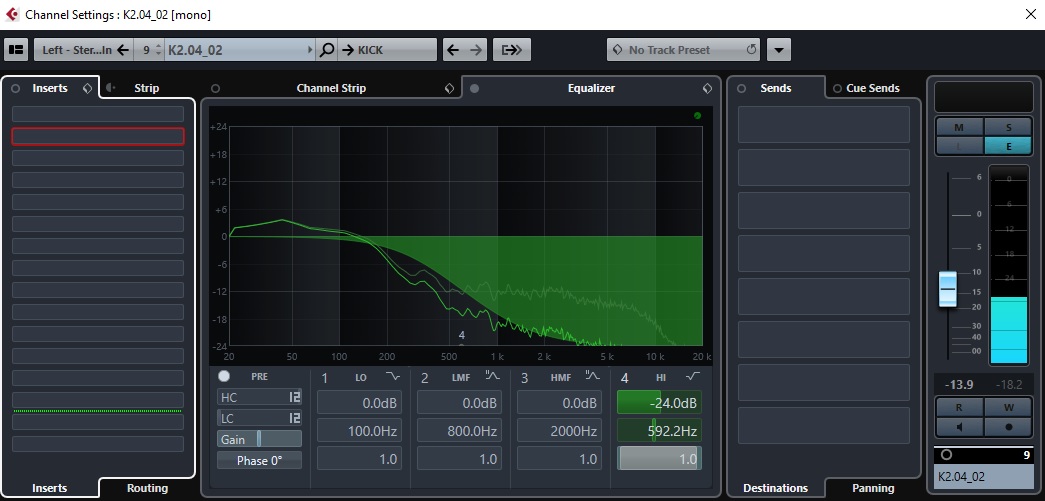
Kick 2 EQ
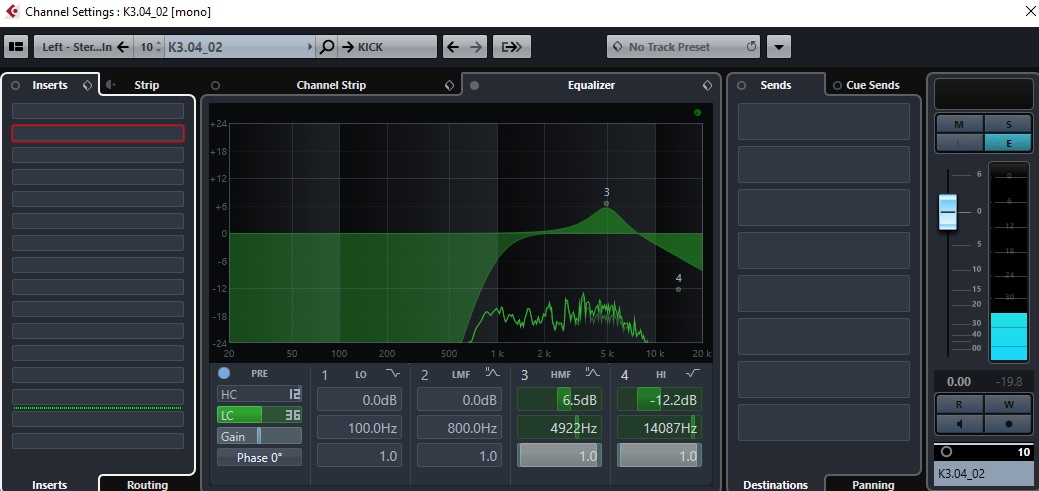
Kick 3 – EQ
There were 3 kick drum tracks provided which were just labeled 1, 2, and 3, but sounded like IN, OUT, and FRONT. I ended up using Kick 1 as my main kick track, providing most of the level. I used Kick 2 only for some extra subs (see the extreme lo-pass filter EQ), and kept it down at around -15dB from the other kick channels. Kick 3 was set just for some extra attack, with all the low end removed, a boost in the attack range, and a bit of hi shelf cut to reduce some of the cymbal bleed.
KICK DRUM BUSS & TRIGGER
Kick Drum Buss Inserts
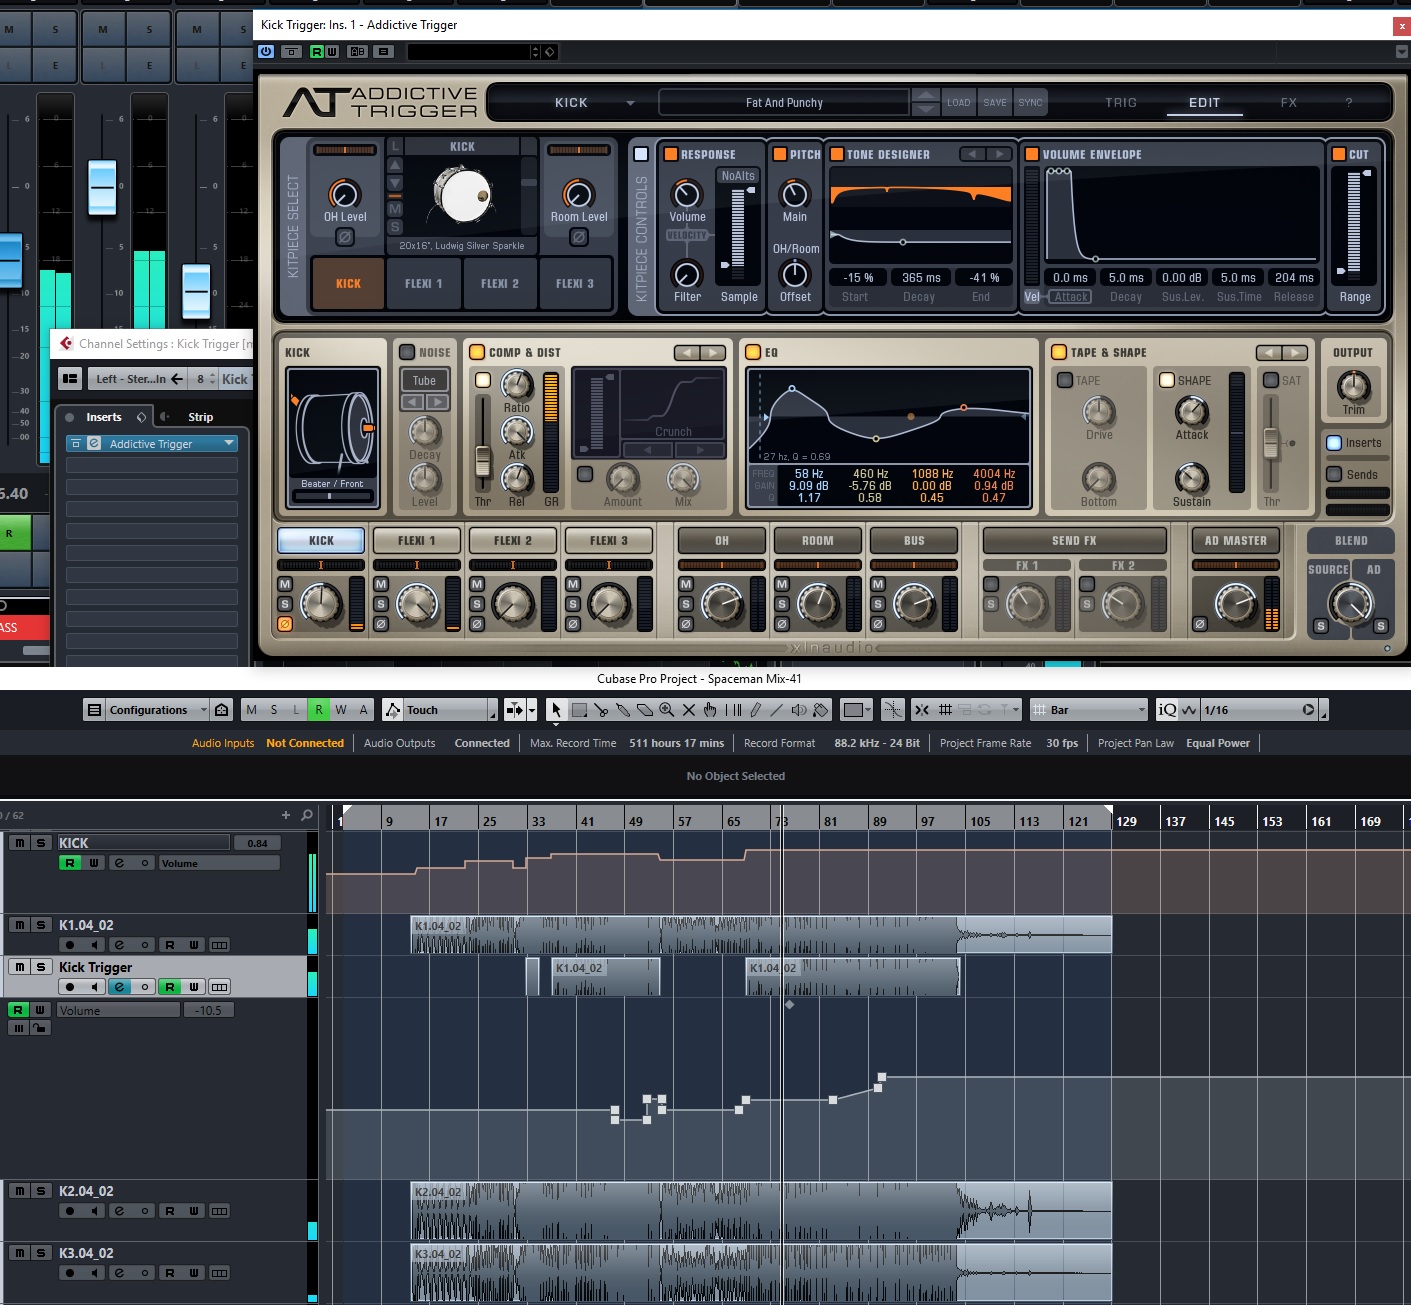
Kick-Trigger
All the kick tracks, including the triggered kick, were routed through the Kick Drum Buss, which used quite a bit of processing to try to bring out the attack, as well as some deep thump, without muddying up the mix. The virtual mix rack contained my favorite N style channel emulation, followed by the Earth EQ to beef up the low end overall with the “Earth” control, but to also add some extra thump with the resonant LoCut filter. You can use that lo-cut similar to other resonant filters (such as UAD’s VOG), but with a bit more control. By adjusting the Slope and the Q, in conjunction with the cut Frequency, you can really dial in a fine tuned sub-thump at the right frequency and control how much thump it adds (with the Q and Slope), and also get rid of the really low rumble you don’t want. After that, I used the FG-Stress for some compression, and then some fairly extreme EQ with the FG-S (on top of even a bit more attack range EQ from the channel EQ). I pulled out a hefty chunk of low mids around 300hz, then used both the HF (set to bell curve) and HMF bands to really crank the attack frequencies for the kick. Even after all of that fairly extreme processing, I still felt I needed more attack (as well as less bleed from the rest of the kit)! So, I followed all of that with the DS-10 Drum Shaper, and really cranked the attack, removed a bunch of sustain, and also cranked up the Tightness Mojo control. And, I still didn’t feel that was enough in the busiest sections! So, I copied one of the kick tracks and used the Addictive Trigger plugin to trigger a similar sounding kick layered with another percussive attack sound. I edited that copied kick track so that I only had left the sections where I wanted the triggered kick, and then automated the level of the triggered kick track to bring it up/down as needed.
SNARE DRUM OVERVIEW
Snare Drum Overview
For the Snare drum, there was a top and bottom microphone. For the most part, I just blended the two snare tracks to taste, and put them through fairly minimal processing, at least compared to the kick drum. There was a lot of snare coming from the overhead microphones, so I mostly wanted the presence and attack from the individual snare tracks. There was no processing done on either of the individual snare tracks.
SNARE DRUM BUSS INSERTS & TRIGGER
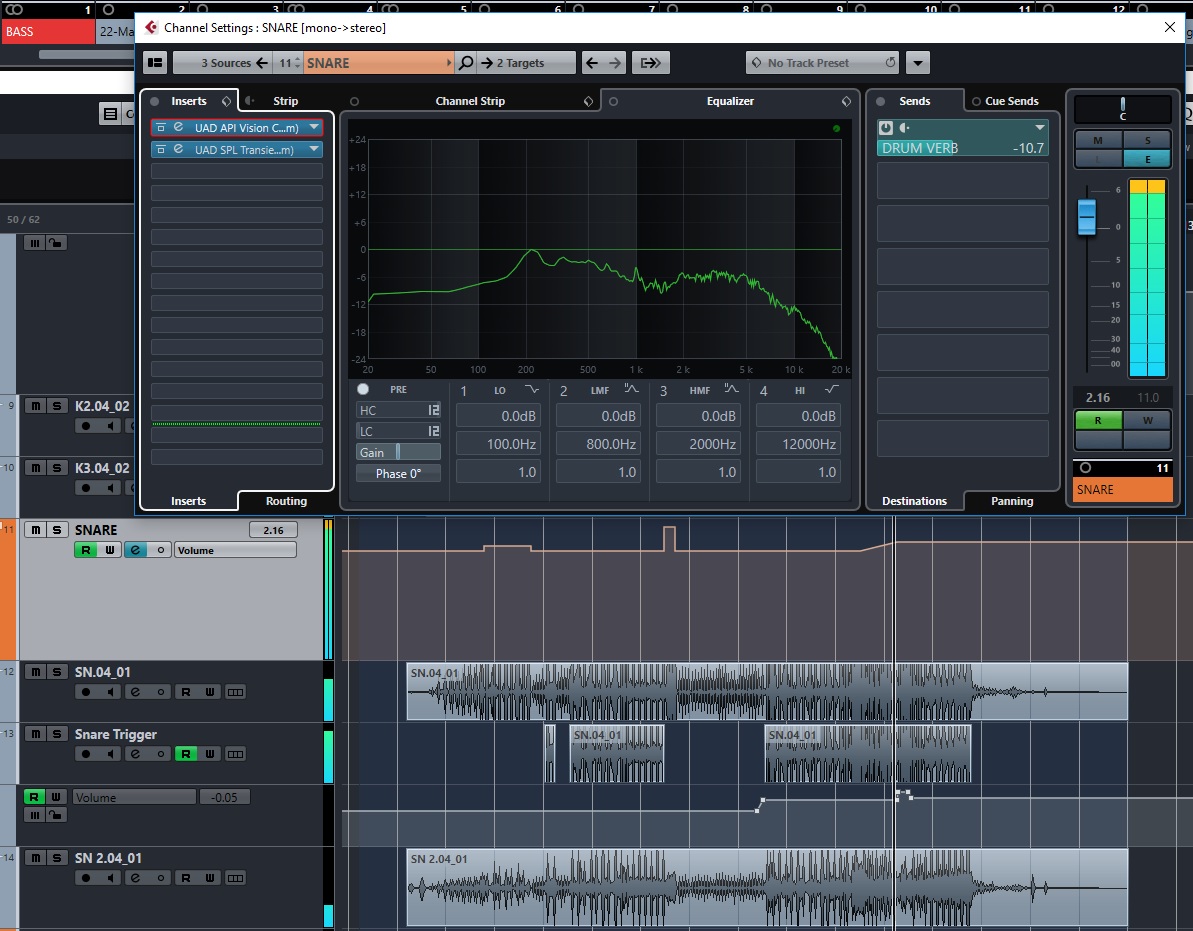
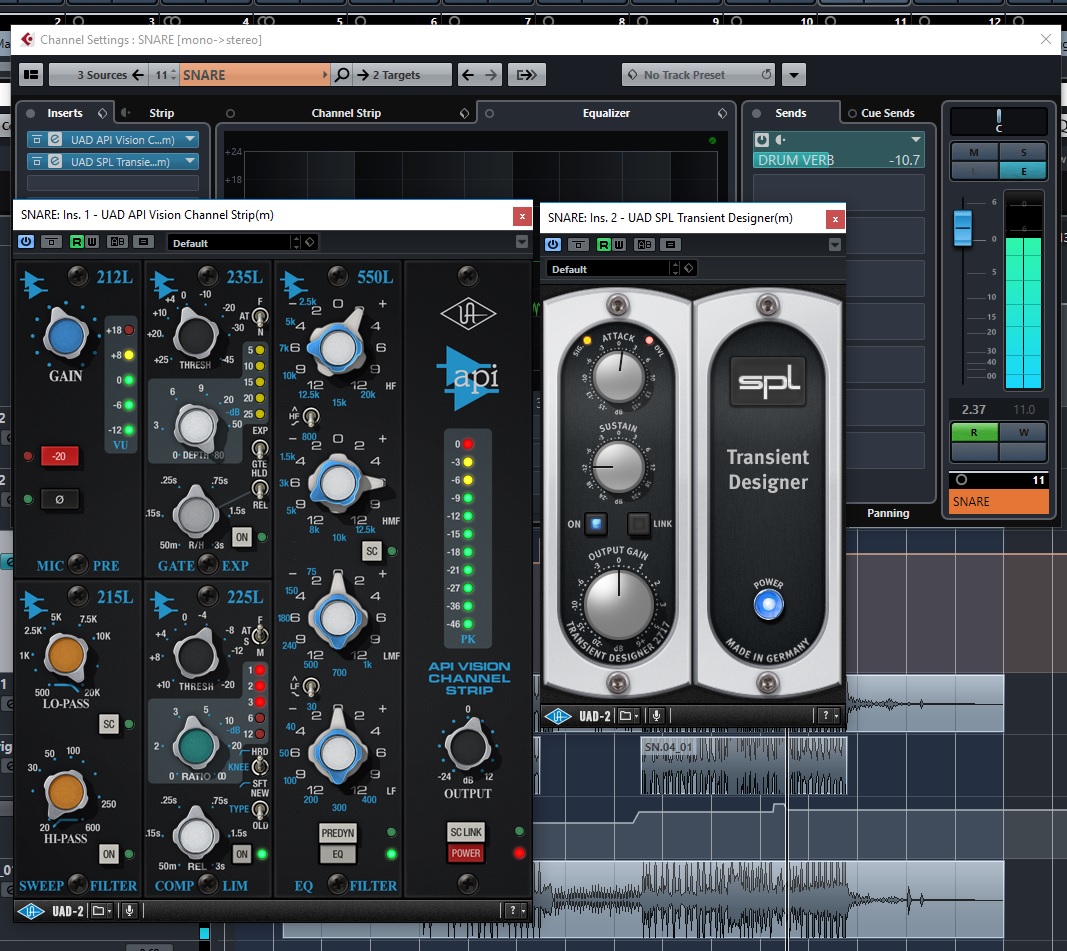
Snare Buss Inserts
Snare Drum Trigger
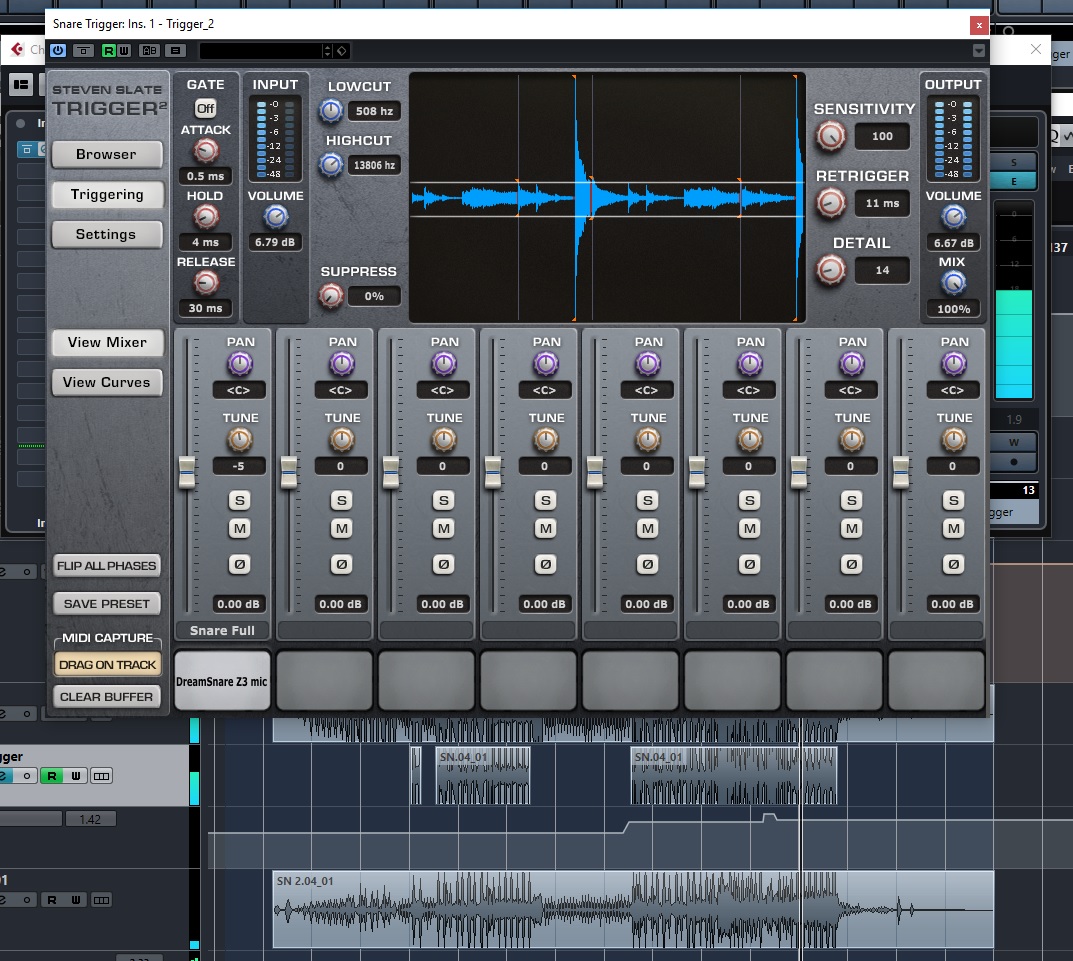
On the Snare Buss, I used just two inserts. The first was the UAD API Vision channel, which I used for some compression and to boost the attack frequencies with the EQ. I followed this with the UAD version of the SPL Transient Designer, which I used to add barely a touch of attack, and mostly to remove quite a bit of sustain. I pulled out as much sustain as I could without it sounded too processed, as I mostly wanted the attack portion from the close microphones, and got the rest of the sound from the overheads (as well as bleed into many other kit microphones). As with the Kick Drum, I needed a bit more punch/attack out of the snare during some of the heavy/dense sections, but didn’t want to bring up the hat/cymbals and all the other bleed that would come with it if I boosted the snare buss too much. So, I copied one of the snare tracks and used it to trigger another snare drum sample, this time using Slate’s Trigger 2 plugin. You can see the track right below the trigger plugin in the screen shot, and see how I only used it in a couple of sections (removed the trigger audio in all the quiet sections). Also, the first time I used it, the volume is much lower than in the really busy section near the end of the song, where I really needed it to help those snare hits cut through.
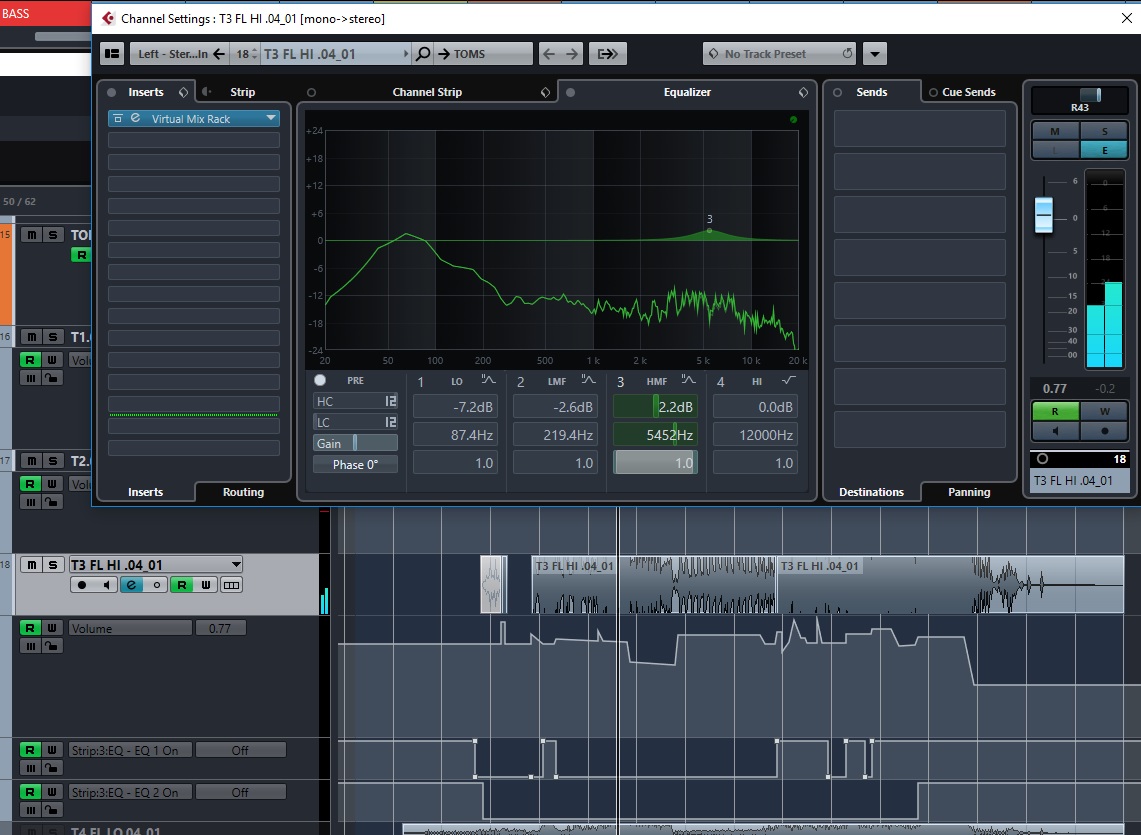
TOMS OVERVIEW
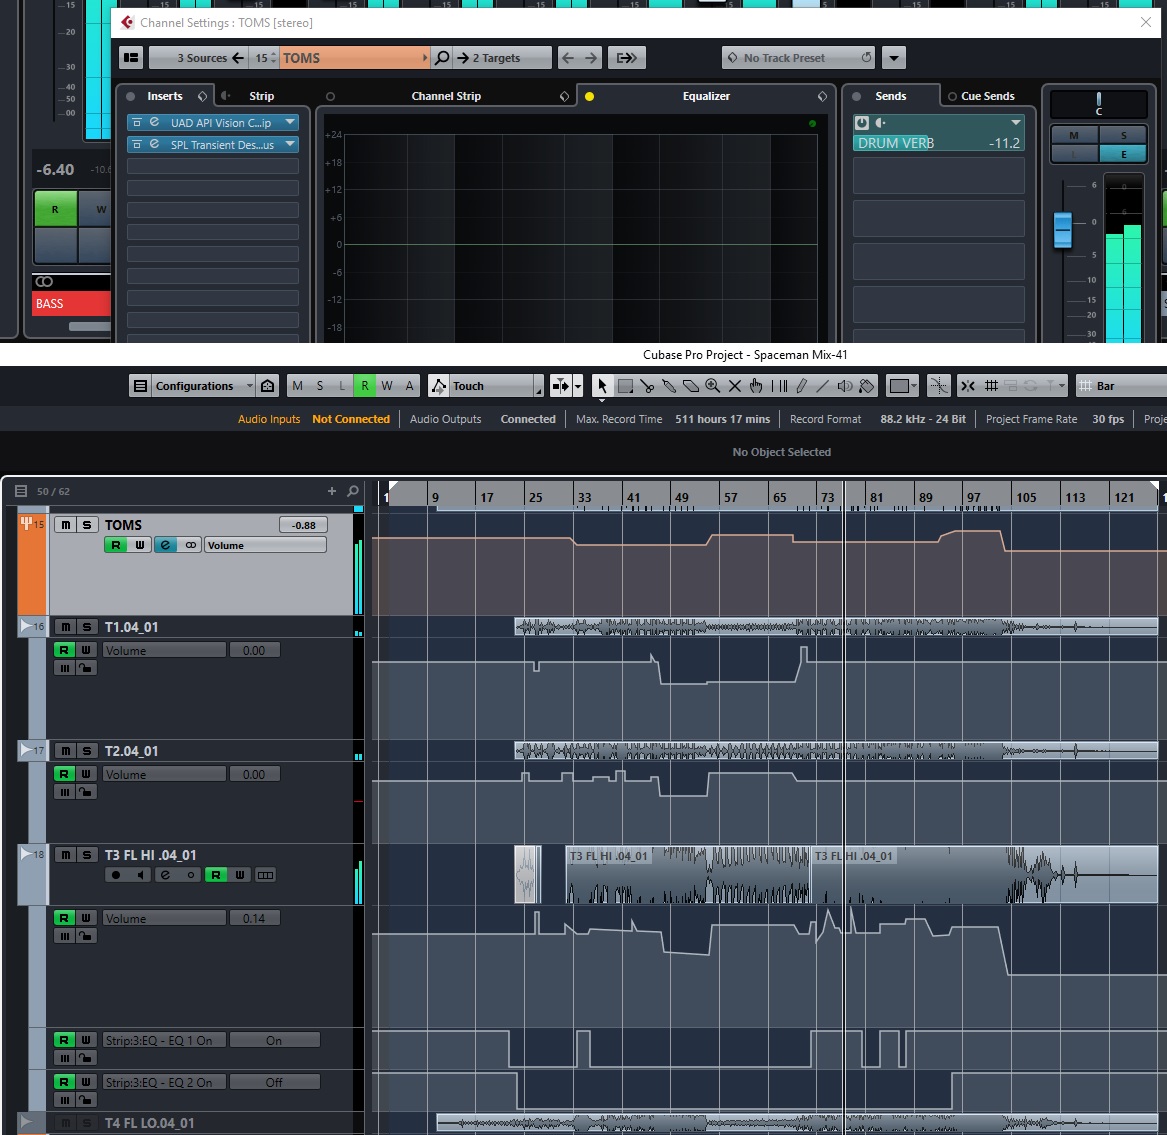
Toms were a bit of a challenge as well. There were four tom tracks, but the 4th tom was never played, so I disabled that track. The toms were played often enough throughout the whole song (lots of fast rolls, along with some nice tom patterns), so I didn’t try to gate them or manually edit them, but I did quite a bit of volume automation, which you can see in the overview screen shot. Toms 1 and 2 were pretty good “as is”, but Tom 3 was a challenge, as it was a floor tom that tended to add too much mud to the mix during the heavy sections if I tried to bring it up loud enough to be heard. For that tom, I ended up setting up a couple of bands of low end EQ cuts on the channel EQ and automated them to cut out some low end during the really heavy & busy sections. You can see where I used that EQ by looking at the Toms overview screen shot… the Strip3 EQ – EQ 1 On and EQ 2 On automation tracks. EQ is on when the automation lines are at the top, off when they are at the bottom. EQ 2 was turned on only at the end of the song, whereas EQ 1 was used in a few spots throughout.
TOMS BUSS INSERTS
As with the snare, a lot of the tone/body of the toms was coming from the overheads (and a bit from the room), so I wanted more of the attack/punch from the close mic tracks. All 3 tom tracks were routed to the Toms Buss where I had a very similar setup to the Snare Buss. Again, I used the API Vision plugin for some compression and EQ. Taking out some low mid boxiness, and adding a bit of EQ in the attack range. I followed that by the SPL Transient Designer Plus plugin, where I really cranked the attack and pulled out a huge amount of sustain, with the limiter engaged. However, I blended the SPL in at around 60% using the Parallel Mix control, so a good chunk of the tone straight out of the API Vision got through without the SPL processing.
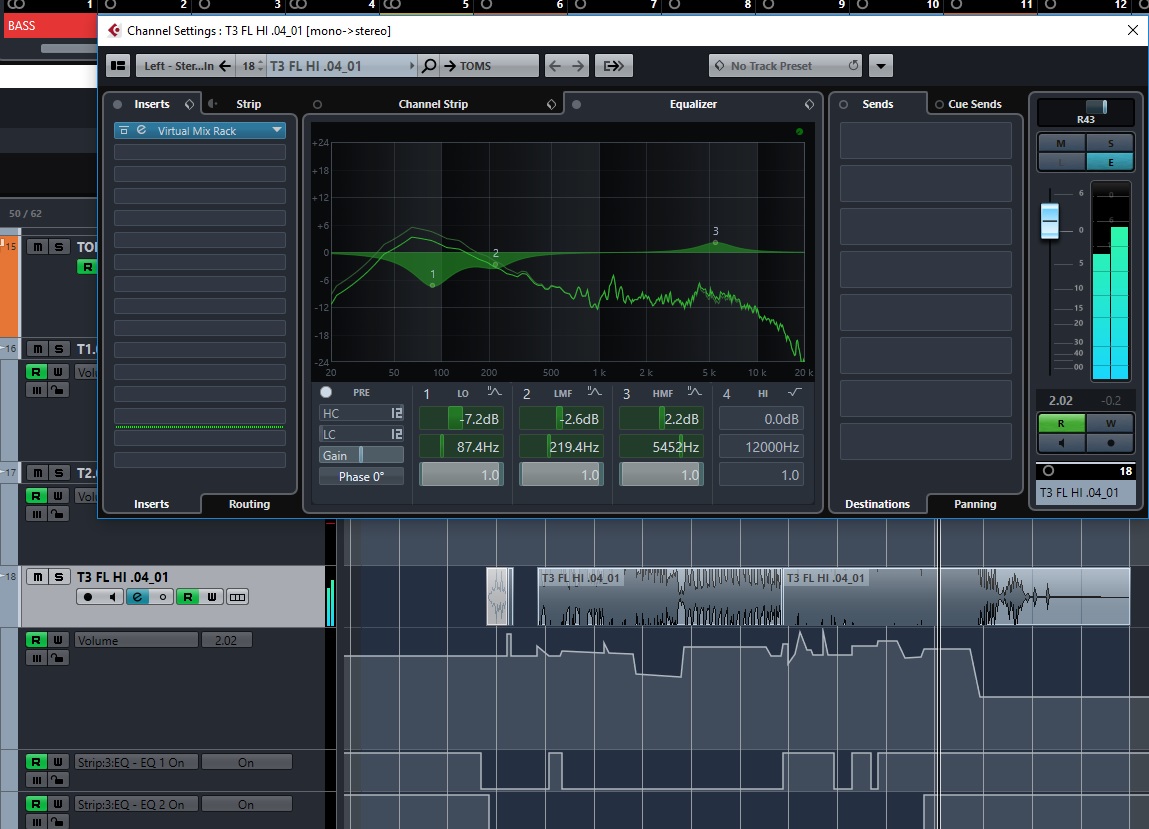
TOM 3 EQ
Tom 3 default EQ, with bands 1 and 2 bypassed
Tom 3 with all EQ bands On
These 2 screen shots show the channel EQ that I automated for the Tom 3 track. First one shows the ‘default’ EQ that had just a bit more attack EQ added. The second shot shows the EQ with all 3 bands turned on. Band 1 pulls out a pretty large amount of lows centered around 87 Hz. That one was only engaged at the very end of the song where everything was loud and heavy and the drummer was playing that tom hard. Band 2 was used in a few more spots earlier in the song and simple pulled out a touch of lower mids, centered around 219 Hz, to keep the tom from getting too muddy in a few spots.
OVERHEADS OVERVIEW & INSERTS
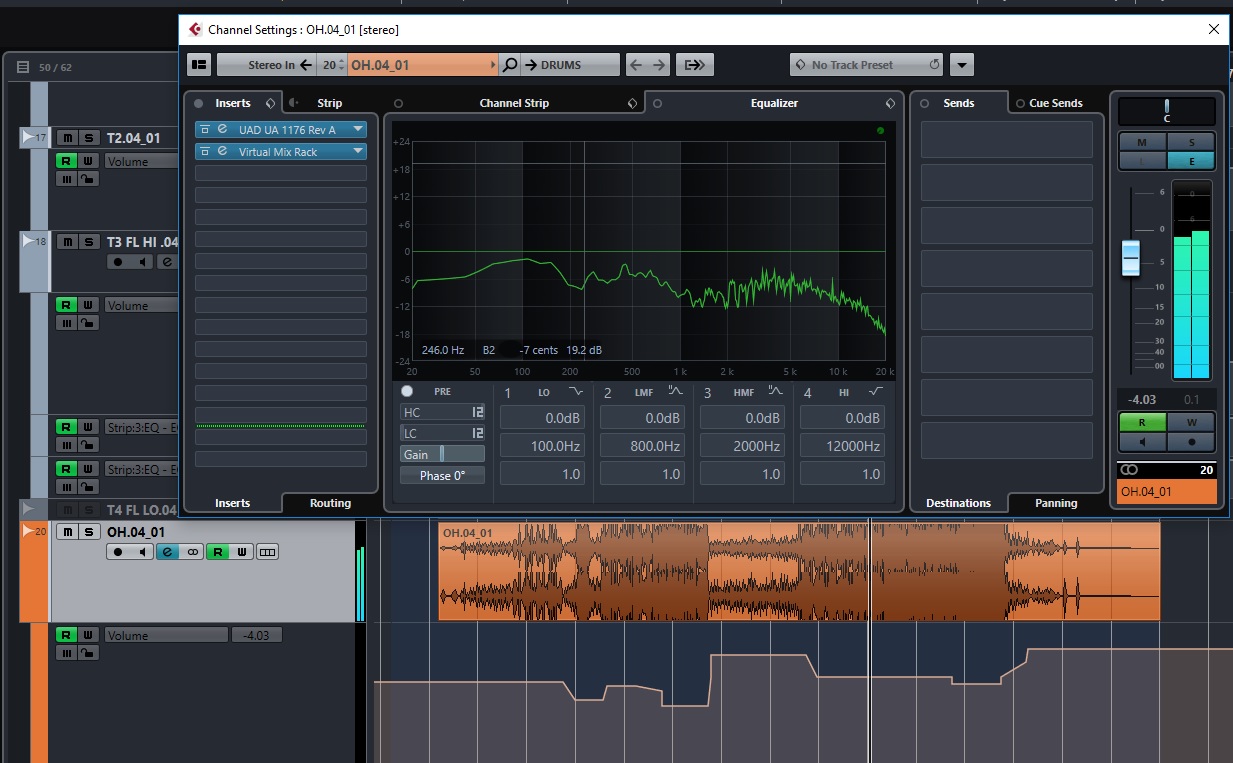
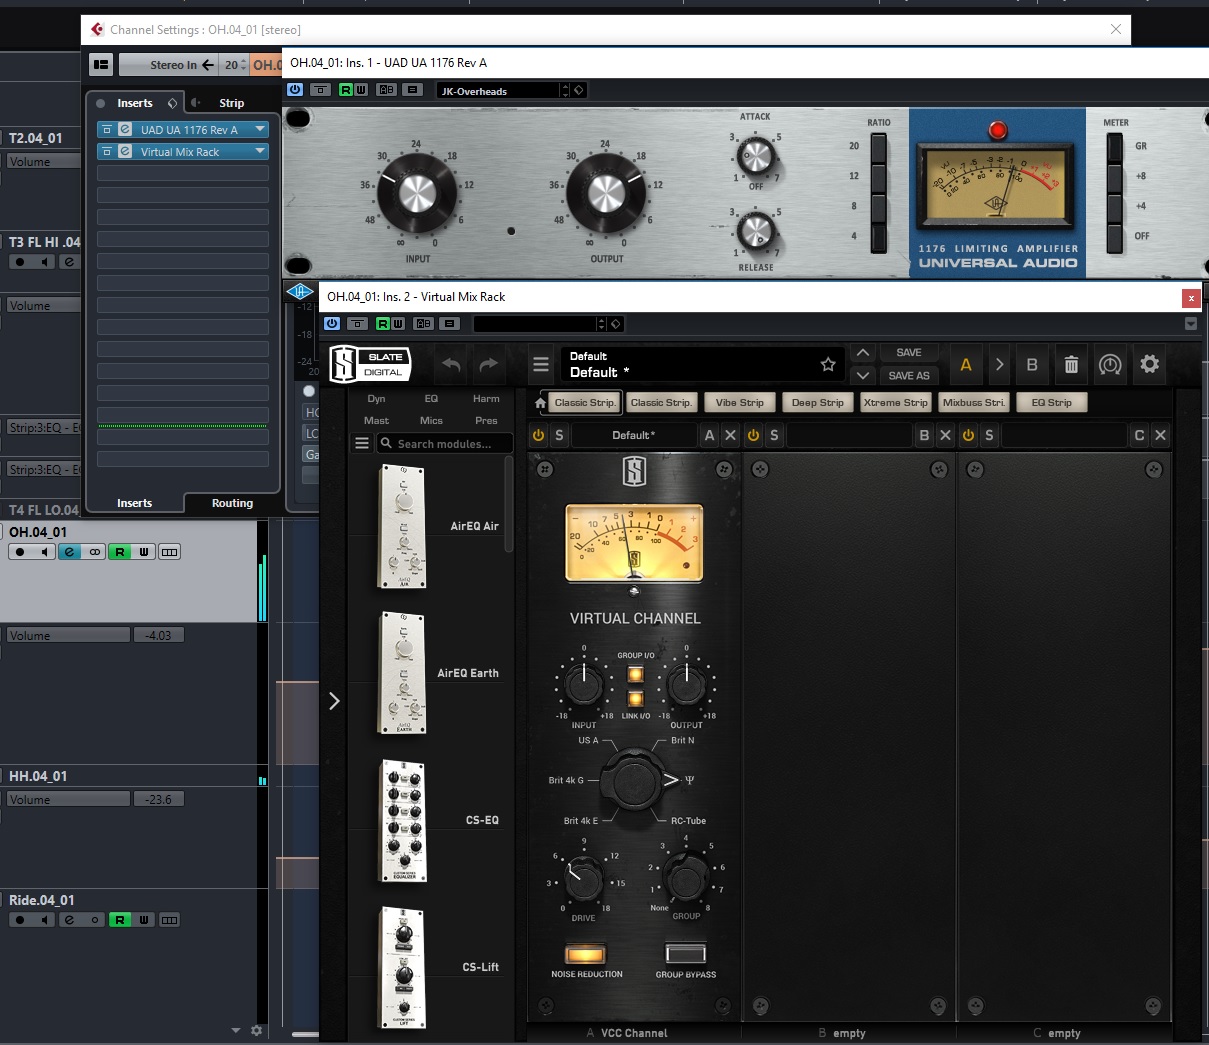
Overheads – Overview
Overheads – Inserts
Overheads were just one stereo track, and I didn’t do much with them. They sounded like they were already EQ’d when recorded, as there was no low bass or subs on the track. I didn’t feel like they needed any additional EQ, so I only processed them with some subtle compression from the UAD 1176 compressor plugin, along with the Trident style console emulation plugin. Plenty of automation to ride them up and down in the song, mostly bringing them DOWN during really loud sections to keep the heavy cymbal playing from taking over the whole mix.
DRUMS ROOM
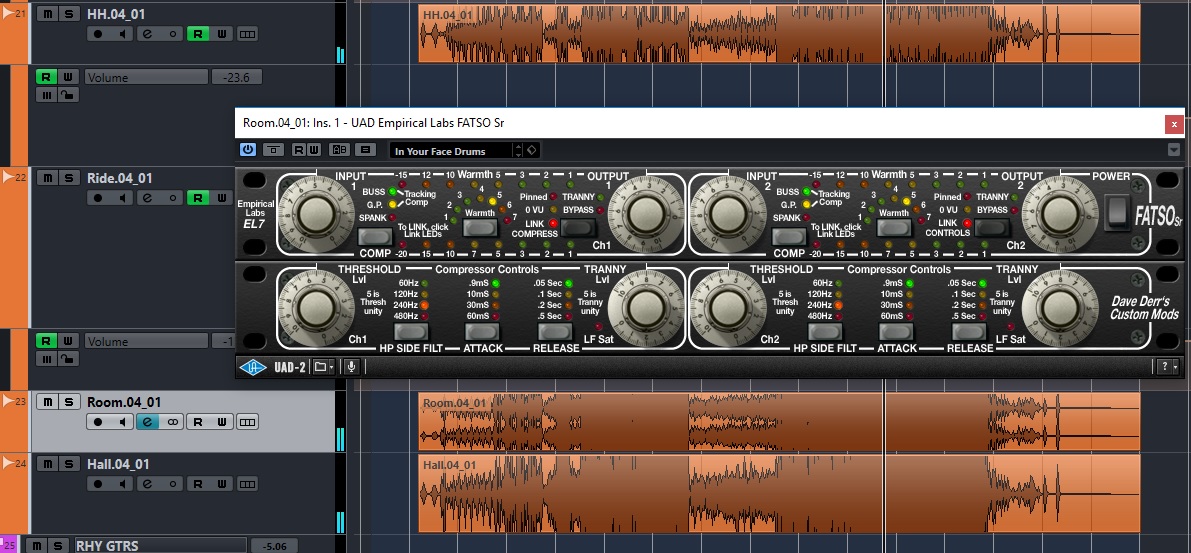
Drums Room – Insert
I was provided a stereo Drums Room track, along with a mono “Hall” track. I didn’t use much of the Hall track at all. The Room track wasn’t very spacious or all that “roomy”, but probably more of an out front pair of microphones. It sounded like it had already been EQ’d and processed, so I added just a bit more color with the UAD Fatso plugin, and blended it fairly low in the mix. I used the Abbey Road Plates plugin for a bit more traditional verb for the drums (see below).
DRUMS MASTER BUSS & VERB
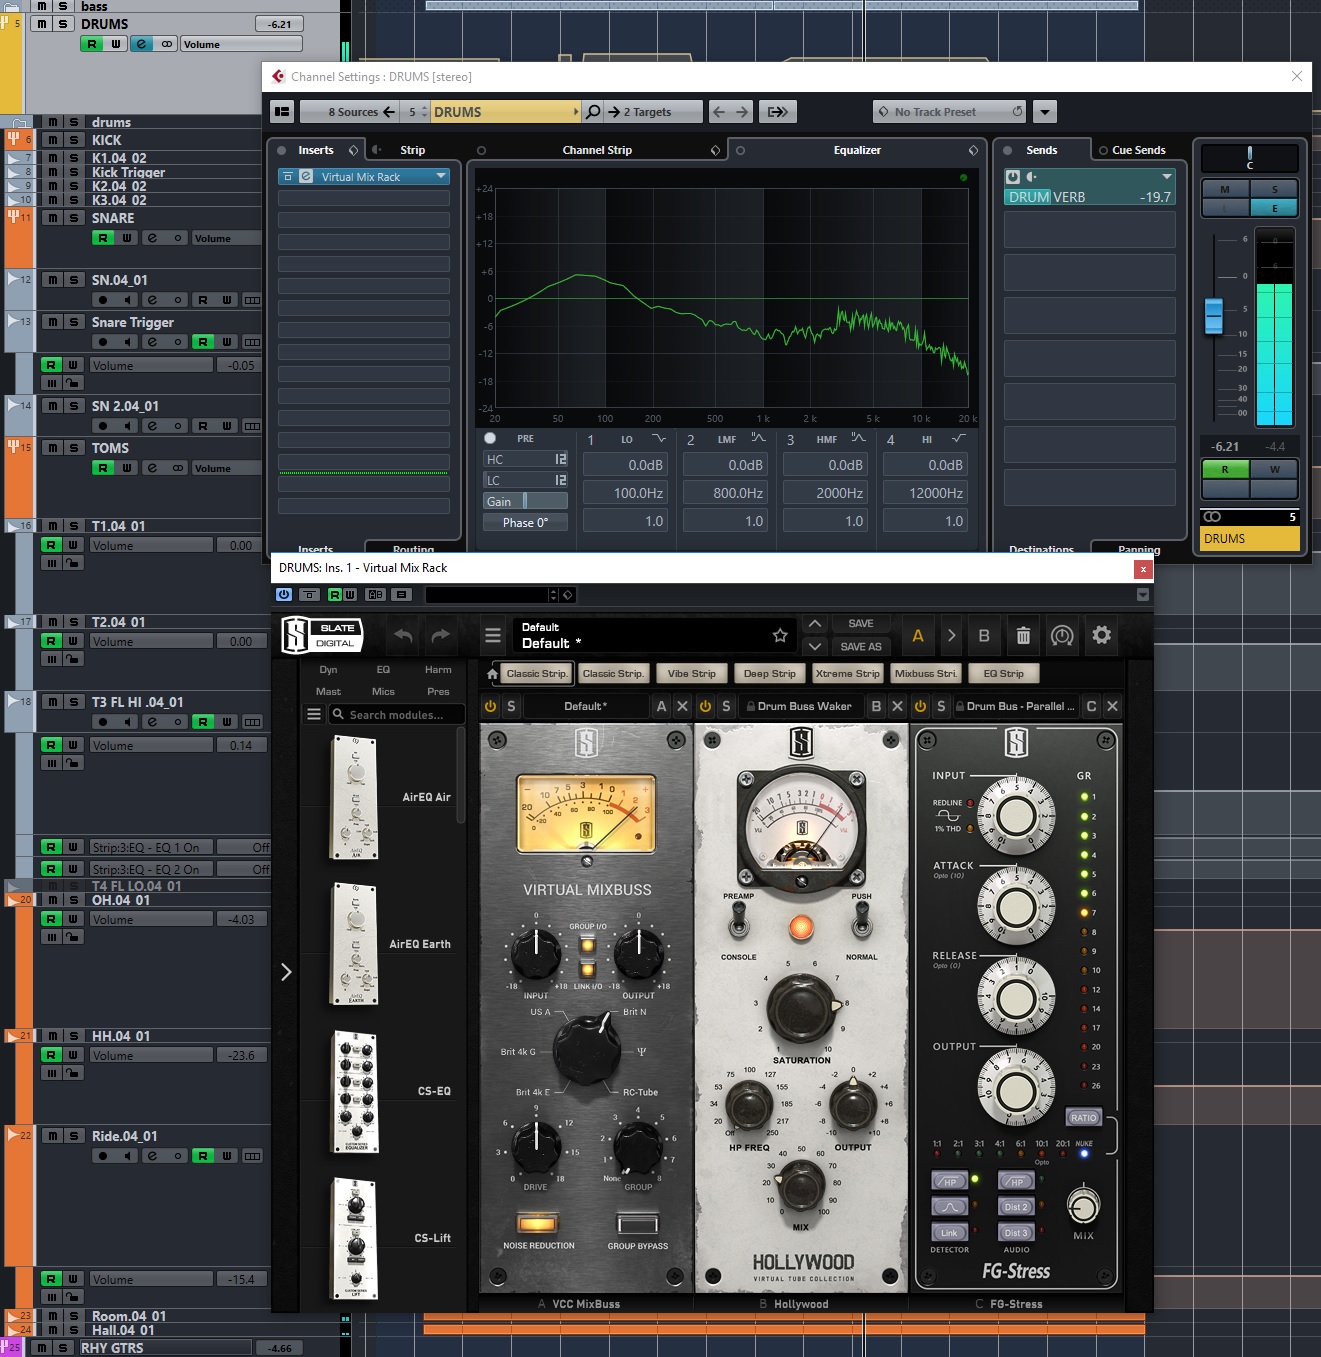
Drums Buss-Inserts
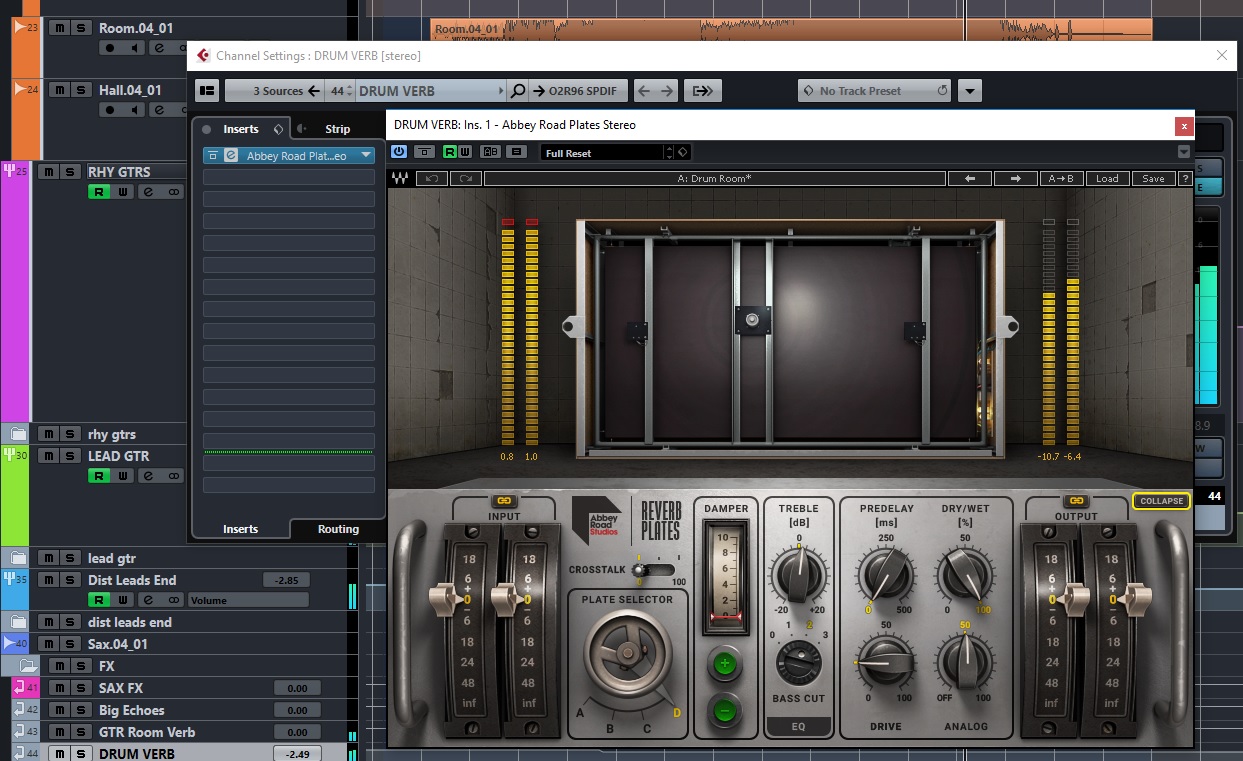
Drums Verb
As with most of my mixing projects, all the above drum group channels and any remaining individual channels, were routed to a master DRUMS group channel, for a final bit of overall processing. Since I had already done quite a bit of processing on various drum sub-busses, I didn’t do much at all on the master drum buss. On the drums buss, I used the N style mix buss emulation, followed by some Hollywood style tube emulation blended in at only about 25%, and then a small amount of parallel compression with the FG-Stress.
The included “Room” and “Hall” tracks for the drums didn’t quite give me the space I wanted, and they were kept fairly low in the mix. Instead, I put the drums through a bit of the Abbey Roads Plates reverb, set for a very short decay. There was some sent from the drums master buss to give the whole kit a bit of space, and then on the snare and toms busses I sent a bit more of those to the verb.
RHYTHM GUITARS
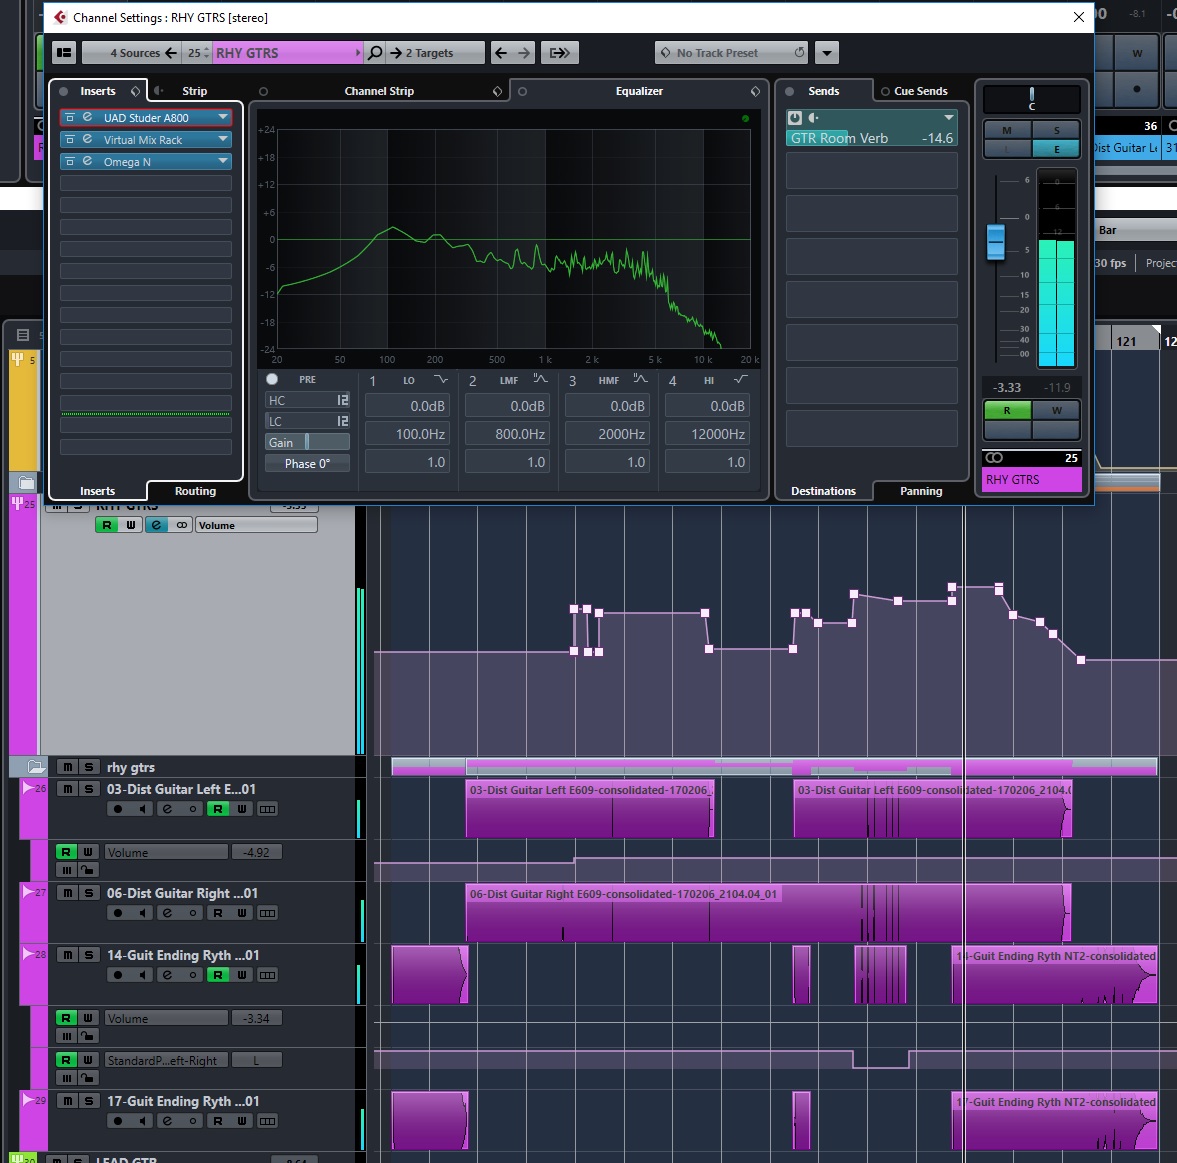
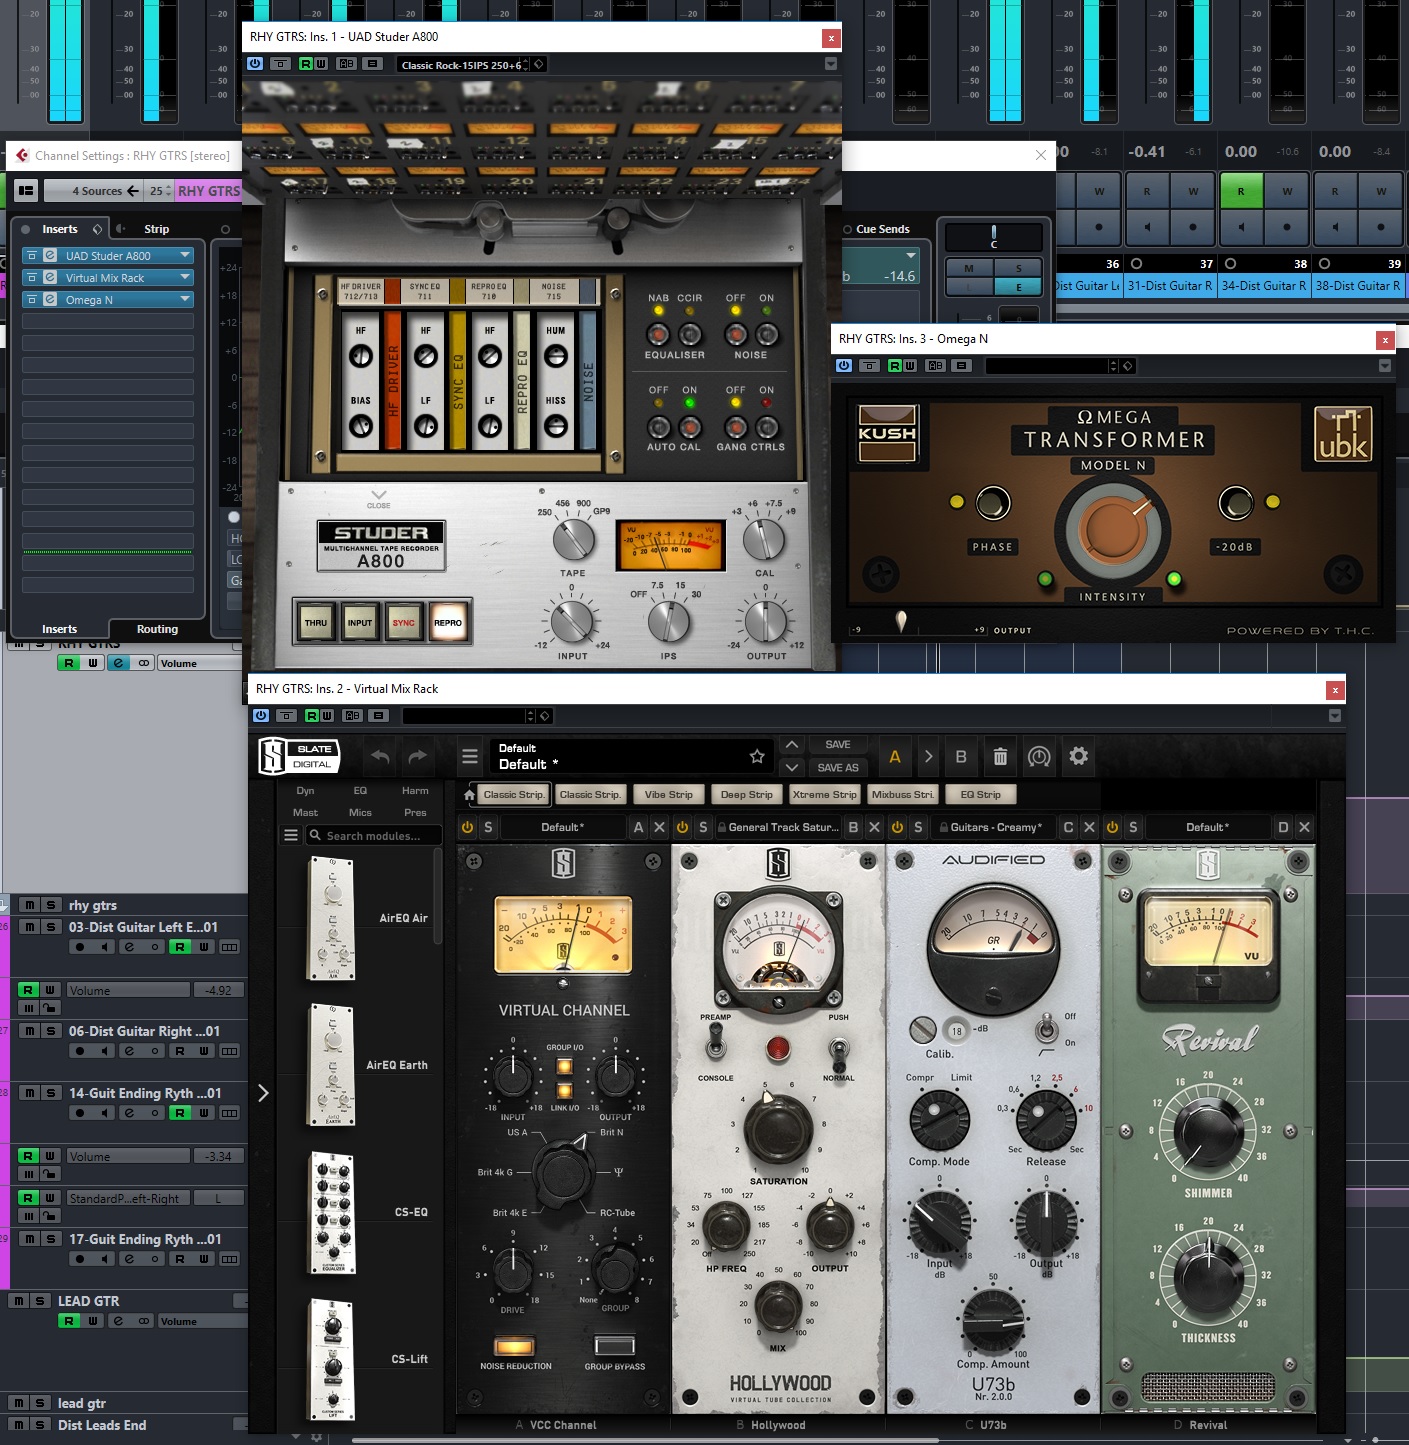
Rhythm Guitars – Overview
Rhythm Guitars – Inserts
There were 4 rhythm guitar parts in the song, all recorded with 2 microphones each, for a total of 8 tracks. I found with most of these if I tried to used both microphones at the same time, there were some weird phase issues that I couldn’t resolve with the normal phase correction techniques and plugins. So, instead, for two of the parts I used one microphone track, and for the other two parts I used the other microphone track. I just picked which ones I thought sounded best for each part. Keeping it to just one microphone per part gave a simpler sound that was easier to work with. All 4 parts were routed to the RHY GTRS buss, which had the only processing on it, and also what I used for most of the automation. I adjusted some clip gains and did a little bit of volume and panning automation on some of the individual tracks, but most of the volume work was handled on the group buss. For inserts, the main thing I wanted to achieve was to get the tone a bit more full, with more warmth and body. To achieve that, I first went through the Studer A800 tape emulation, set for more of a classic rock style. I followed that with the virtual mix rack that contains my favorite Brit N console emulation, then some Hollywood tube saturation, a touch of overall compression with the U73b, and then some more “Thickness” with the Revival plugin. After that, I ran through one of my new favorites, the Omega Transformer model N plugin from Kush/ubk. All that seemed to really help warm up and fatten those rhythm tracks. A touch of room reverb was added with a Guitar Verb I set up on an FX chain and used for most of the guitars.
LEAD GUITARS
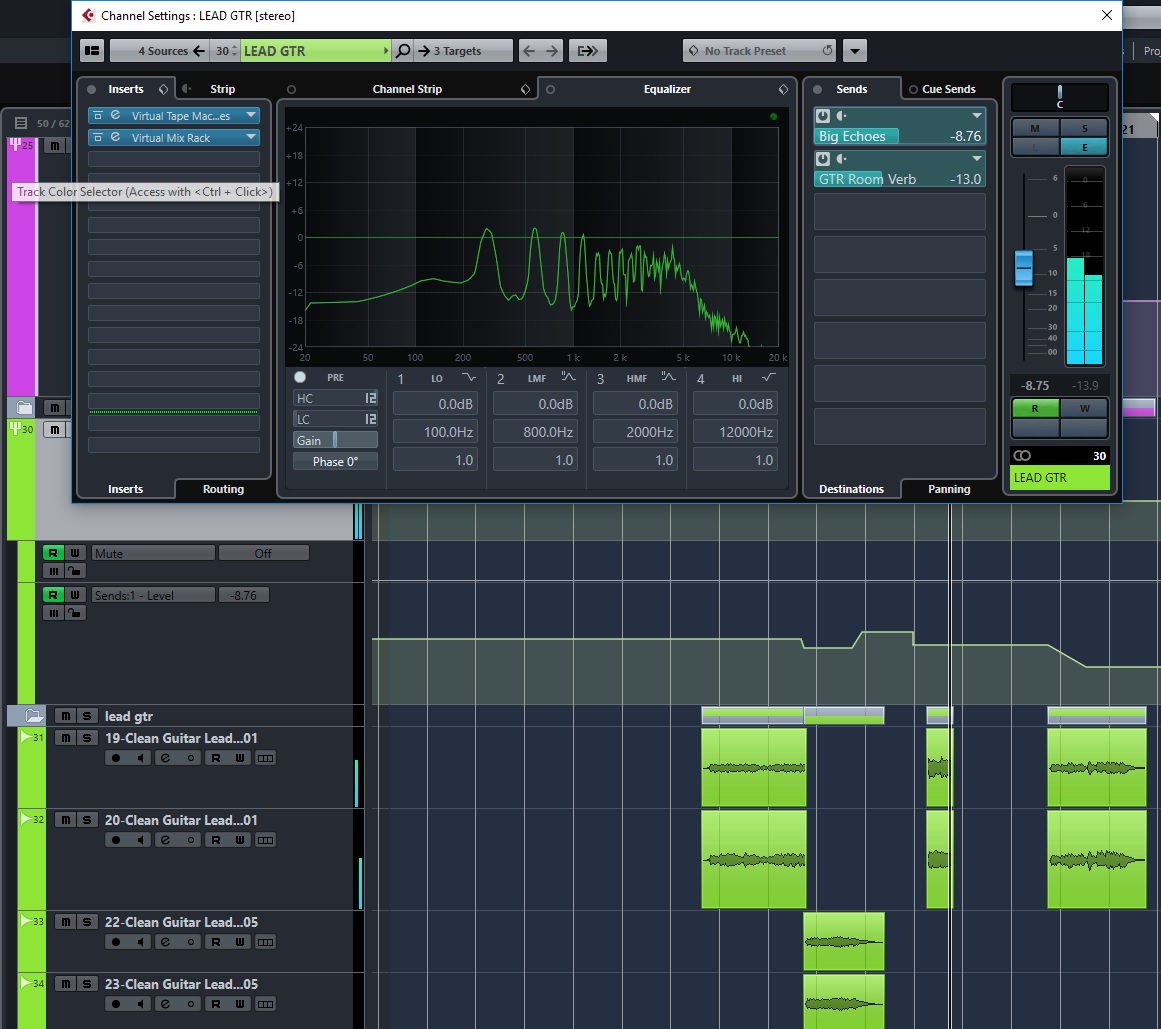
Lead Guitars – Overview
Lead Guitars – Inserts
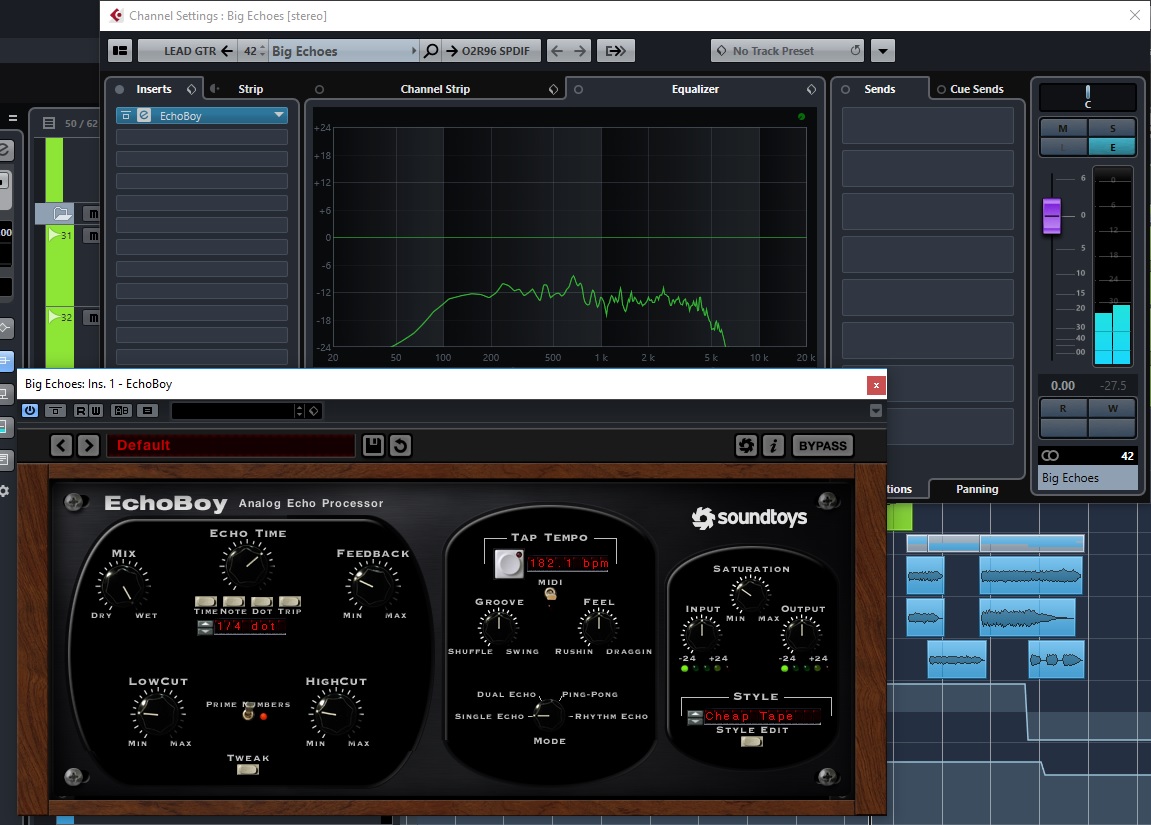
Lead Guitars – Big Echo FX
There were 4 tracks used for the Lead Guitars, but just two parts with 2 microphones each. The second part was really just an overlap. Nothing difficult with these. The tone and playing was all good. Just a bit of overall volume automation for the different sections. Inserts were some virtual tape emulation, plus Brit N console, some Hollywood Tube saturation, and modest compression (blended at about 75%) with the U73b. Effects were the same room style Guitar Verb I had on the other guitars, plus a “Big Echo” effect from EchoBoy, with the send level automated to keep it low in the mix blend for the various sections (used more for additional space/ambiance than discrete echoes).
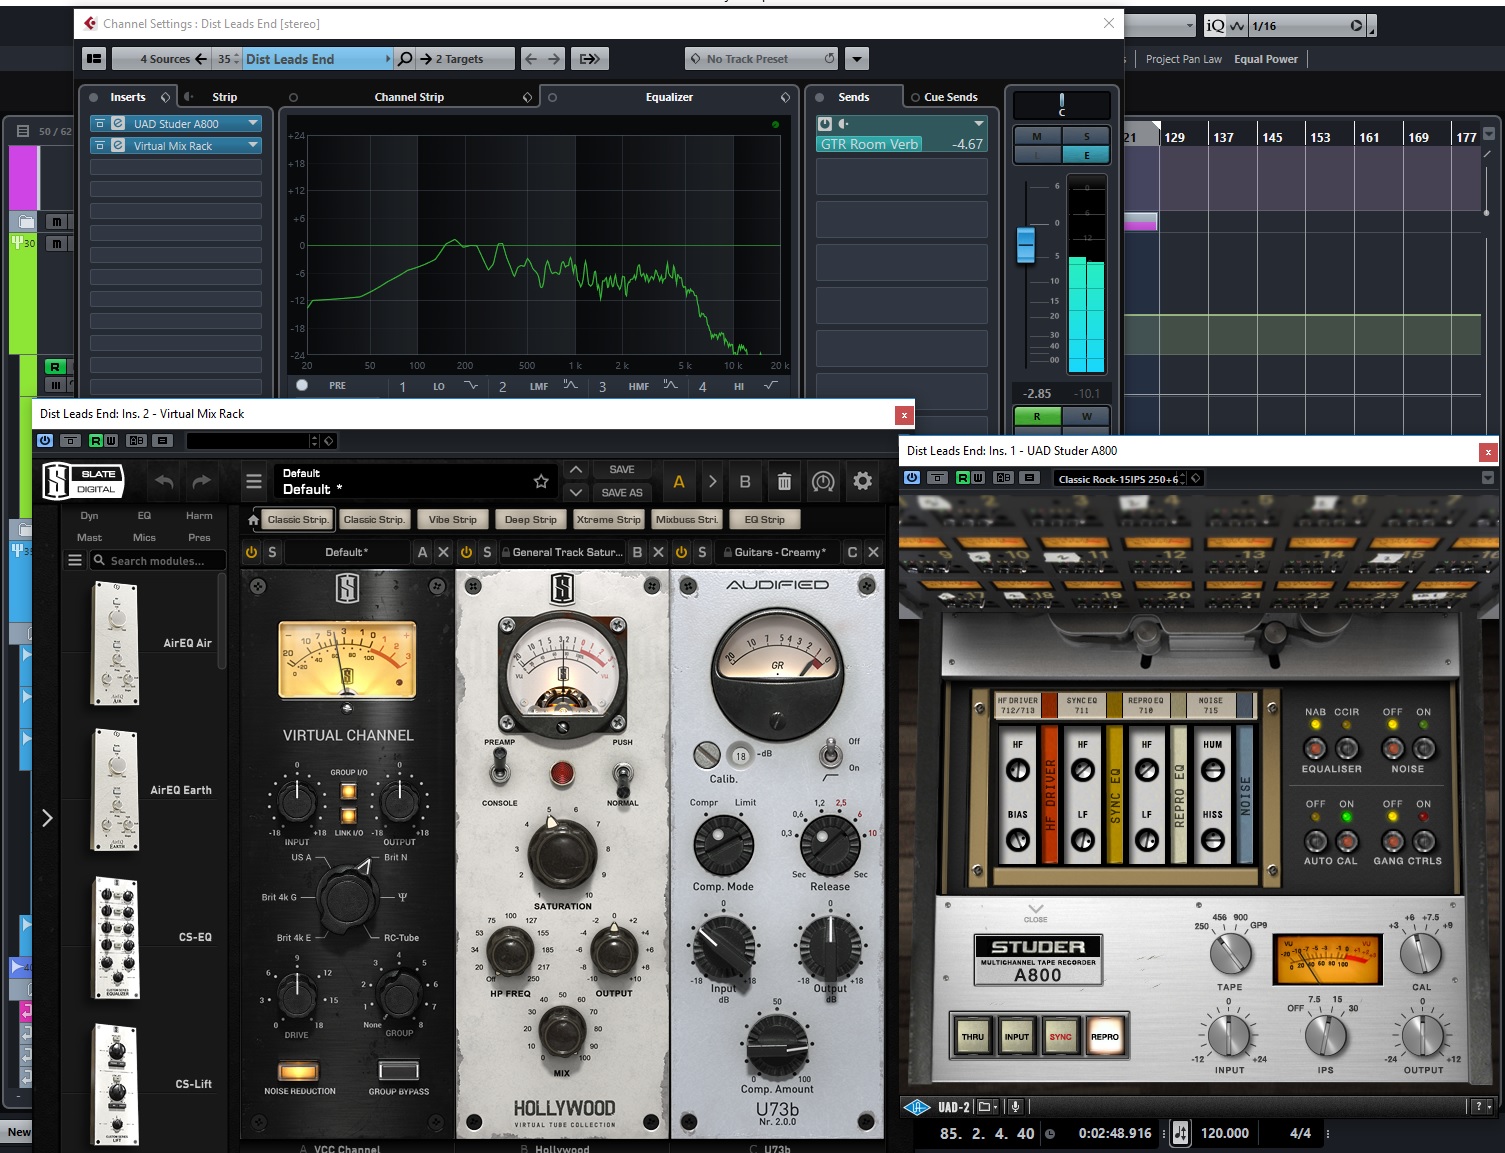
DIST LEADS END
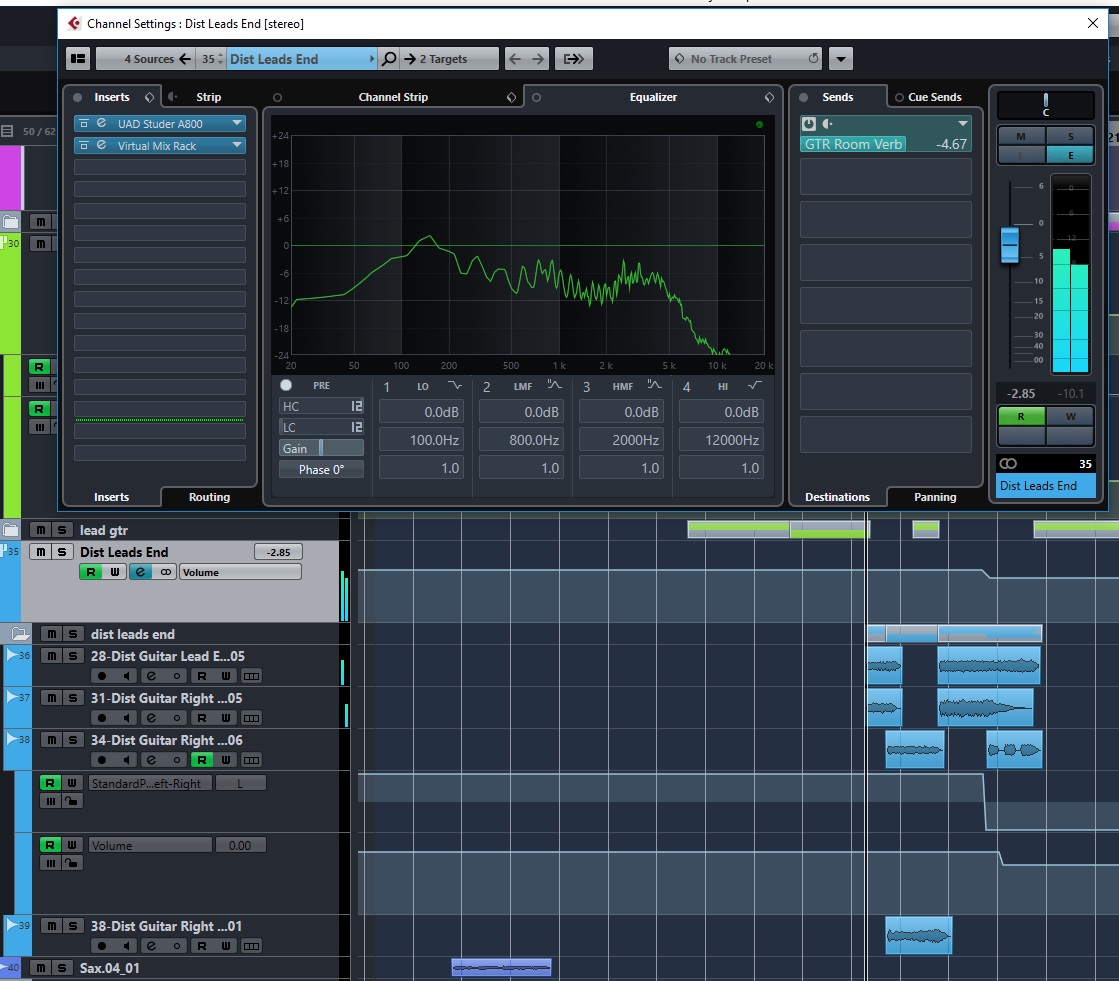
Dist Leads End – Overview
Dist Leads End-Inserts
There were another 4 tracks of Lead Guitars near the end of the song, that they had titled Dist Leads End. These were processed almost exactly the same as the other Lead Guitars group, minus the big echo effect.
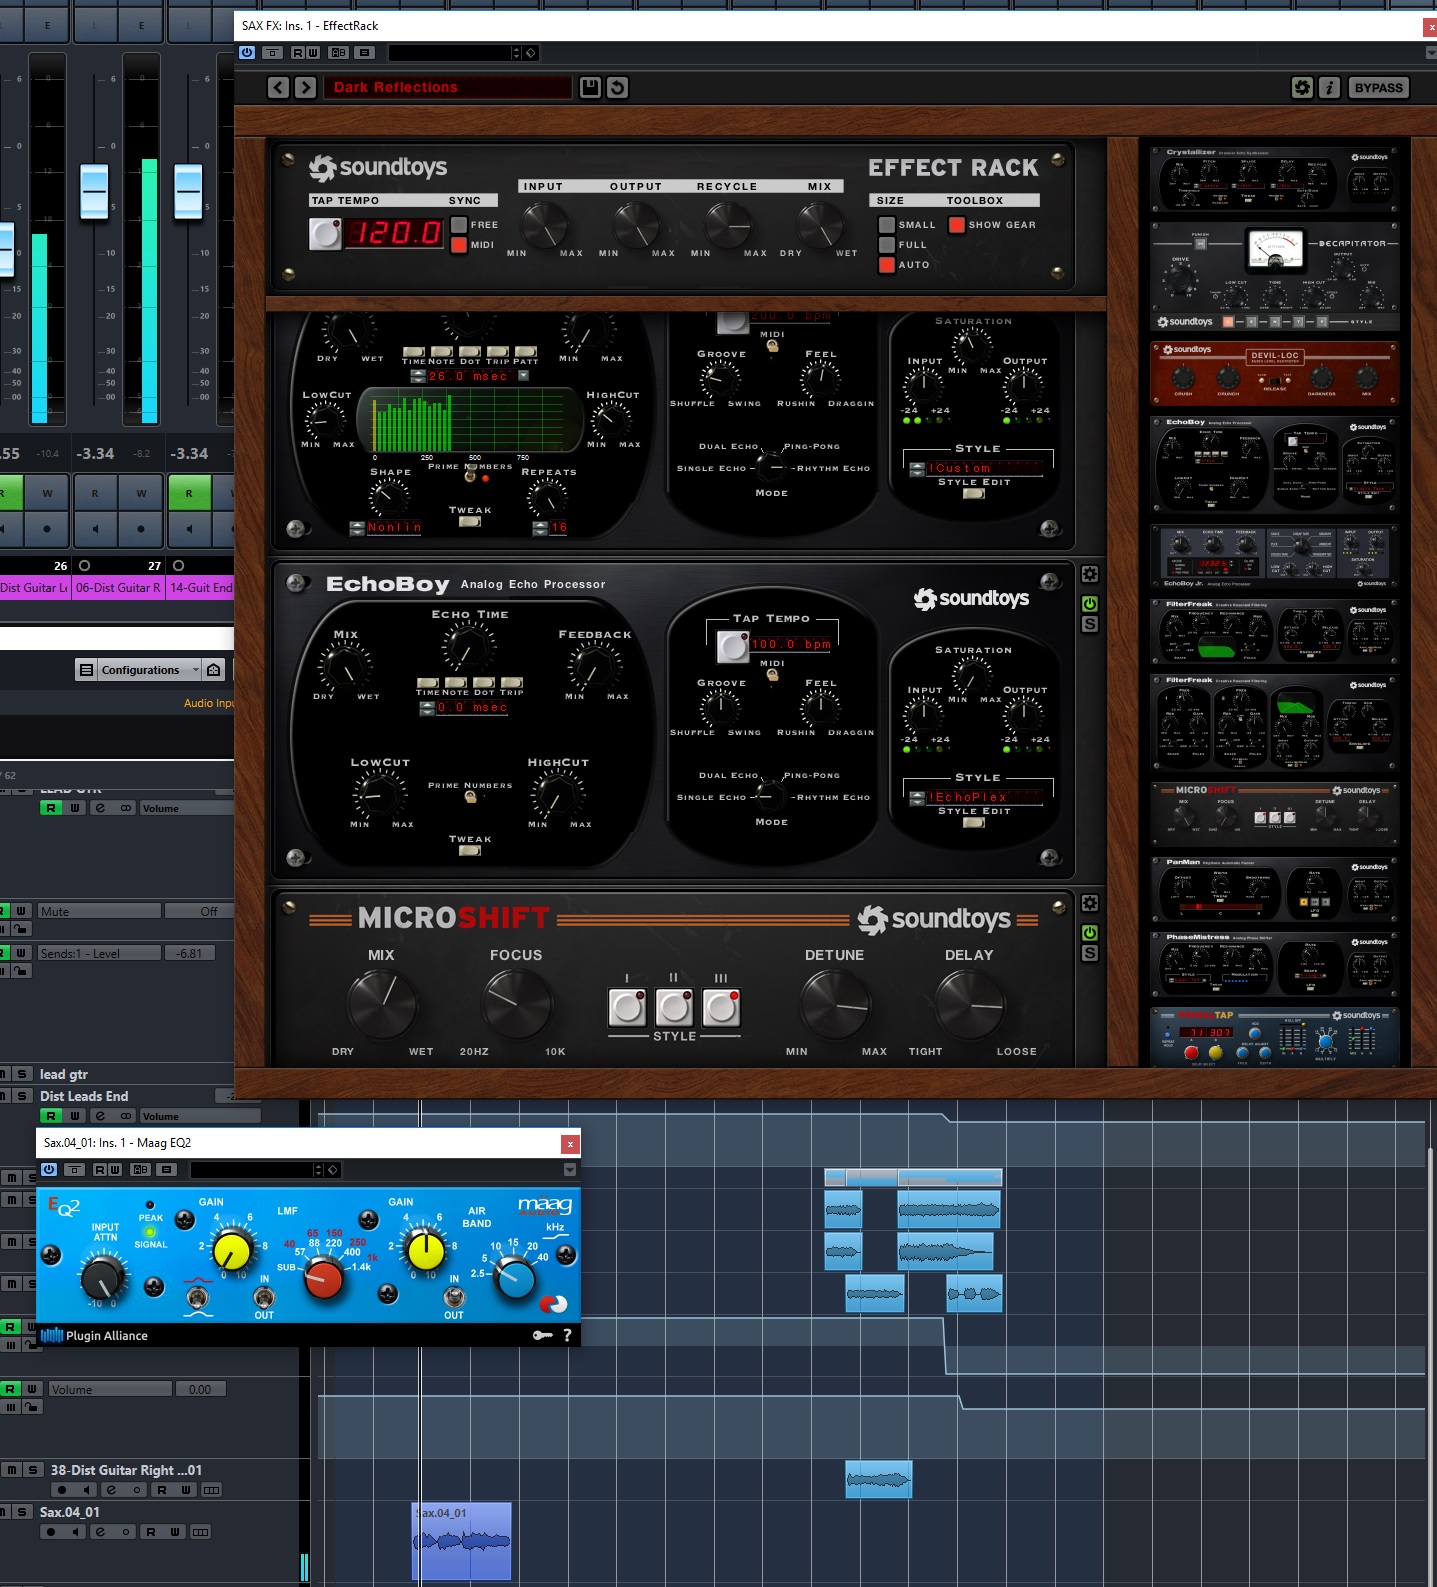
SAX
Sax – Insert and FX
There was a short sax part near the beginning of the song. It sounded fairly good on its own, but seemed a bit to dark. So, the only insert I used on it was the Maag EQ plugin to dial in some high frequencies and “air”. I then used the SoundToys Effect Rack plugin to chain together several SoundToys plugins to get the effects I wanted for the sax. It’s a couple of EchoBoy instances set up more for a type of reverb/space feel than discrete echoes again, and then a bit of Microshift blended in at just over 50% to widen those effects out a bit in the stereo spread.
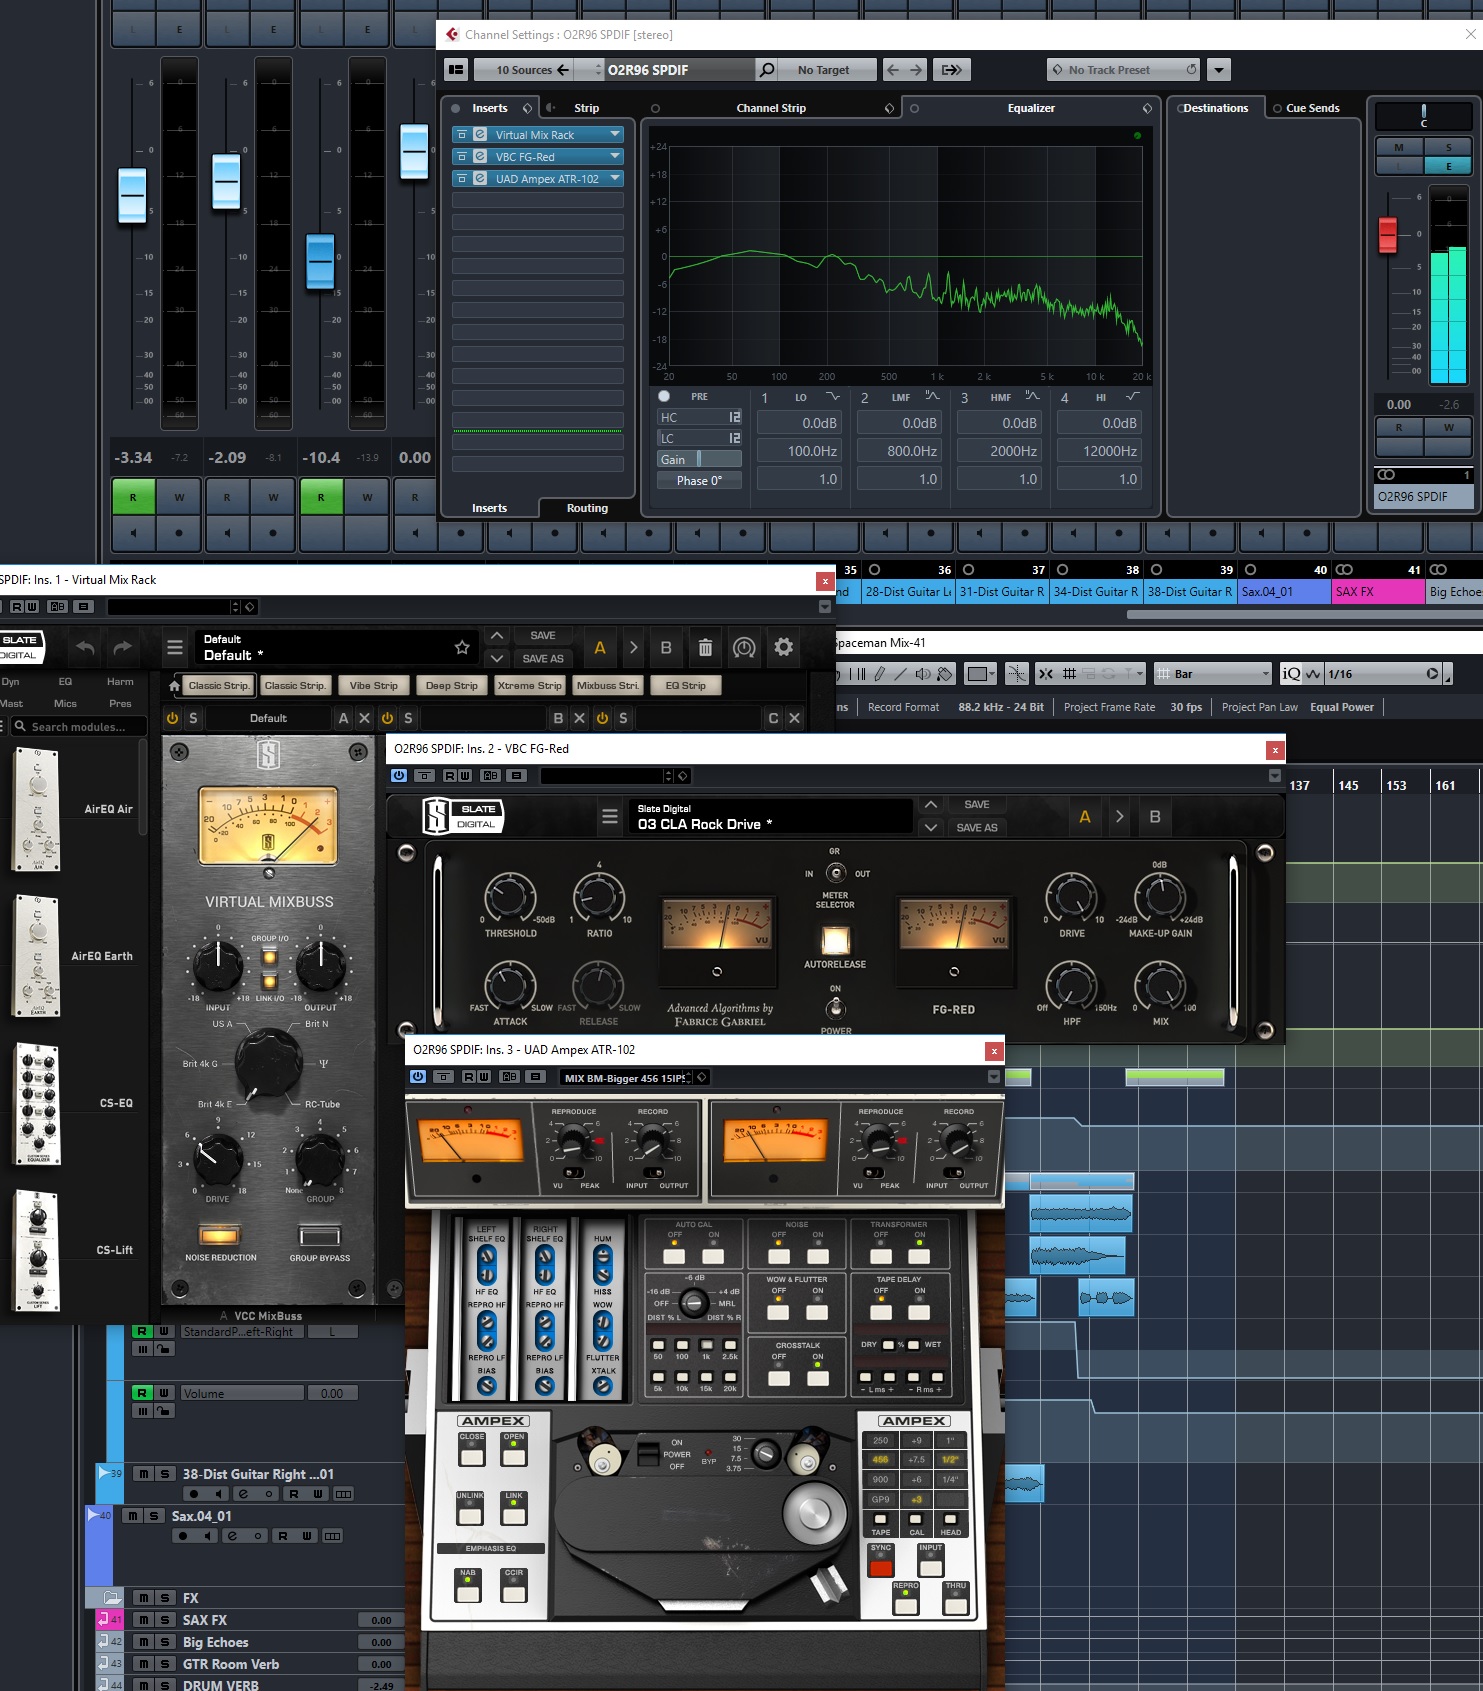
MIX BUSS
Mix Buss -Inserts
On the overall Mix Buss, I used some Virtual Mix Buss console emulation, with the Brit 4K style, then some light overall compression with the VBC FG-Red compressor, and followed it all with the UAD Ampex ATR-102 tape emulation. Nothing drastic, just some overall “glue” for the mix. Some people are afraid of mixing with compression on the mix buss, or think that all of that should be saved for mastering. However, many mixing engineers use processing on the master buss, myself included. As long as you get it set up fairly early in the process, so that you are “mixing into” the compressor, and you aren’t trying to achieve final mastering loudness type levels, or overdoing the compression, then there should be no problems and it’s a very common practice (one that I use for almost every mix). I always keep my fairly subtle, whether I’m using plugins, or even when running out through my analog hardware API 2500.