
She Don’t Love Me by Backbeat Underground
Free Mix Winner #4
I actually did this mix for one of the band members of Backbeat Underground in June of 2017, but then I got super busy (do we detect a pattern here?) and didn’t have time to post this until early 2018. But, then SoundCloud blocked me from posting it on my free mix playlist there because the band had already posted their own version of the mix (although they gave me permission, and they tried to clear it with SoundCloud, I guess it was too late). So, I ended up sitting on this a few more months, and decided I’m just going to abandon posting things on SoundCloud from now on, and will just post on my own server with my own music player. Finally posting this and screen shots now in April 2018.
This was a challenging mix, but not because of the quality of the recorded tracks, or a busy arrangement, or anything like that. Rather, this was a challenge for my aging DAW system to handle. My DAW computer was almost 7 years old at the time I got this project to mix, and the project was recorded at 96K sample rate, meaning every plugin I wanted to use needed over twice the processing power than when used during a typical 44.1K (CD quality) project. In addition, we were going for a kind of lo-fi, gritty, sound with lots of subtle distortions, and I was trying out a lot of the very new Slate Digital tube/console emulation plugins, which by themselves are fairly processor intensive. Plugins have gotten much much better at modeling analog gear and non-linear distortions and artifacts, but all this modeling requires a lot of processing power! I kept maxing out both my CPU as well as my UAD-2 Quad processor card. The only way I was able to get this mix finished, using the type of processing I wanted to use on it, was to use the Freeze function in Cubase on a lot of individual tracks, as well as do a bunch of pre-rendering (exports) on my group tracks.
Now that I have finally upgraded to a new, much more powerful DAW, I was able to open up earlier versions of the project before I rendered the Group busses, and unfreeze tracks, and get screen shots of everything I used. The new DAW can handle it all at once without breaking too much of a sweat.
So, let’s go through the tracks and groups and take a look at what I did for this mix:
BASS
BASS Group Inserts
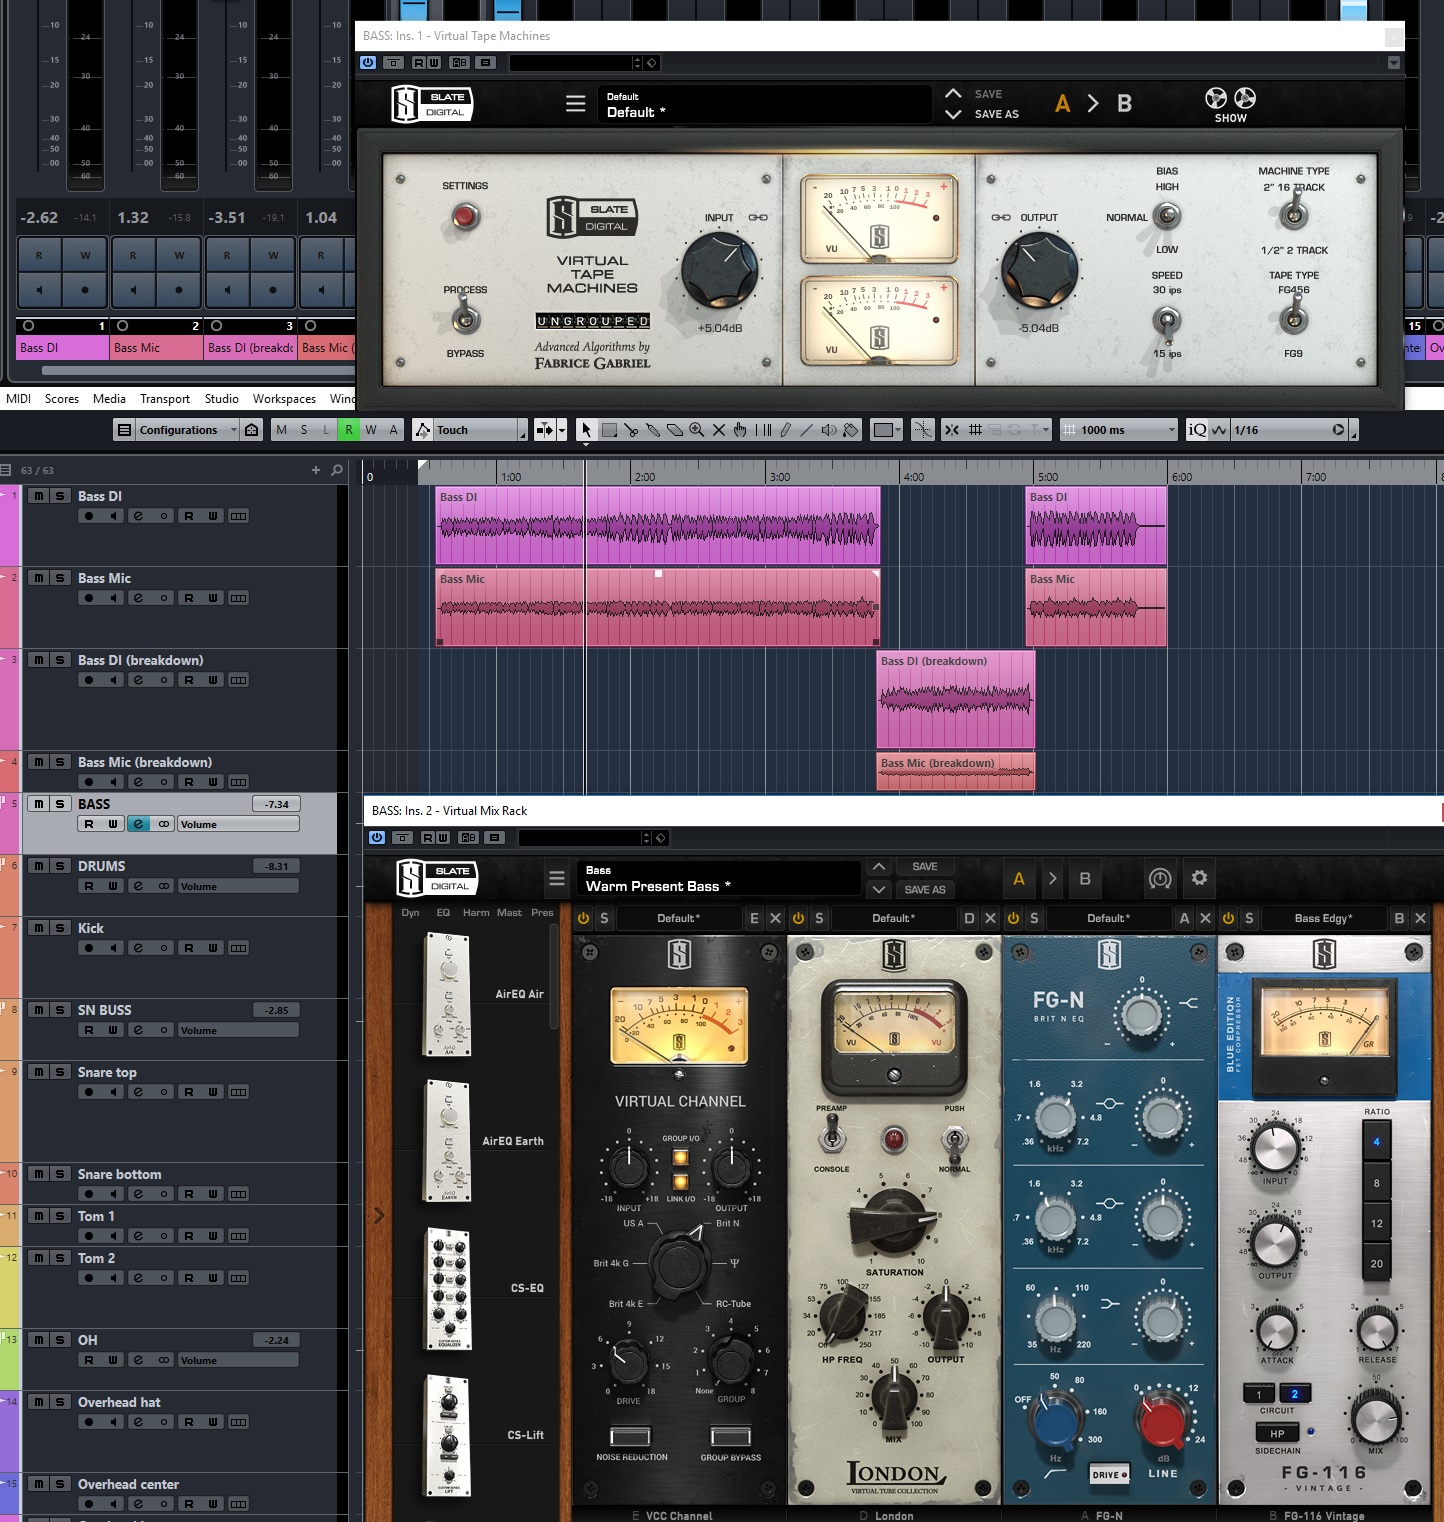
I was given DI and Mic tracks for the bass, with the breakdown section on separate tracks. I didn’t process the tracks individually, but got a good blend, and routed them to a Bass group channel and did all my processing on that group channel. Nothing too heavy on the inserts processing for the bass. A bit of tape emulation first, followed by the Slate Virtual Mix Rack filled with a channel emulation, the “London” virtual tube emulation (blended in at 50%), some subtle EQ, and very light compression.
DRUMS
Kick Drum
Kick Drum Inserts
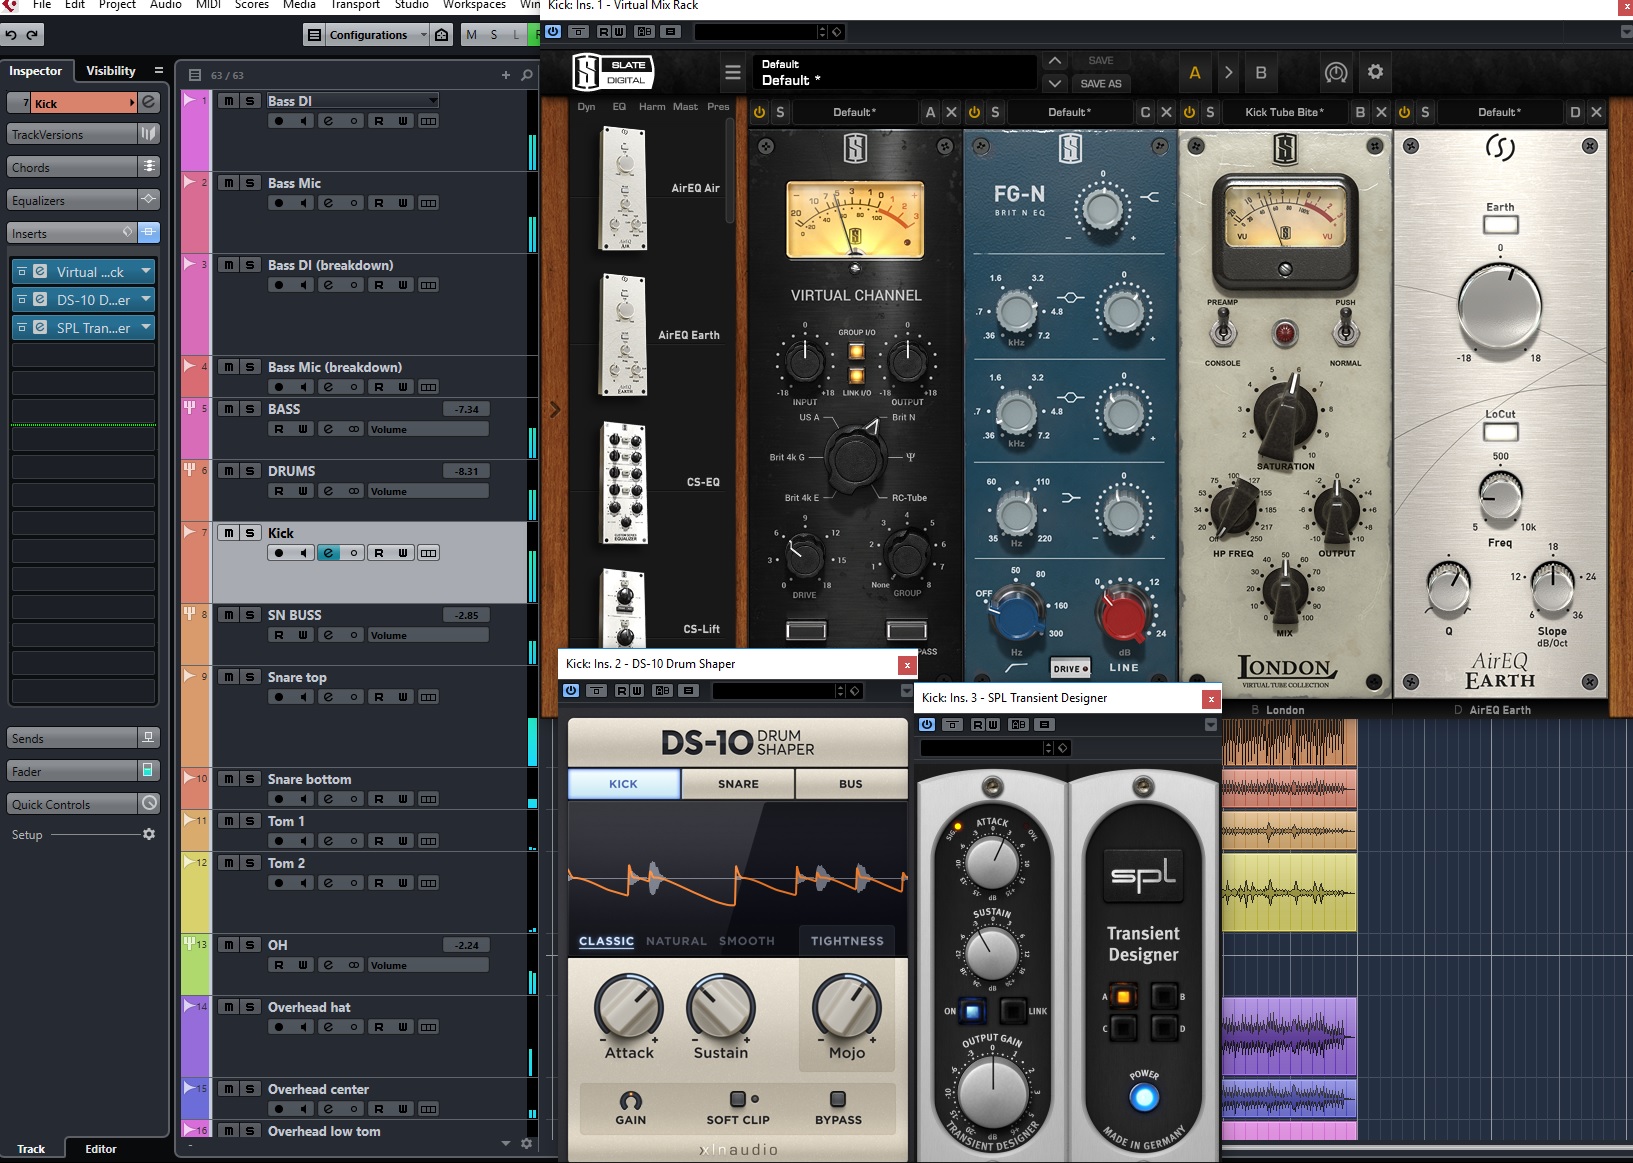
Kick drum was just one audio track, and I did a decent amount of processing on it to get the sound I was after. I used the Virtual Mix Rack with the “Brit N” emulation, which gives the low end a bit more thickness. Followed by a bit of “N” style EQ to remove some low mids and bring out the attack frequencies a bit. Then, a bit of tube love blended in parallel. Finally, a technique I like to use often to really bring out the chest thump lows of a kick drum, while simultaneously getting rid of the deep sub rumble that I don’t want, is to put a resonant filter on it. Slate’s AirEQ Earth module has a nice Earth control at top that give a nice overall low end type of boost, but the fun is with the resonant LoCut filter. You can really fine tune the resonance, Q, along with the slope and the frequency controls to get just the right amount of “thump” in exactly the right spot for the audio you have to work with. After all that, I ended up using two types of transient shaping plugins to try to get as much attack out of the kick drum as I could (without triggering a sample). I wasn’t going for a metal kick drum sound, by any means, but the drum sound was quite “pillowy” to begin with. I still wanted to have some of that big pillow sound to it, but I needed to get at least a bit of bit out of it for some definition as well.
Snare Drum
Snare Top and Bottom Inserts
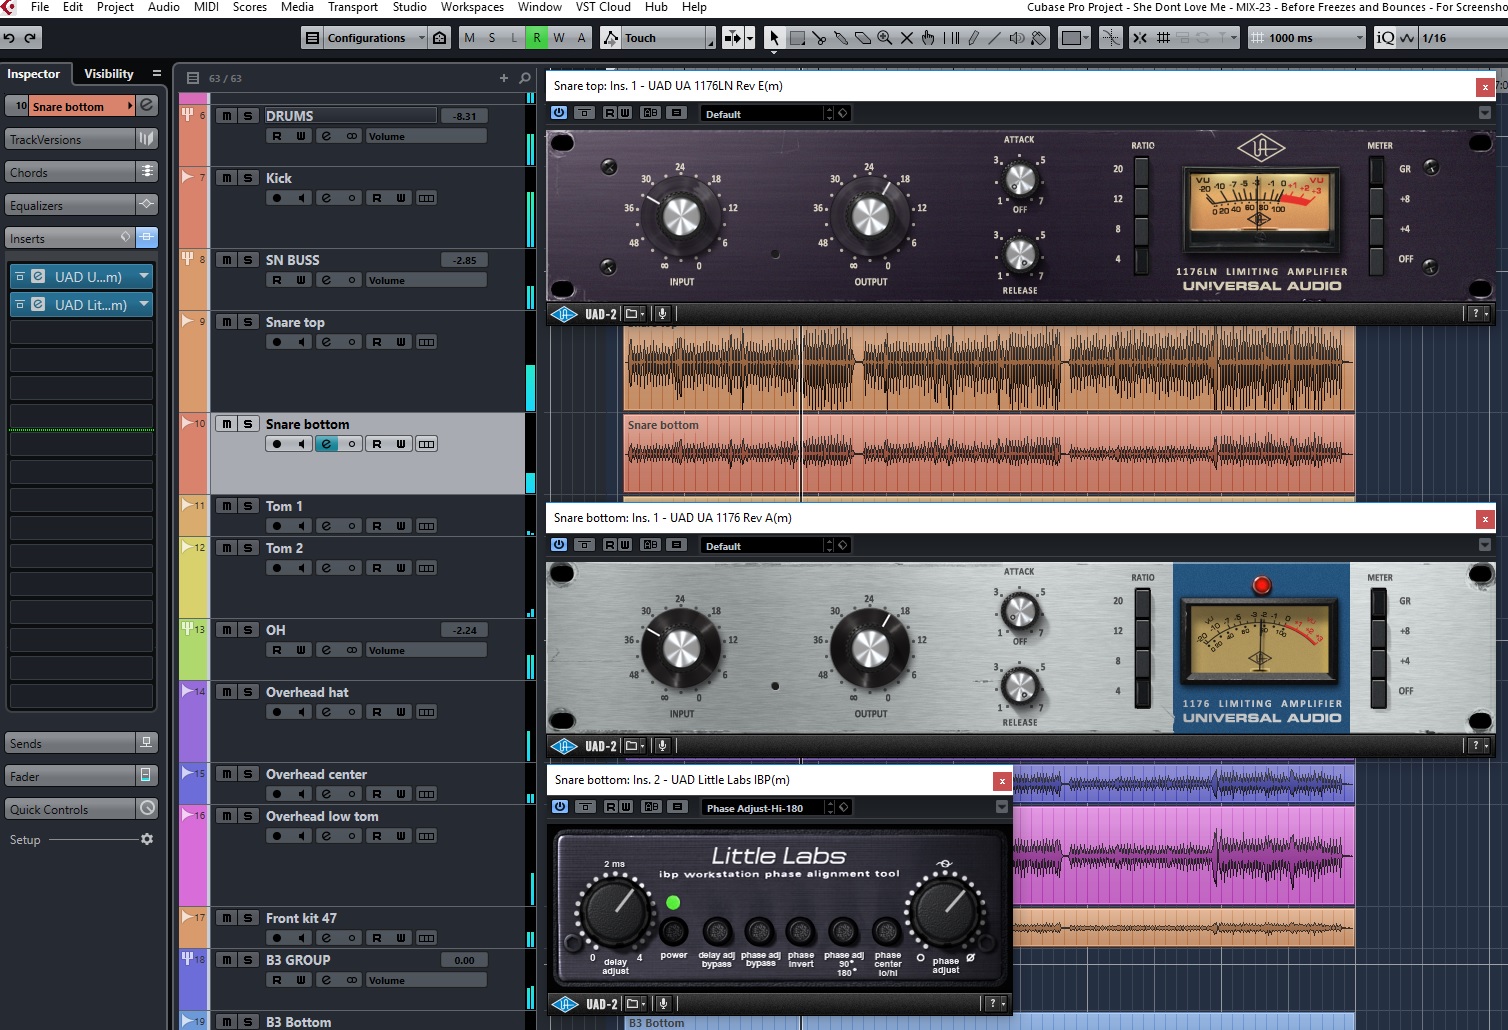
I was given a top and bottom audio track for the snare drum. On the top snare track, I put a UAD 1176 compressor emulation. On the bottom snare track I used a slightly different UAD 1176 emulation, and also used the IBP plugin (In Between Phase), to help phase align the two tracks better.
Snare Buss
Snare Buss inserts
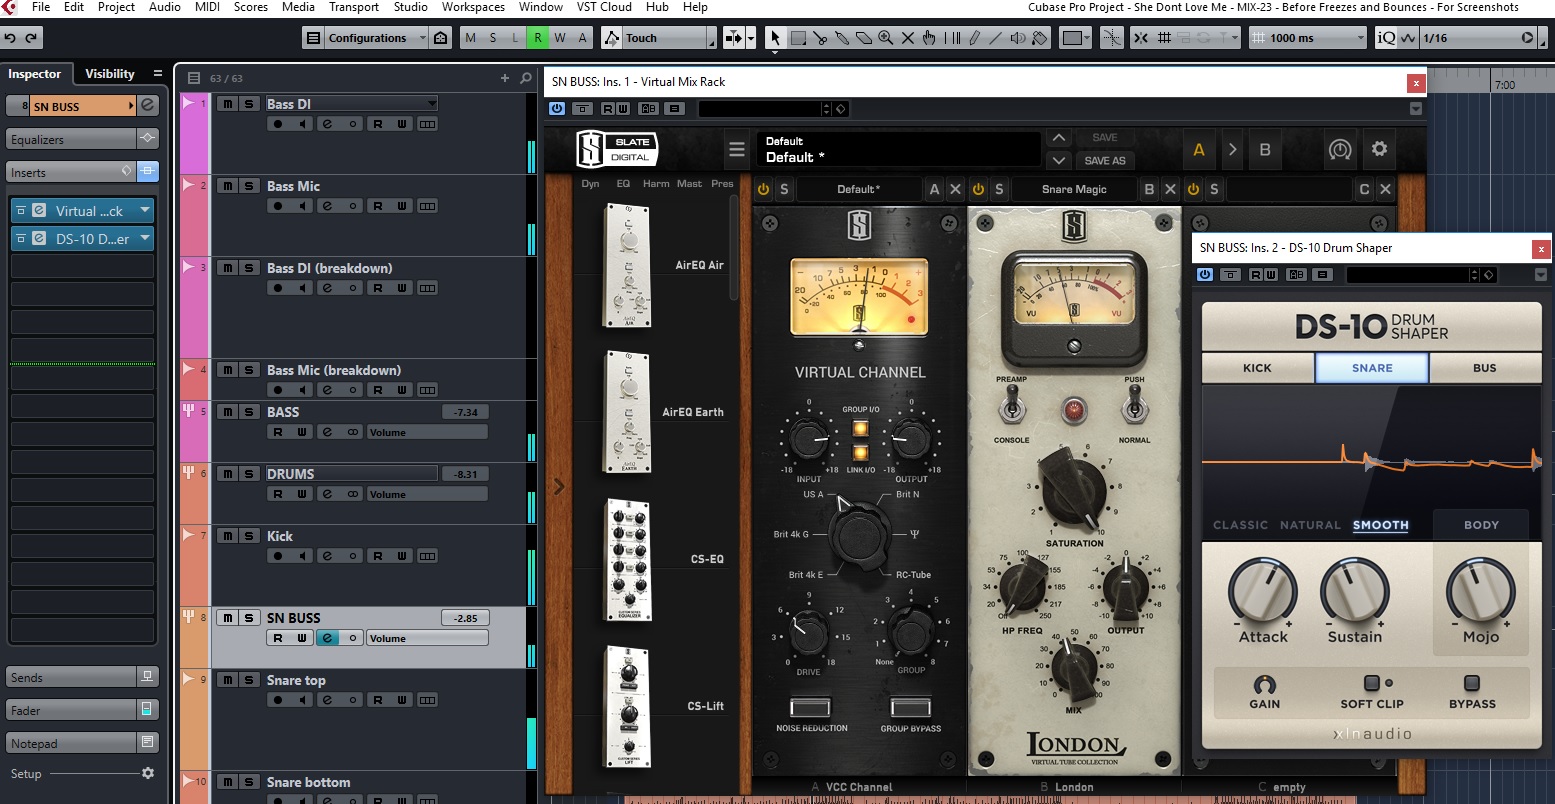
The two snare tracks were then routed to my Snare Buss, which has the console emulation, tube emulation, and the DS-10 drum shaper on it. Nothing drastic here. Just a touch of tube blended in, and a bit more attack and a bit less sustain from the shaper.
Toms
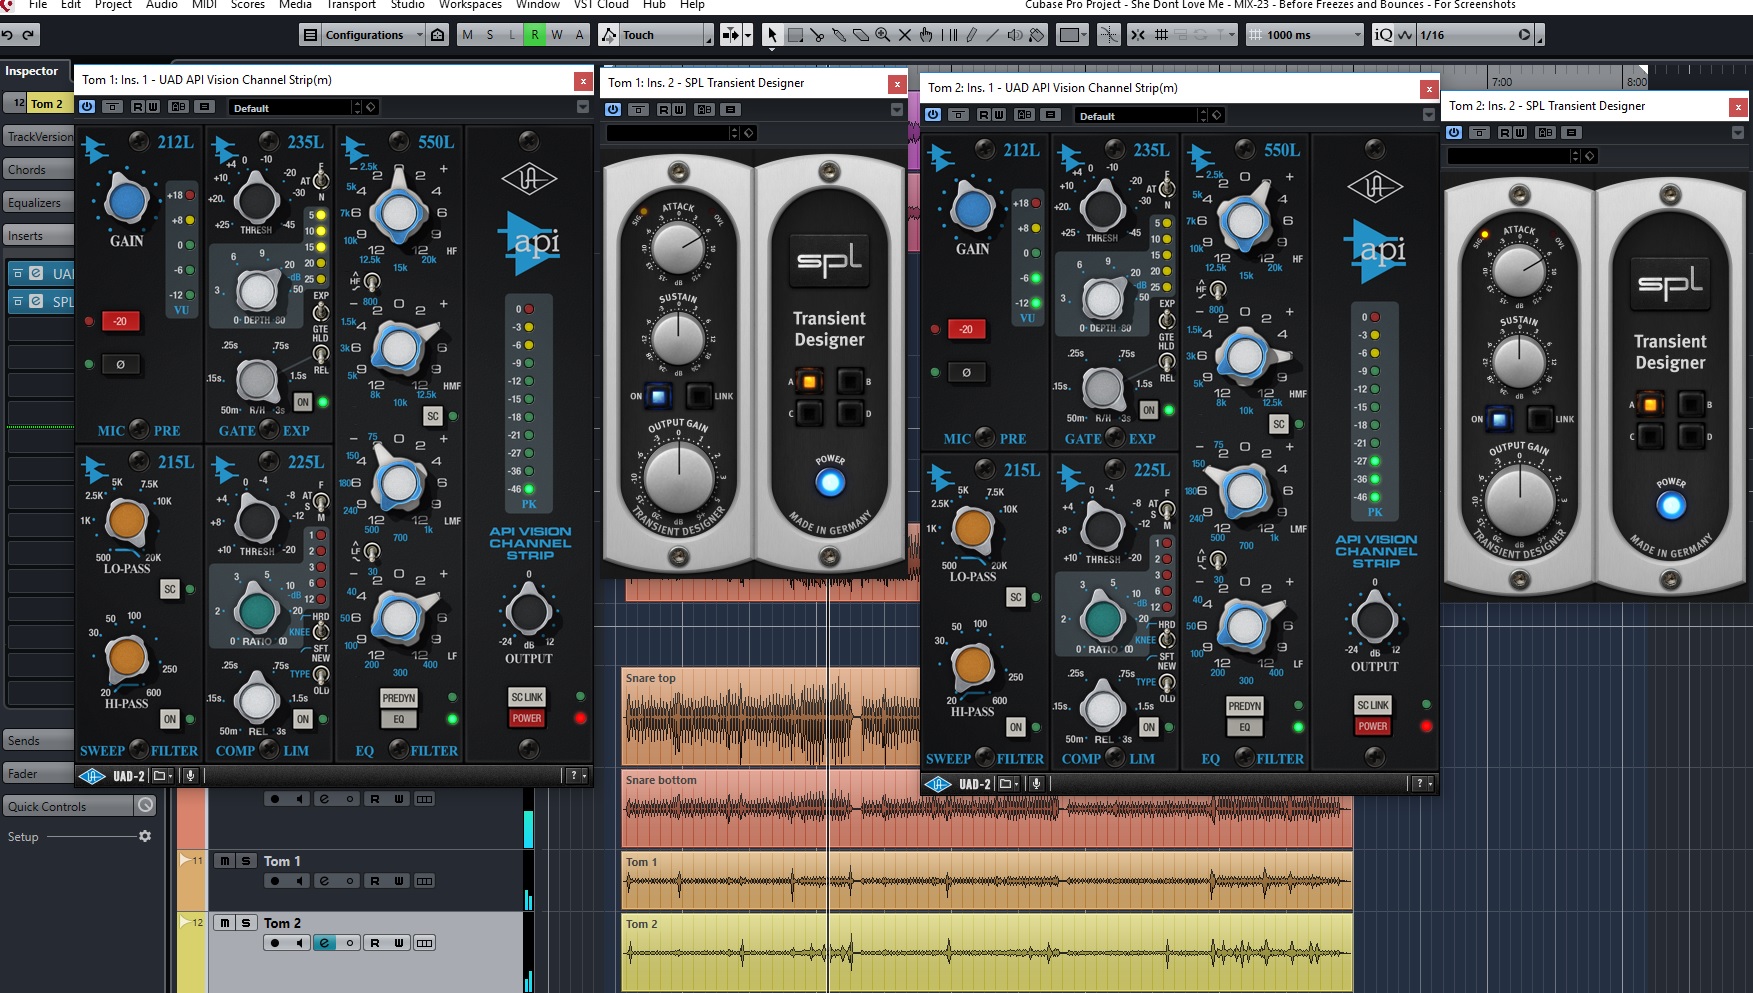
Tom 1 and Tom 2 Inserts
There were just two Tom tracks, and I used the same insert chain on both, with just slightly different EQ settings. I used the UAD API Vision channel strip, but only the gate and the EQ sections. The gates were set as expanders to just reduce the bleed levels between tom hits, without completely turning off the tracks. Transient Designers were used on both toms to get a bit more attack as well.
Overheads
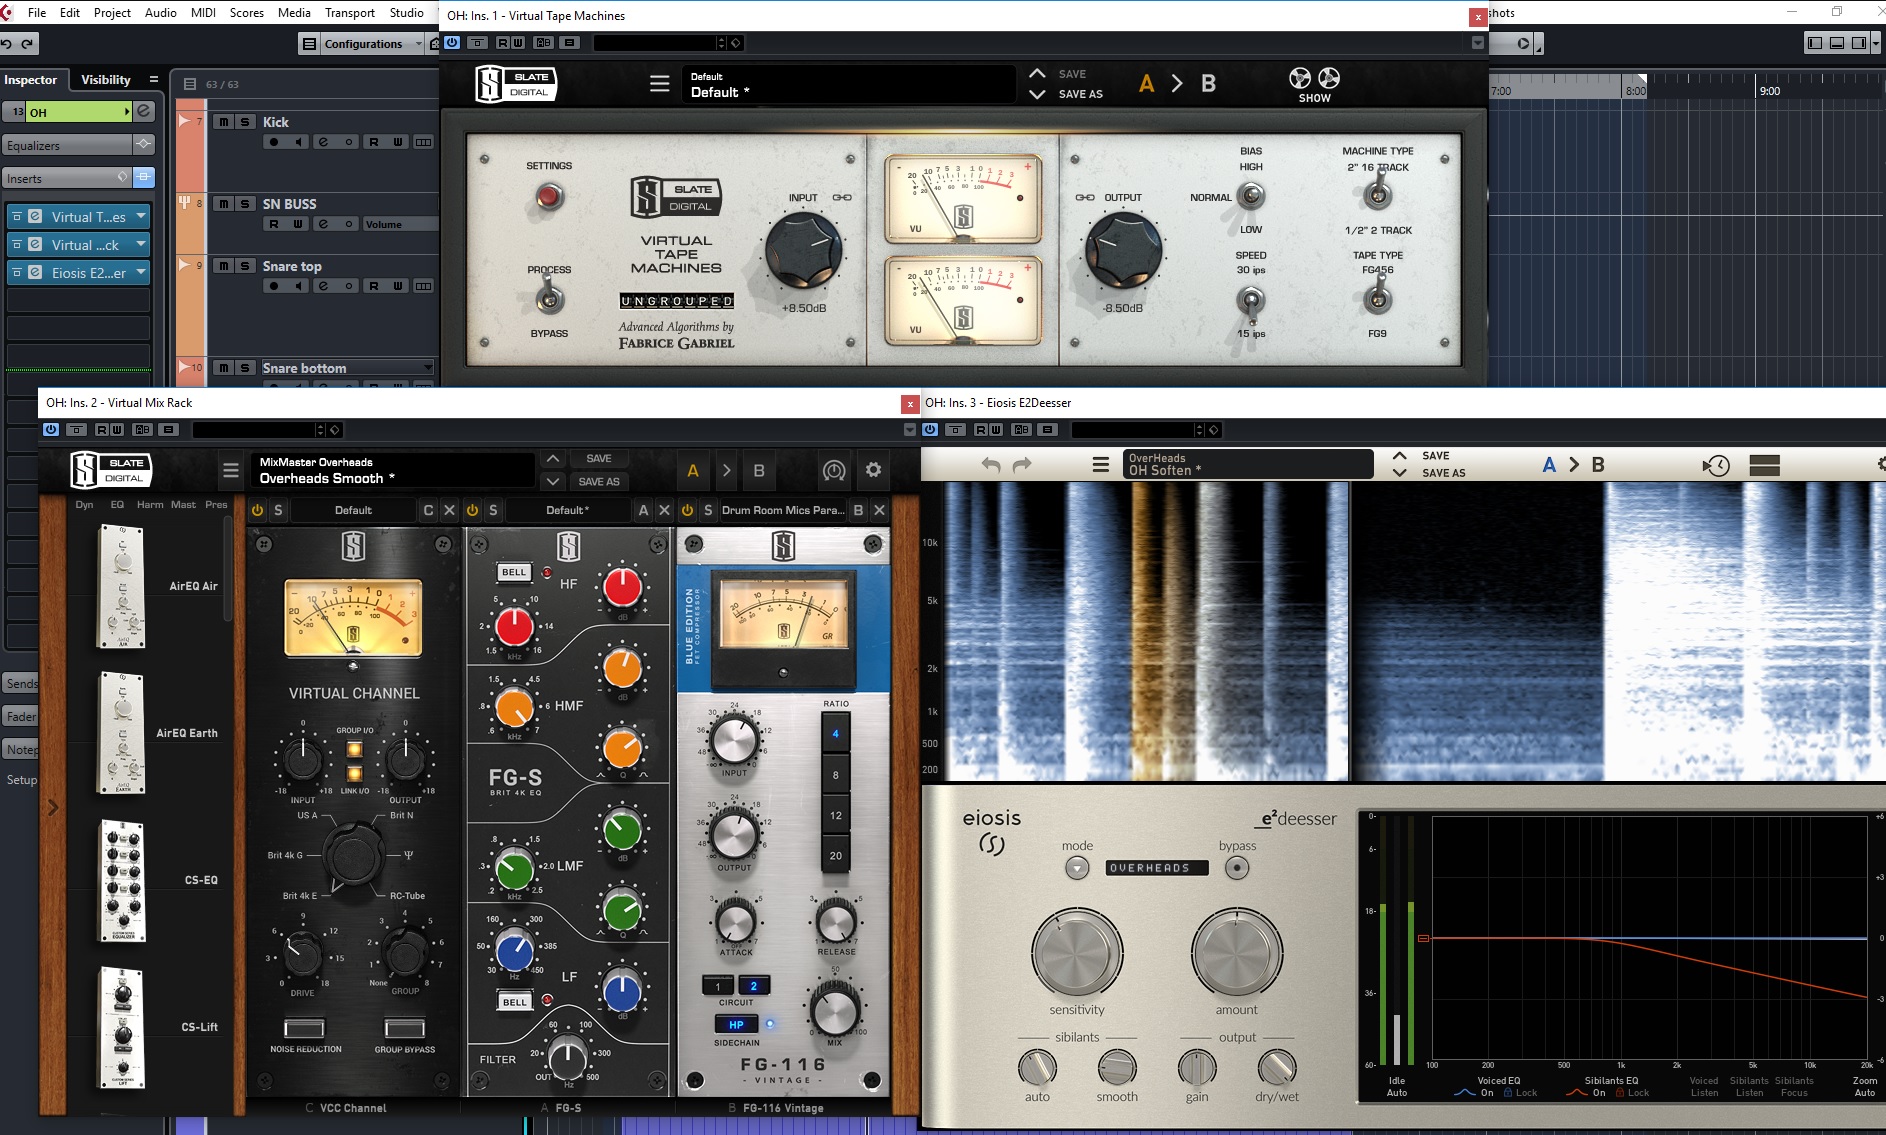
Overheads Inserts
Overheads were a bit different than most projects I get, in that they used a left, center, and right microphone for the overheads. I panned accordingly and routed them all to an Overheads buss, and put my insert processing on the buss. Nothing too drastic here. A bit of channel emulation, followed by some EQ, then come parallel compression blended in subtly. After that I put a de-esser on the buss to reduce the harshness/brightness of the cymbals a bit more when he hit them hard. This Eiosis de-esser has a nice drum overheads mode that works fairly well once you get it tuned for the particular track.
Front of Kit

Front of Kit inserts
Although they didn’t have room mics, they had a front of kit microphone track that I worked with to give a bit of “room” type sound to the kit. Along with the console and blended in tube emulation, I ended up using two different EQs on this track, one of them before the compressor, and the other after the compressor. This one had a good amount of compression on it, but is was blended in parallel, as was the tube distortion.
DRUM BUSS
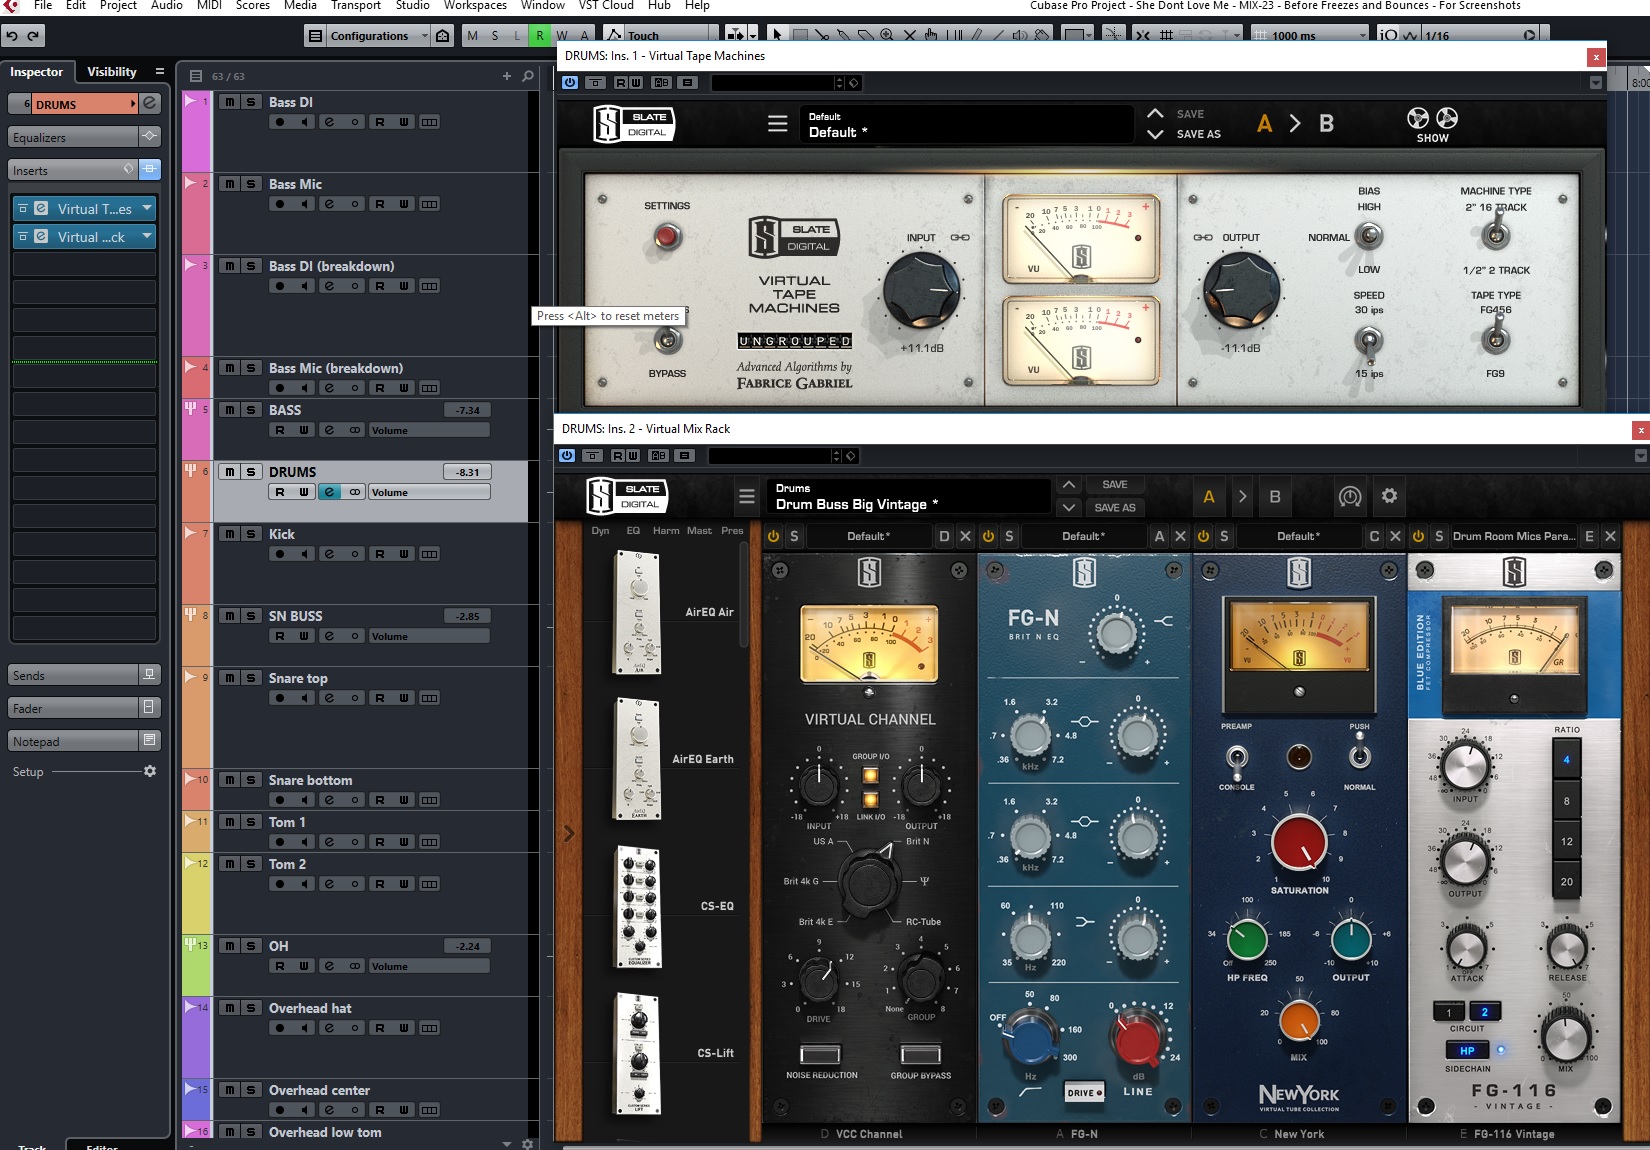
Drums Buss Inserts
Finally all those above drum tracks and busses were routed through the main Drums Buss, which has a bit more of pretty much everything on it. Again, some console emulation, followed by some Neve styled EQ, then some overall tube saturation, and then a bit more parallel compression.
B3
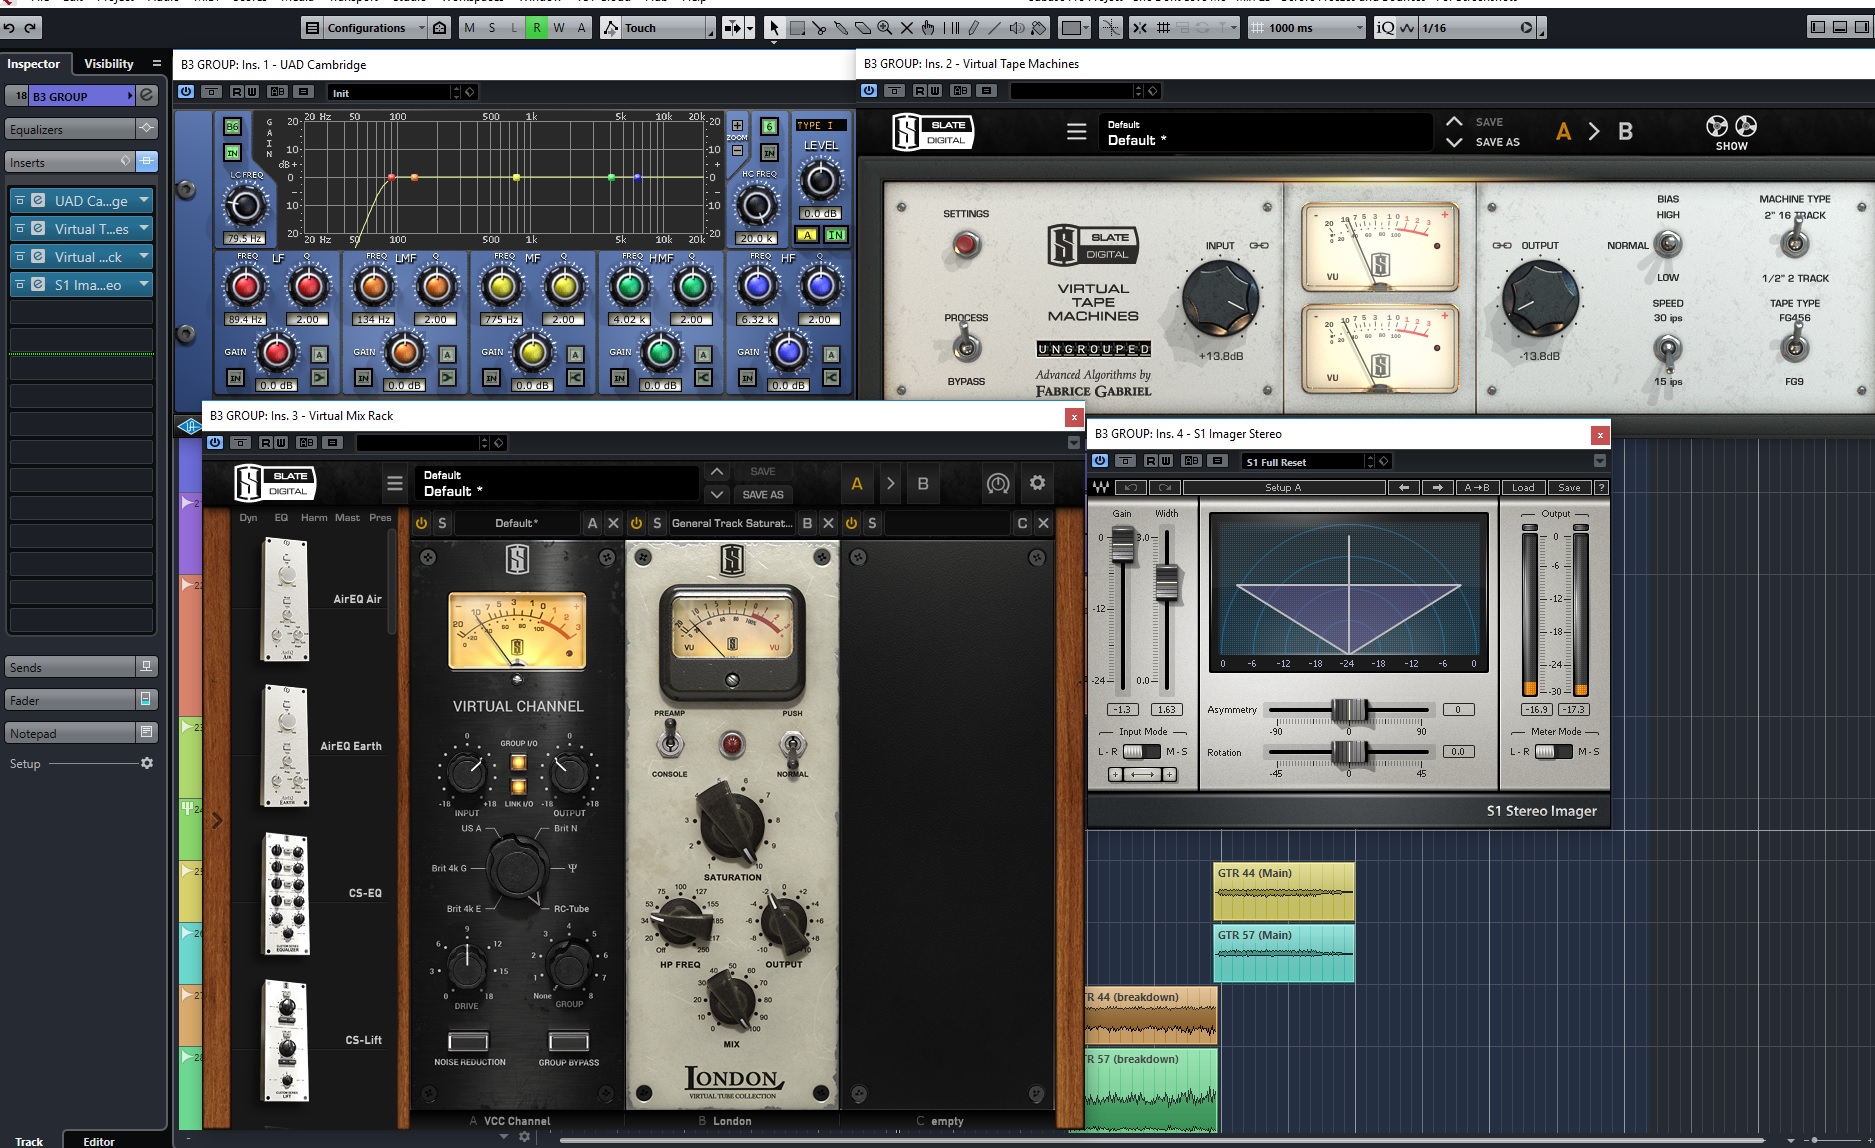
B3 Group inserts
I was given 3 tracks for a B3 organ, with the traditional bottom mic and upper L/R microphones on the leslie cabinet. In addition there was also a short Farfisa organ part on a separate track. All those tracks were balance and routed to a B3 group track, which is where I did very light processing. I used the UAD Cambridge EQ to roll off some deep sub rumble that I didn’t want. Then a bit of tape emulation, followed by tube console emulation (RCA console), and then some mild tube distortion (London). At the end I put a touch of the S1 imager to widen out the spread of the Leslie cabinet stereo image a bit more.
Main Guitar
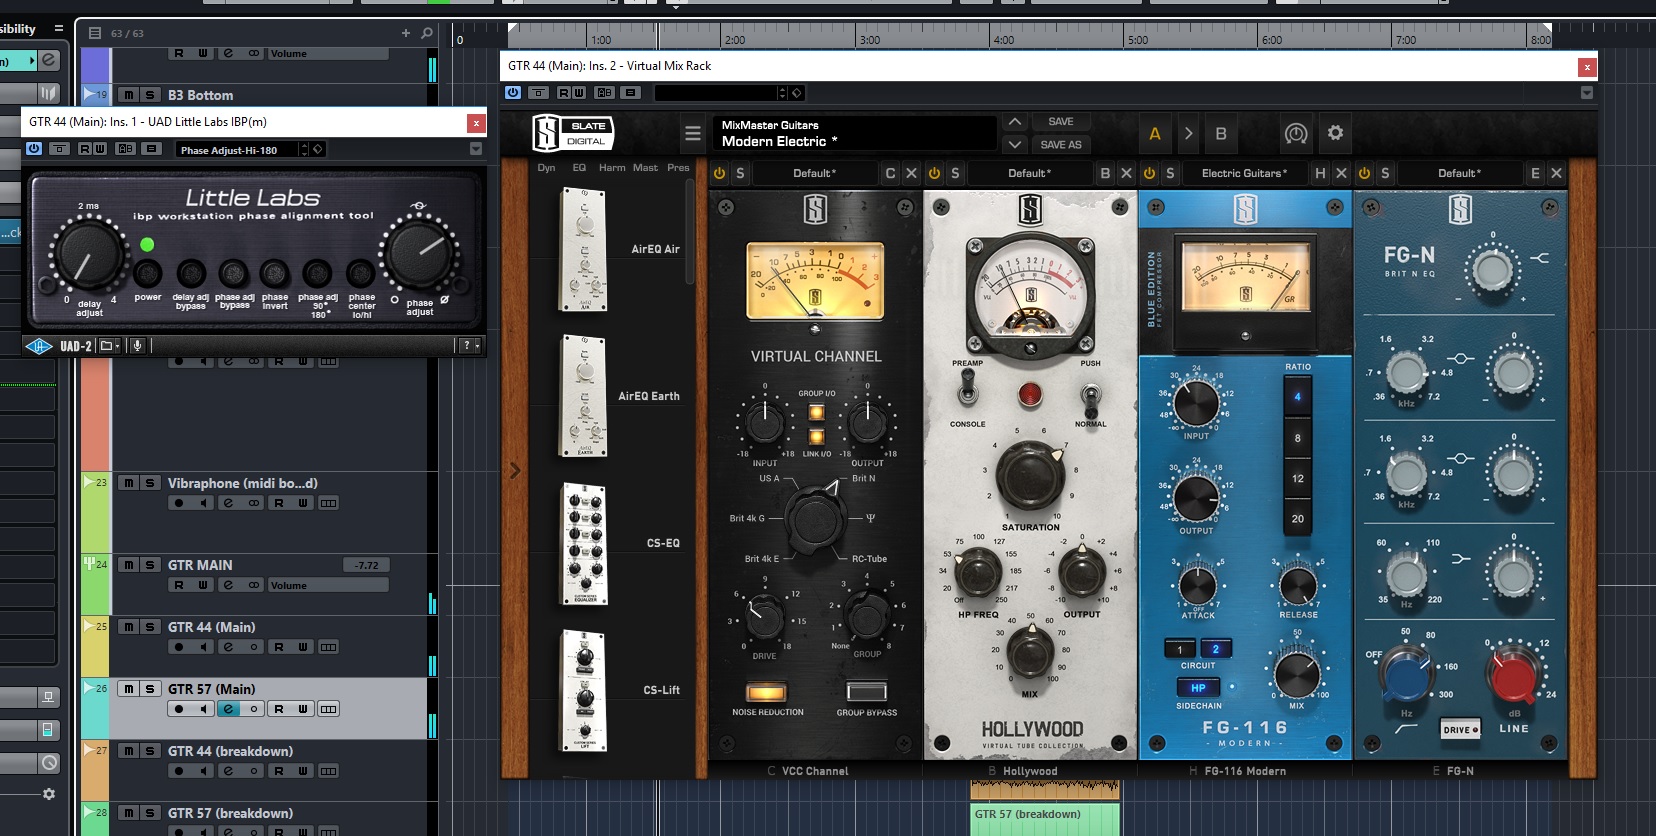
Main Gtr inserts
There were two different microphones used on the main guitar amp, and I used both of those tracks, with the same Virtual Mix Rack on both (then froze the tracks to free up processing power). On one of the two tracks I used the IBP plugin to get them better in phase. Overall processing was fairly subtle, as it didn’t need much. My pretty standard setup of console emulation, tube emulation, just a touch of EQ to bring out some high end, and a small amount of parallel compression.
Guitar Stabs

GTR Stabs Inserts
There were 4 tracks of guitar “stabs”, which I routed to a group channel and did a very minimal amount of processing, as they were simple parts that didn’t need much. For these, I used the UAD tape emulation (was running out of CPU from all the Slate plugins on other tracks). Then, I used the UAD Cooper Time Cube plugin to give a subtle chorus/ambient space to those guitars.
Horns
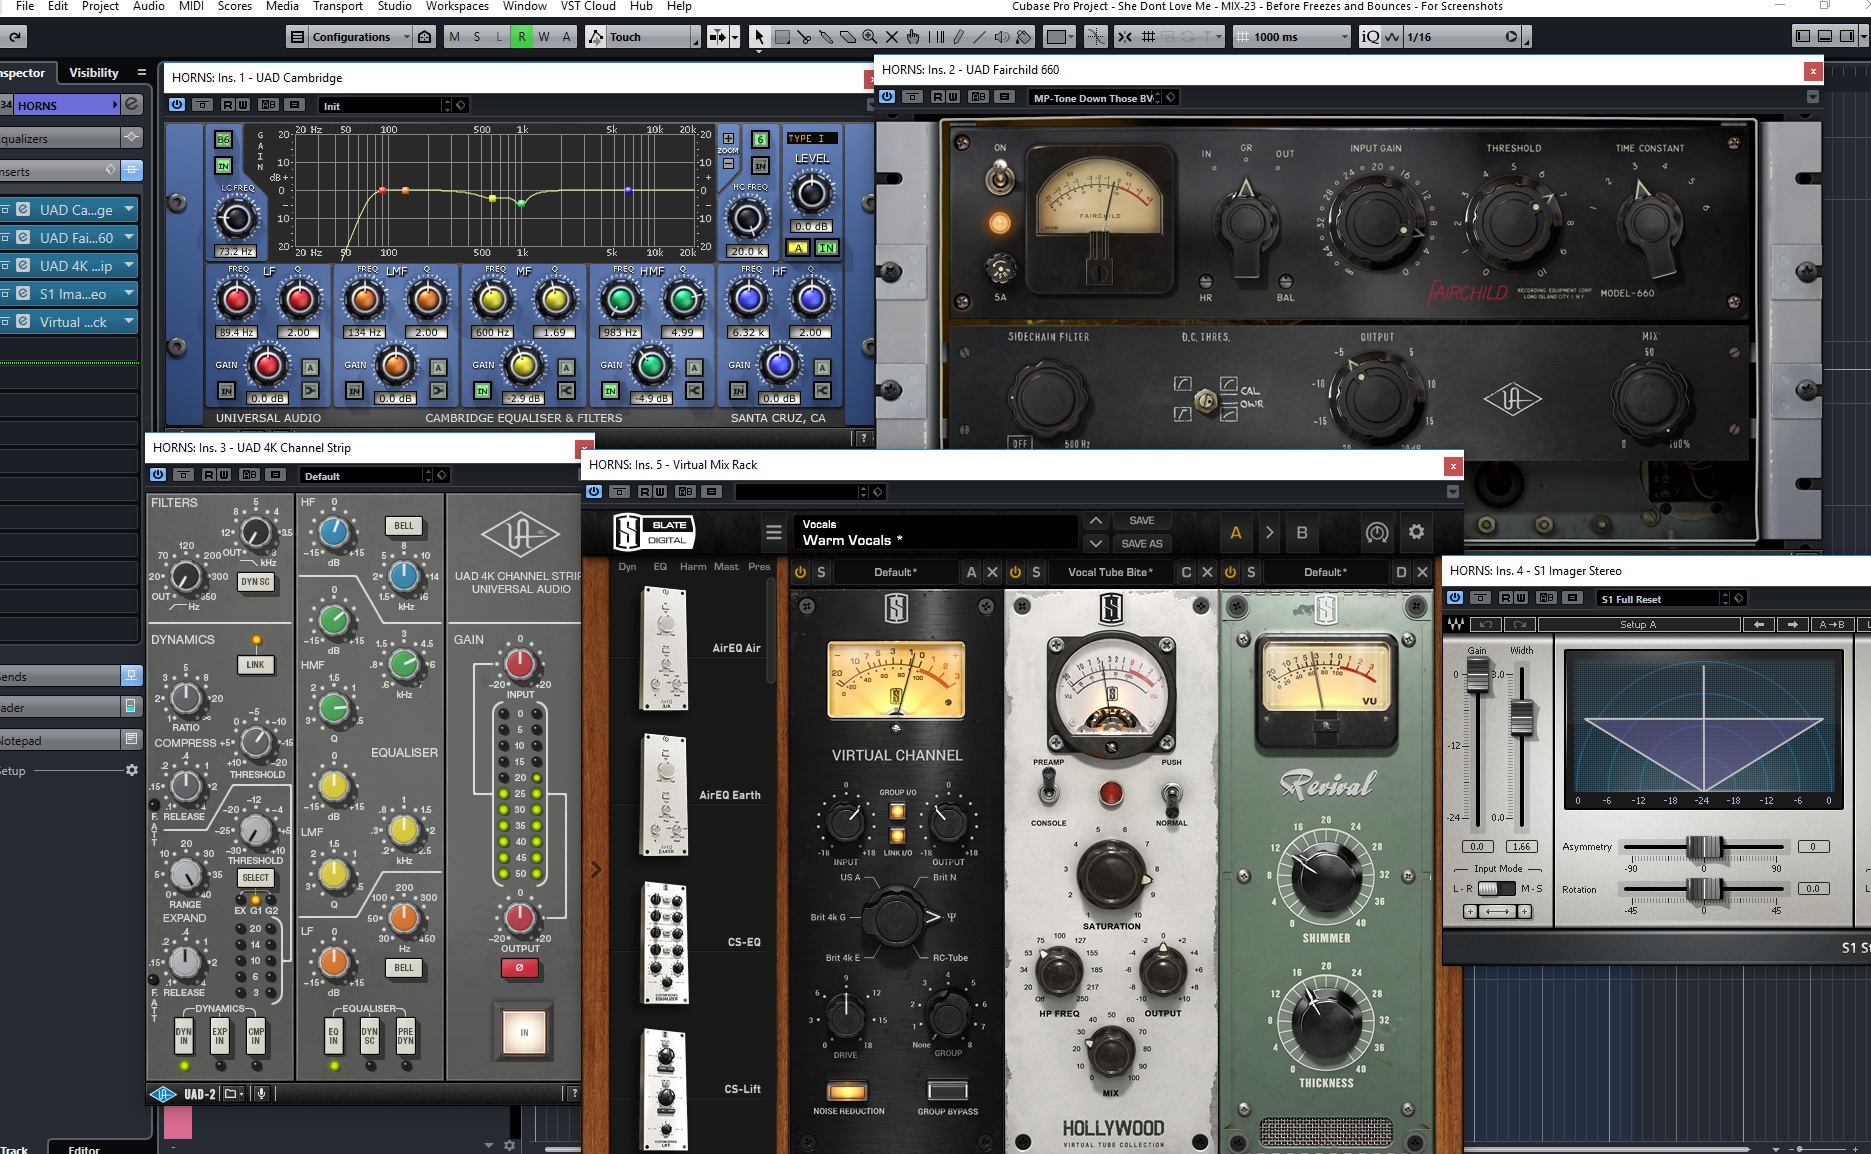
Horns – Inserts
Horns were a bit of a challenge as far as how they were recorded. Some sections of the song had more layers than others, but I tried to keep the sound consistent and did most of the processing through a group channel. I ended up using essentially 3 different types of EQs on the group. The UAD Cambridge first to remove room rumble and take just a touch of the nasal mids out. Then after going through a Fairchild compressor emulation, I used a bit of SSL style EQ to add some bit around 5K as well as some high end air. Then, after the typical console and tube emulations, I used the Slate Revival to add a bit of overall “thickness” and “shimmer”. Finally, followed up with a bit of S1 imager to widen the stereo image a bit.
Background Vocals
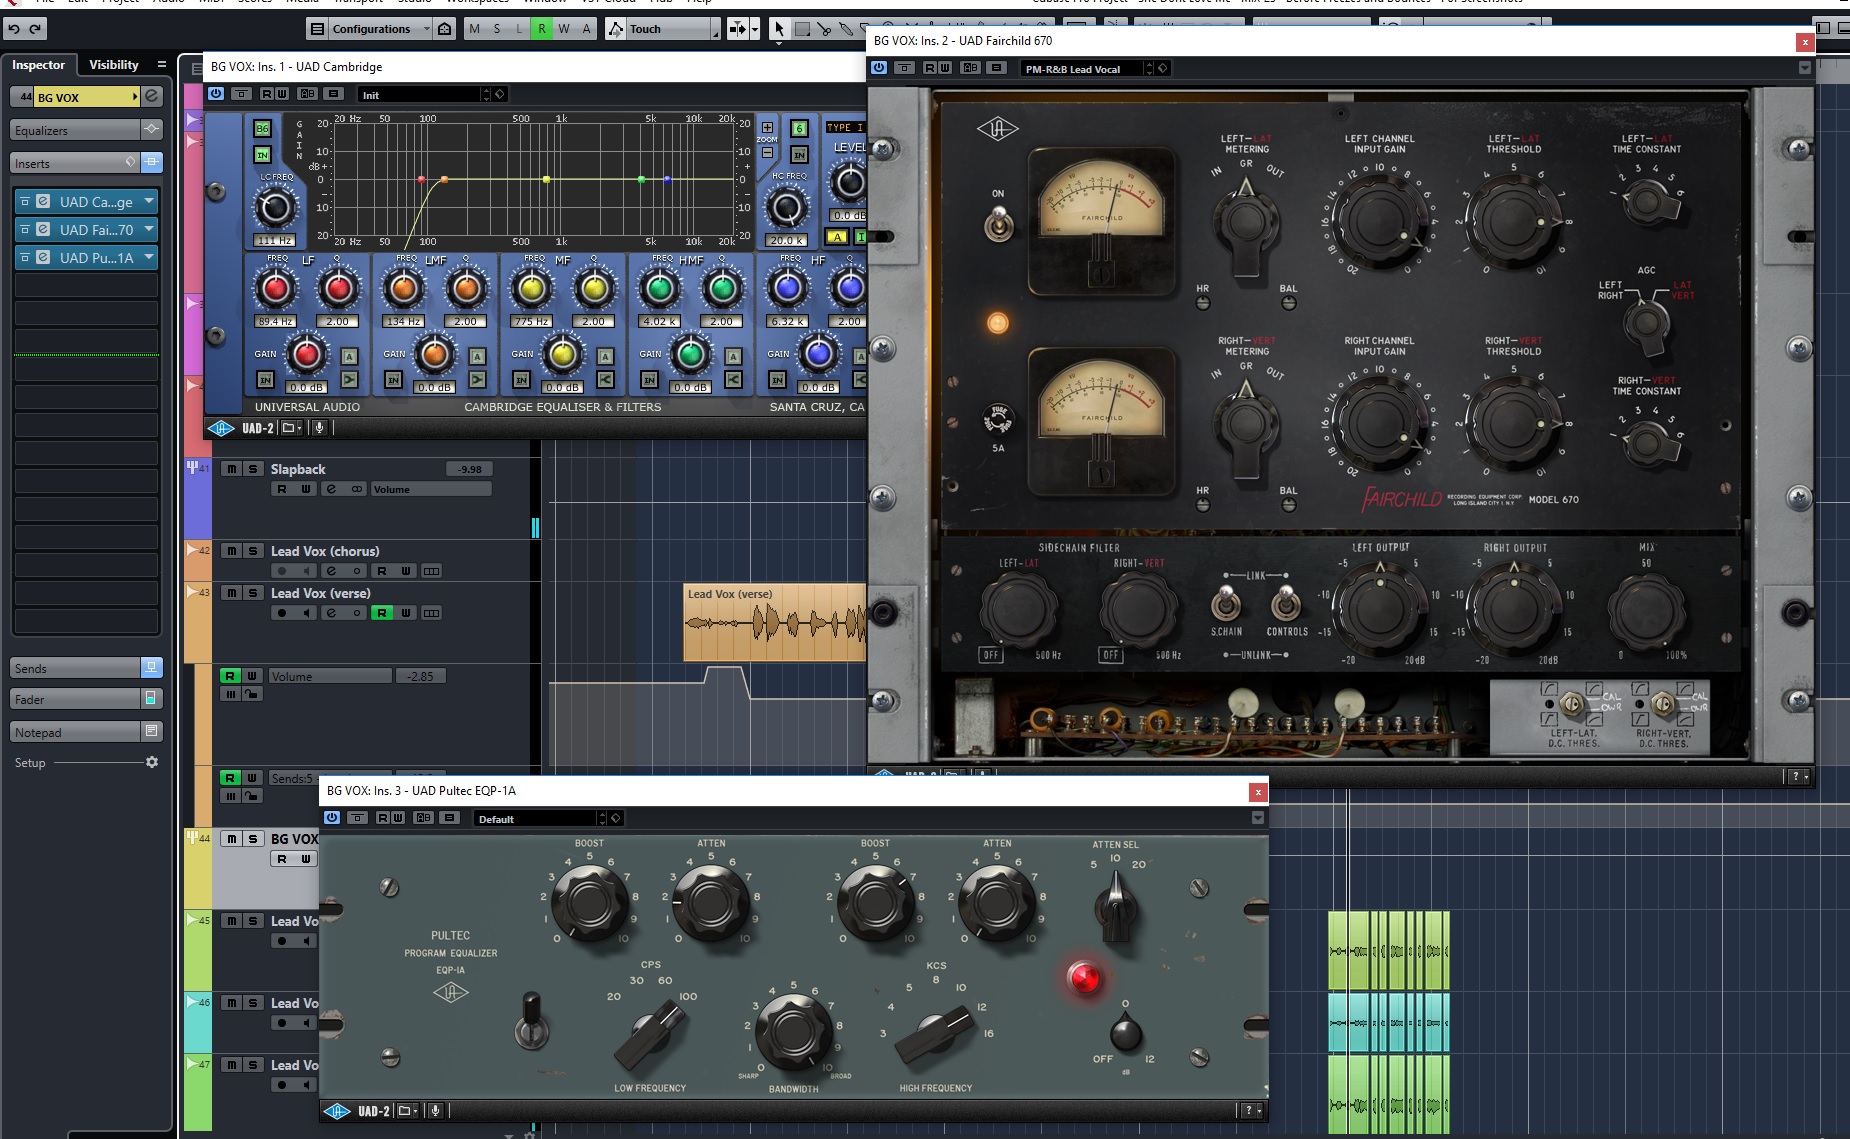
BG Vox Inserts
Background vocals were pretty simple and didn’t require very much processing. For them I just used the Cambridge to high pass filter out all the low end rumble, then a bit of compression with the UAD Fairchild emulation, followed by a bit of Pultec EQ for some extra air.
Lead Vocals

Lead Vox Inserts
Lead vocal originally was a bit cleaner, but then they asked me to add a bit more edge/distortion to it. So, it’s close to the same chain that ended up on the background vocals, but with the addition of some tape, console and tube emulation, plus the Revival plugin adding both thickness and shimmer. It also got different compression using a UAD 1176 model. All of that followed again by the Pultec emulation adding some high air.
FX Channels
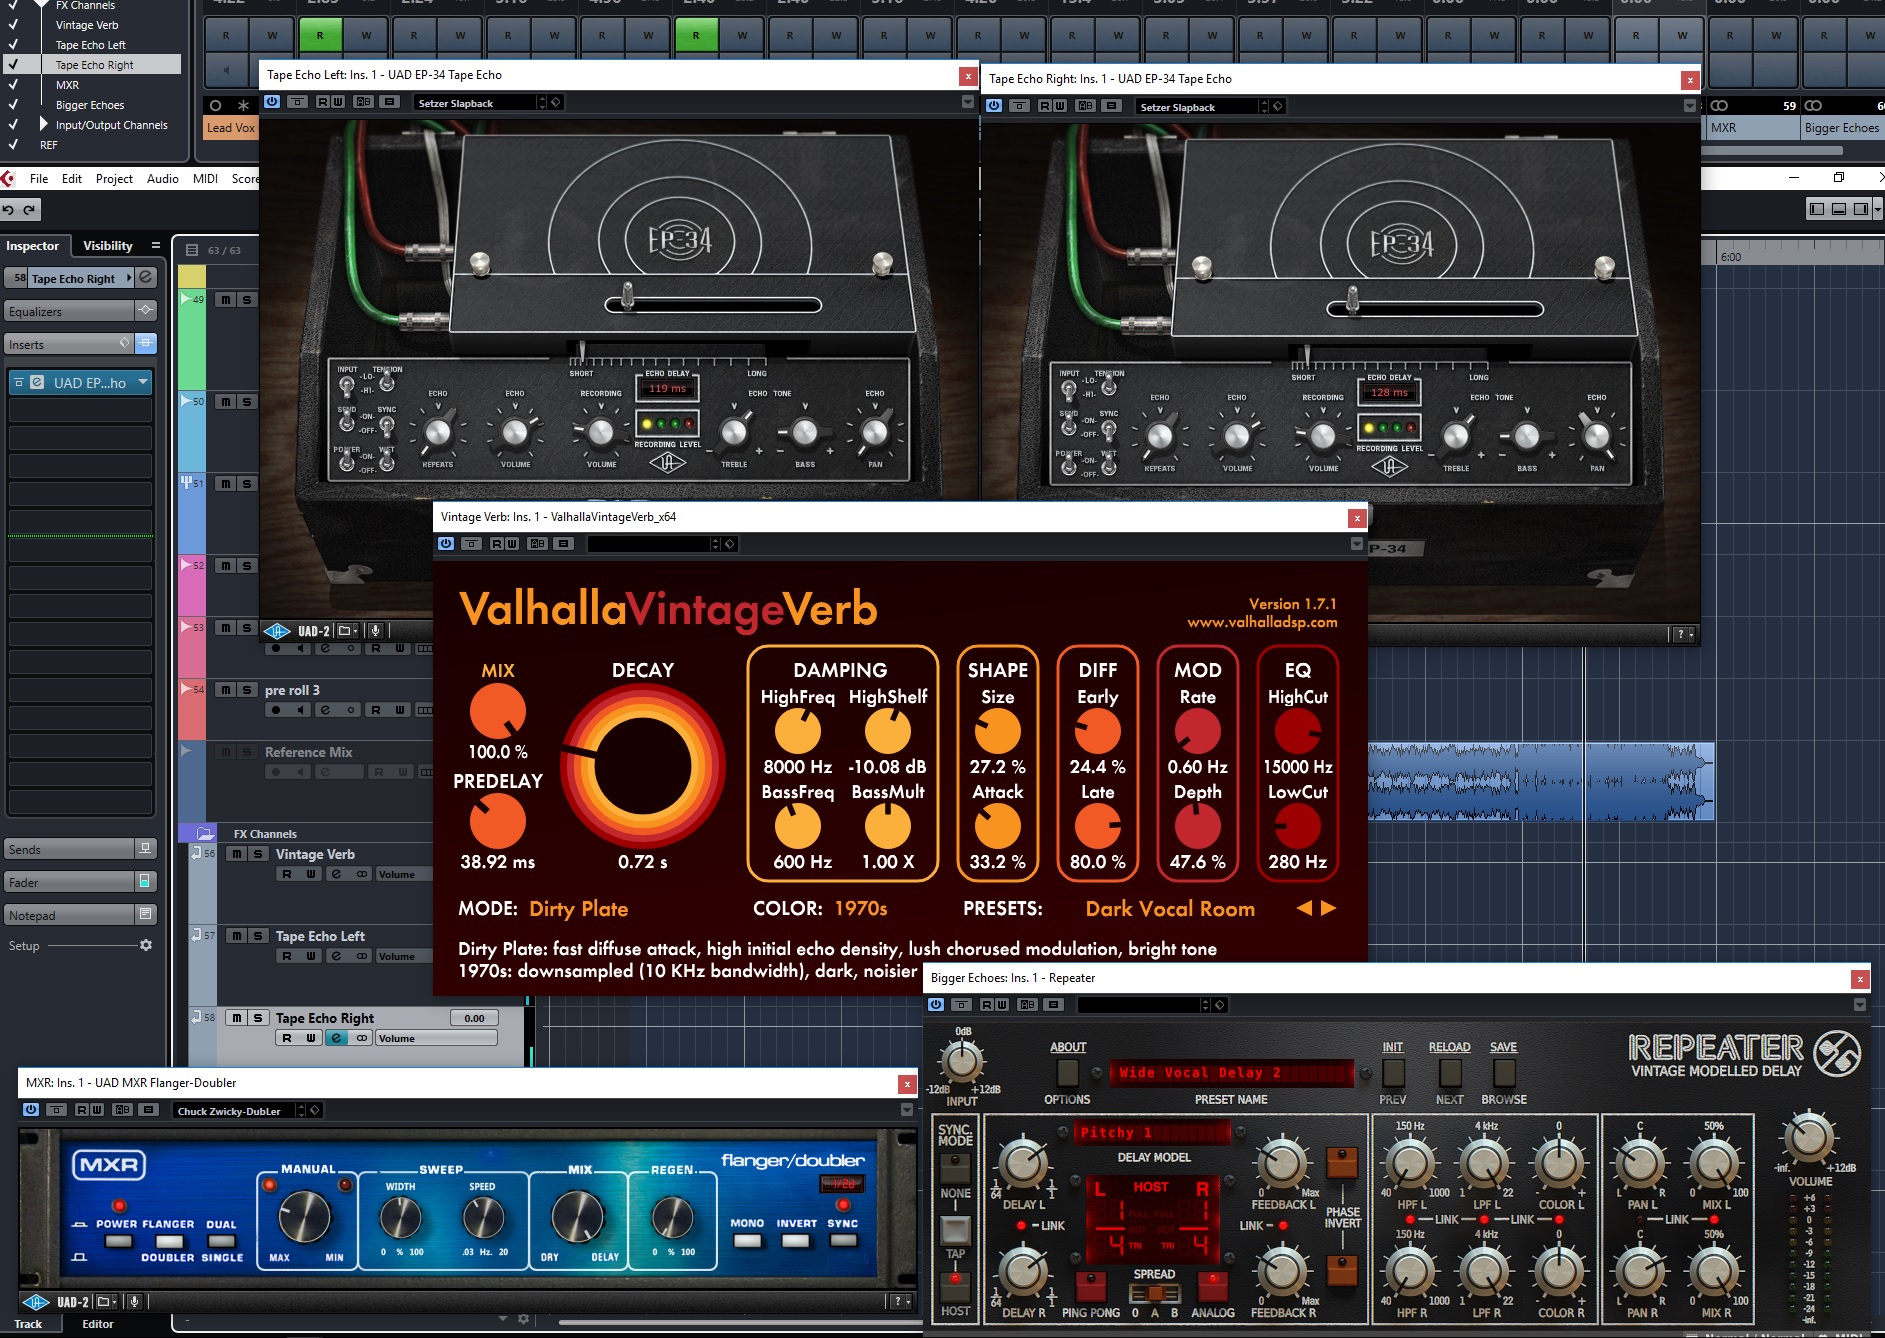
I actually didn’t use too much in the way of FX for this song. There was the Cooper Time Cube that was put on the Guitar Stabs group, but everything else pretty much shared the 4 effects in this screen shot. Although 5 plugins were used, I actually used the two EP-34 tape echo plugins to create one stereo tape echo effect (one panned left, one panned right, and slightly different delay times). Those were basically my short tape slap echo effect, and they were routed to one stereo group channel so I could automate the level of them as a stereo pair. The Valhalla Vintage Verb was shared by several tracks/instruments, as well as the vocals. The Repeater was used for slightly longer echo/delay effects, mostly automated on the vocals to bring in/out as desired. The MXR plugin was also used as a light doubler type effect on the vocals and horns.
Rendered Groups and Automation
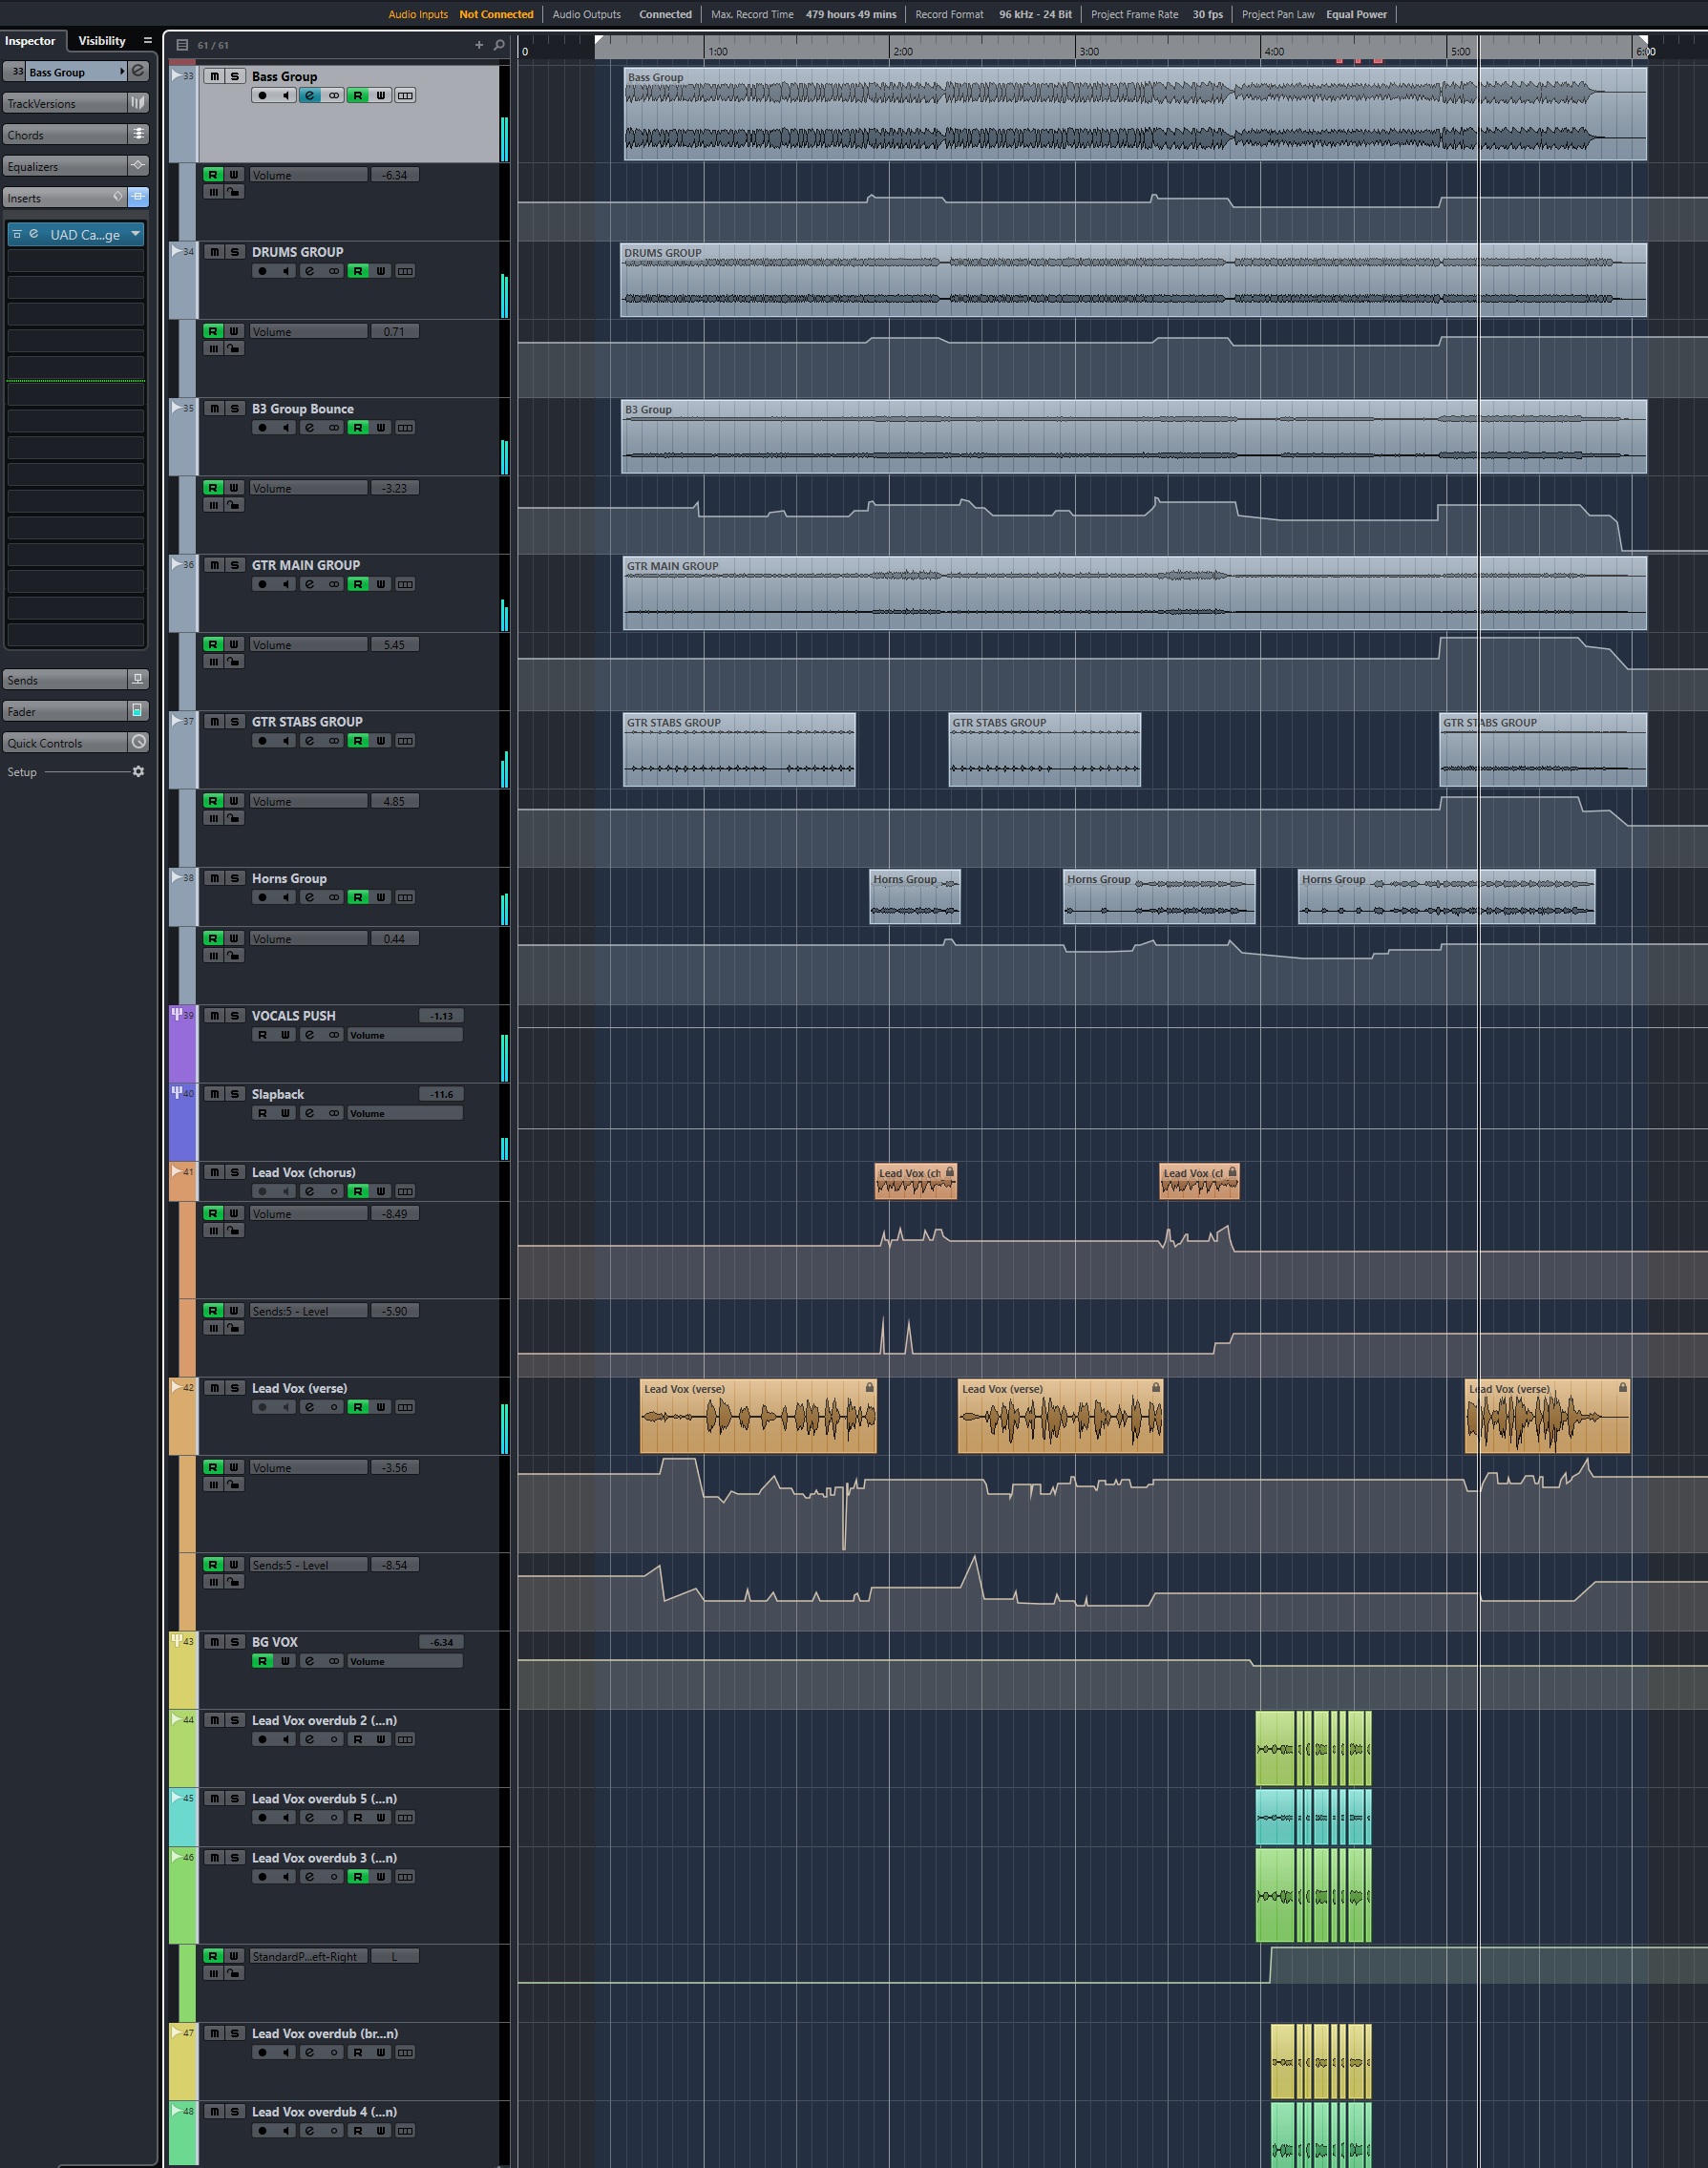
Rendered Groups and Automation
If you made it this far, following along, you can probably see how a 7 year old DAW system quickly ran out of processing power! This last screen shot, spread across two screens, shows all the rendered group channels, and the vocal tracks, with all the automation expanded so you can see the amount of automation I used. Not as much as some songs, but still a good amount. Once I was confident in my sound for each group, I rendered that group to a new track so I could then disable the group and all the plugins, thus freeing up processing power as I went along. Once everything was dialed in and rendered, then I was able to go through the song and write the automation for everything.
If you think you have a really great song that I would enjoy mixing, please use the Free Mix Submission form on my mixing web site.